Configure approvals
Approvals are available for Projects, Products and Subjects. Responsible stakeholders can sign off their area of responsibility. This article explains how to configure approval types, user roles or team roles, and the dialogs for Approvals.
Target groups
- Solution developers
Context
Approvals can be configured for projects, marketing plans, tactics, campaigns, products and subjects.
Prerequisites
Approvals are only available with the censhare Dedicated solutions.
Introduction
The censhare Standard workspace provides a preconfigured Approval feature. You can use Approvals in project assets of the type Project, Campaign, Tactic, Marketing plan, in Subject type assets. Approval allow the responsible stakeholders to sign off their area of responsibility independently. The Approvals tab of the respective assets shows the current status, history, and the dialog elements of approvals.
To use Approvals in your system, you must assign an approval type for projects, products, or subjects. You can assign multiple approval types to one asset type. Approvals can be restricted to asset types, user roles, and team roles. If needed, you can add custom approval types.
By default, Approvals are not restrict the approval actions. If required, you can customize the approval dialogs in the workspace configuration of the respective user roles.
Data model
Approvals are stored and controlled with a structure of hierarchical Features and the respective Feature items:
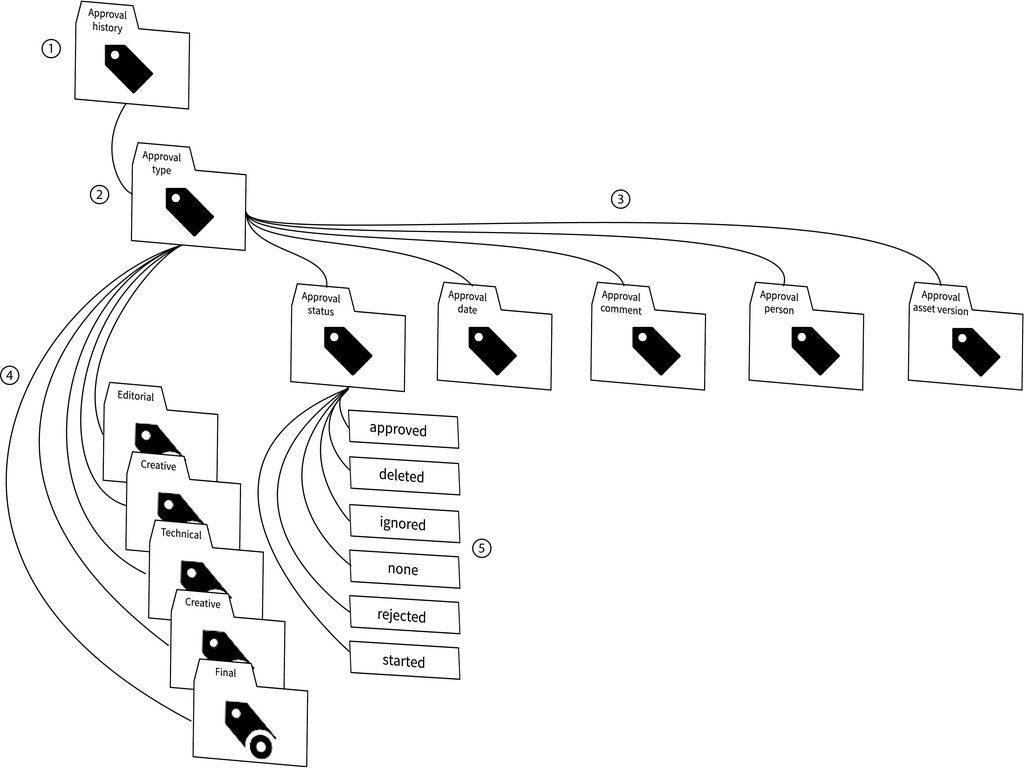
(1) The Approval history feature can store multiple Approval type child feature values. Each value represents an approval action.
(2) The Approval type feature stores the type of approval value and the respective child feature values. Multiple values are allowed.
(3) The Approval status child feature is set by any approval action that a user performs. The Approval date, Approval person and Approval asset version child feature values are set automatically. The Approval comment child feature is optional for each approval action.
(4) The Approval type feature items represent the areas of responsibility and can be enabled individually for each asset type. Custom types can be added.
(5) The Approval status values are stored in a value list in the Approval status feature.
In the Standard workspace, the Approvals tab (resource key: censhare:workspace.container.approvals) is configured for Project, Campaign, Tactic, Marketing plan, Product and Subject asset pages. The tab contains the Approvals actions widget and the Approvals history widget configurations.
Approval history
The Approval history feature stores the values of the approval type child features. Each approval type and each approval action create a new Approval history value.
The child features store the following details that display in the Approvals history table:
Approval date: Timestamp of an approval action. Values are generated automatically.
Approval status: User selected value from the approval status value list.
Approval type: The available approval type must be configured for each asset type. See Configure Approval types section below.
Approval person: The user that performs an approval action. Values are generated automatically.
Approval asset version: Each approval action creates a new asset version. Values are generated automatically.
Approval comment: Stores user-generated comments to each action.
Key steps
Approval types
The Approval type feature is configured as dynamic value list. Initially, the dynamic value list is empty, and no approval type is configured.
Approval types are stored as Feature item assets that are assign to the Approval type feature. Available approval types must be configured in the Approval type feature. The following approval types are available in the censhare Standard workspace:
Feature item | Resource key |
|---|---|
Approval type: Creative | censhare:approval-type.creative |
Approval type: Editorial | censhare:approval-type.editorial |
Approval type: Technical | censhare:approval-type.technical |
Approval type: Legal | censhare:approval-type.legal |
Approval type: Budget | censhare:approval-type.budget |
Approval type: Final | censhare:approval-type.final |
The desired Feature items must be assigned to the Approval type feature. In the Feature item, you can define a user role and a team role filter for the respective approval type.
To add an approval type, proceed as follows:
In censhare Web, search for the Approval type feature (resource key: censhare:feature.approval.type) and open it in an asset page.
In the Child feature items widget, click
 .
.In the Add top-level asset dialog, filter the results for Approval type*.
Select the desired Approval type: ... feature items.
To save your changes and close the dialog, click OK.
The selected Approval types display in the Child feature items widget.
Approval type settings
For each approval type, you can define user roles, team roles, and asset type filters. Proceed as follows:
To open the desired Approval type: ... feature item, double-click it in the Child feature items widget of the Approval type feature.
In the Feature item properties widget, click
 .
.In the Configuration area, select the desired roles and filters:
Role: Select a user role. The approval is only shown to users that work with the respective role in their domain. You can select multiple items.
Team role: Select a team role that a user must have to perform this approval. You can select only one item.
Note: If a team role is assigned to a user, the user role is overruled. Team roles are not applicable to Products.
Asset type filter: Enter the ID of the asset type for which this Approval is applicable ( for example: project.). For multiple asset types, click below the input field
to add a new field. Enter only one asset ID per field!Note: By default, approvals are configured for the asset types marketing-plan., project., project., campaign., project.tactic., product. and subject. - if you enter other asset type filters, the Approval becomes unavailable.
To close the dialog, click OK.
Repeat the previous steps for each Approval type.
Approval dialogs
By default, any user can start, ignore, or delete all approvals that are configured for an asset type. We recommend to disable the Edit dialog for user roles that are not allowed to sign off approvals.
In the Approvals actions widget, users can change the Approval status of and asset. The status of an Approval are configured in a value list of the Approval status feature (ID: censhare:approval.status). The following values are configured:
Action | Description |
|---|---|
Start | Indicates that an approval is in progress. |
Approve | Indicates that the approval was signed off. |
Reject | Indicates that the approval was rejected. |
Ignore | Indicates that the approval is not relevant. |
Delete | Deletes the current approval status and resets the approval. The approval can be started again. |
None | Initial value when the approval was not started yet. |
Users with the respective user roles, or users that are assigned in the respective team role, can start, approve, or reject their approvals directly in the Approvals actions widget. In the Edit dialog of the Approvals actions widget, users can start, delete, and ignore Approvals. You can customize the widget dialog of the Approvals actions widget for different workspaces/user roles.
Users can comment each Approval action in a context dialog. If you do not require this option, you can disable the comments dialog for the respective steps.
The dialog customization is done in the workspace configuration of the censhare Dedicated solutions. For each custom configuration, add a resource replace variant of the respective Module asset. The following graphic shows the asset structure in the workspace configuration:
(1) Approvals are configured in an asset workspace page.
(2) The Approval tab is configured in a generic workspace container.
(3) The Approvals actions are configured in a Properties widget.
(4) The Dialog asset stores the HTML configuration of the Approvals actions widget.
(5) The Script asset renders the approval data and user interface controls of the Approvals actions widget.
(6) The Approval history is configured in a Report widget.
(7) The Transformation widget stores the XSLT of the report widget.
To add a custom configuration, proceed as follows:
In censhare Web, search for the Approvals Display Dialog Controller Script asset (resource key: censhare:metadata.approval.display.dialog.controller).
Click
 to open the Page actions menu, and select Variants ►Resource replace variant. The asset variant is displayed in the Resource replace variants widget.
Move the cursor over the entry, click
, and select  Edit relation properties.
In the dialog, select a Resource replace role. To add more roles, click
. If the logged-in user has the respective role, the Resource replace variant is used instead of the default script.To save your changes and close the dialog, click OK.
Open the Resource replace variant in an asset page.
Go to the Editor tab.
Edit the script according to your requirements. For details, see the User interface controls section below.
Click SAVE.
To add another configuration, repeat the previous steps.
User interface controls
In the Approvals Display Dialog controller script, search the following snippet and edit it as described in the table below:
$scope.approvalStatusConfig = {
	none: 	   {value:'none',
		   		display_value:'None',
		   		buttonLabel:'',
		   		enabled:true,
		   		addComment:true,
		  		createTask:false},
	start: 	   {value:'started',
				display_value:'Started',
				buttonLabel:'Start approval',
				enabled:true,
				addComment:true,
				createTask:false},
	approve:   {value:'approved',
				display_value:'Approved',
				buttonLabel:'Approve',
				enabled:true,
				addComment:true,
				createTask:false},
	reject:	   {value:'rejected',
				display_value:'Rejected',
				buttonLabel:'Reject',
				enabled:true,
				addComment:true,
				createTask:false},
	delete:    {value:'deleted',
				display_value:'Deleted',
				buttonLabel:'Delete',
				enabled:false,
				addComment:true,
				createTask:false},
	ignore:    {value:'ignored',
				display_value:'Ignored',
				buttonLabel:'Ignore',
				enabled:false,
				addComment:true,
				createTask:false}
};Attribute | Description |
|---|---|
value | The internal value of the approval status. Do not change! |
display_value | The displayed text value of the approval status. Edit, if necessary. |
buttonLabel | The button text of the approval status. Edit, if necessary. |
enabled | To disable an approval status, set to false. |
addComment | To disable comments for an approval status, set to false. |
createTask | Not implemented in the current version. Do not change! |
Notes:
(1) Disabling the approval status none has no effect. If you disable the start status, the approval is started automatically, and the Approve/Reject buttons display at start. If you disable the delete status, approvals cannot be reset.
(2) If you change the configuration, always test if the Approvals controls work as expected.
Result
The appropriate approvals are available to the users in their workspace. Users can perform the appropriate actions in the Approvals actions widget.