Configure the Asset picker
The Asset picker provides a simpler way of selecting of assets instead of using the Asset Chooser.
Context
The configuration of the Asset picker for a "Related assets" widget or a property widget is done within censhare Web.
You need access to the Admin Client to get some configuration parameters for configuring a property widget.
By default, the "Asset picker" is disabled. You have to activate it for each "Related assets" widget first. If you want to configure the Asset picker in a Property widget for a certain property you have to add the respective code snippet to the dialog definition for editing the properties. Besides that, you can adapt the presentation of the entries in the drop-down list of the Asset picker.
Prerequisites
At least some knowledge about relations and asset references and how they are configured in censhare.
To adapt the presentation of the list entries of the drop-down list you need knowledge about:
the configuration of tables within a widget
adapting the view snippet for presentation of information within one list entry of the drop-down list of the Asset picker
To make your configuration system-wide available:
adapting the standard workspace configuration
Introduction
The Asset picker provides an easier way of selecting of assets instead of using the "Asset chooser". You can use the Asset picker within a "Related assets" widget. You can choose the Asset picker for selecting assets for a property within a property widget.
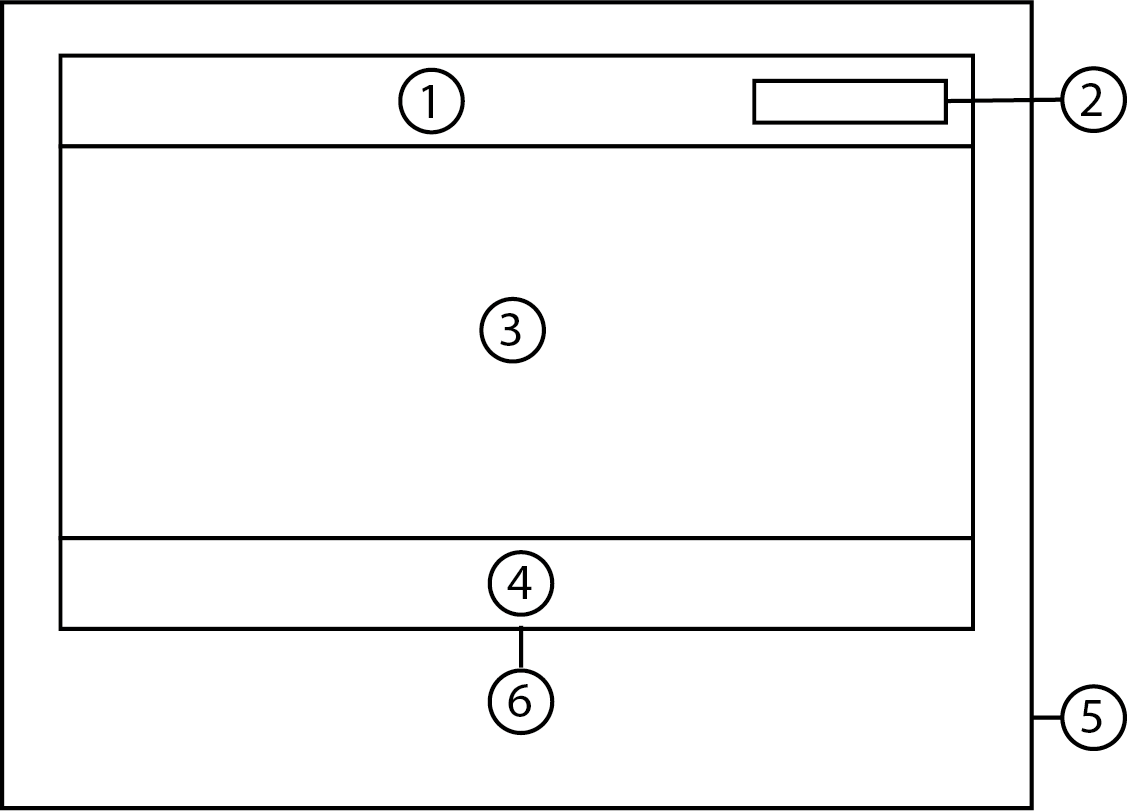
The Asset picker (6) with the entry field (1), the "Create" button (2), the drop-down list with selectable assets (3) and the "Asset chooser" button (4). The Asset picker is shown within the respective editing dialog of a property widget (5) or asset list of the "Related assets" widget (5).
To use the Asset picker within the "Related assets" widget, activate it in the widget configuration. Besides that, you can choose if the user is allowed to create a new asset. In this case, you have to define which asset type shall be created. Of course, the user needs the right to do that. In addition, the number of assets that a user can add can be restricted using the concrete widget.
In a property widget, you can add controls within the edit dialog of the widget that use the Asset picker. You have to add a control for each asset link type separately. This is done by adding the code snippet for the control in the definition of the editing dialog of the desired widget.
The Asset picker shows all entries a user can select in a drop-down list. You can adapt the presentation of the entries of this list. Internally, censhare uses a table to show the entries of the list. The configuration for this table is stored in the module-table asset "Table: Asset picker" asset (asset type: "Module/Table").
For each column that is shown in a table there is a module-table-column asset (asset type: "Module/Table/Table column") that contains the layout for this column. This asset contains a template for the layout of this column. In our case there is only one column definition that is linked with the module-table asset. In order to change the presentation of the entries of the drop-down list you have to change this column.
Note: If you want to make the change in the workspace persistent or available for a certain role in censhare you have to adapt the standard workspace structure. In general, this means that you create a resource replace variant of the of the respective module asset like the widget in question. Then, for instance, add your configuration respective the code to dialog definition and assign it to the desired user roles.
Configure the Asset picker for "Related assets" widget
Go to widget action menu on top right of the widget.
Select the "Configure widget" entry. The configuration dialog opens.
Activating the Asset picker
Go to the "Asset picker options" section.
Click the "Use Asset picker" box.
Limit the number of relations that can be added
Go to the "Relation or reference" section.
Click the "Limit relations" box.
Enter the value for the limit in the field behind it.
Note: This limit is only valid for the current widget. If there is another widget with the same configuration but without a limit, the user can add more links. If he uses a widget with a link limit after that he will receive a warning. He cannot add further links here until he removes links accordingly.
Configure "Create asset" function
Click the "Allow to create new asset" box.
Select the desired asset type within the "New asset type" drop-down list.
Note: If you do not select an asset type, the "Create" button will not be shown.
Add a relation in the property widget with the Asset picker
In order to see the Asset picker and to select a certain asset within the edit dialog, you must prepare the code so that the control is shown. Add it to the dialog definition of the property widget.
Preparing the code for property control
The template for adding a control looks like this:
<cs-asset-relation asset-id="XXX"
    flavor="XXX"
    direction="XXX"
    asset-type="XXX"
	multivaluerelation-type="XXX">
</cs-asset-relation>
Control
<cs-asset-relation PARAMETERS>

</cs-asset-relation>This Control is used to display the Asset picker in "MetadataDialogs" controls.
ID of the asset
Parameter: "asset-id"
Value: ID of the asset to relate to
Example: asset-id="asset.traits.ids.id"
The ID of the asset is used to start to search for related assets. Normally, this will be the current asset. To access its ID, use the expression "asset.traits.ids.id". The control itself allows any asset to be referred here.
Design of the drop-down list
Parameter: "flavor"
Value: the desired flavor
Example: flavor="csAssetListItemRendererWidget2xn"
This parameter determines how the rows of the drop-down list of the Asset picker are rendered. Choose your desired flavor.
Direction of the relation
Parameter: "direction"
Value: "child" or "parent" (relation)
       "feature" or "feature-reverse" (reference)
Example: direction="child"
This parameter determines the direction of the relations respective asset references that are shown or created. Note that the equivalent notations for the child and parent direction of an asset reference are "feature" and "feature-reverse".
Type of asset to create
Parameter: "asset-type"
Value: asset type
Example: asset-type="task."
Describes the asset type which is created when the user presses the "Create" button. If this parameter is not set, the button will not appear. Find the list with all asset types in the Admin Client in the "Asset types" table of the "Master data" section. Search for the desired asset type and enter the ID as value for the "asset-type" parameter.
Add a link
Parameter: "multivalue"
Value: This parameter has no value.
If you add this attribute there will be a new link created with the selected asset. Otherwise, the new link will replace an existing one.
Relation type that is created
Parameter: "relation-type"
Value: ID of the asset relation type, asset reference feature or
       asset key reference feature
Example: relation-type="user.task."
This defines the relation type that is created with the selected asset.
Find the list with all asset relation type in the Admin Client: Go to the "Master data" section to the "Asset relation types" table. Find the desired asset relation type and enter the ID as value for the "relation-type" parameter.
Find the desired "asset reference" feature respective "asset key reference" feature in the Admin Client: Go to the "Master data" section to the "Feature" table. Find the desired asset (key) reference feature and enter the ID as value for the "relation-type" parameter.
Example for asset relation
<cs-asset-relation asset-id="asset.traits.ids.id"
    flavor="'csAssetListItemRendererWidget2xn'"
    direction="child"
    asset-type="task."
    multivaluerelation-type="user.task.">

</cs-asset-relation>Example for asset reference
<cs-asset-relation asset-id="asset.traits.ids.id"
    flavor="'csAssetListItemRendererWidget2xn'"
    direction="feature"
    asset-type="layout.snippet."
    multivaluerelation-type="censhare:layout-snippet">

</cs-asset-relation>Adding the code for property control
On the asset page, go to the tab and the properties widget where you want to add the Asset picker.
Click the action of the widget on the top right and choose "Configure widget".
In the dialog, go to the "Metadata definitions" section and click the "Edit dialog" button.
The "Template Editor" dialog opens. There, go to the "Template" tab.
Add the prepared code snippet inside the <ul> ... </ul> tag.
Click OK to close the Template Editor and then OK again to close the configuration dialog.
The Asset picker for the defined asset type is now available. If you now click the "Edit properties" button for the widget, the added selection field displays, too.
Adapting the presentation of entries of the drop-down list
The table definition for the drop-down list is stored within the "Table: Asset picker" asset with the resource key: "censhare:table.default.asset.picker". This table asset contains a reference to the only column definition asset "Column: Asset item (default table)" with the "censhare:table-column.default.asset.item" resource key.
The column definition asset contains the "Template" property. It contains a piece of code that defines which data of the asset in the respective entry is shown in which way. By default, the "Column: Asset item (default table)" asset contains the following code:
<cs-item-renderer
    flavor="'csAssetListItemRendererWidgetmxn_1rows'"
    item="data">

</cs-item-renderer>This piece of code renders a single-line entry that shows the name of the asset.
Adapt this piece of code according to your needs:
Prepare your template.
Open the "Column: Asset item (default table)" asset in an asset page.
Go to the "Properties" widget on the "Overview" tab and click the "Edit properties" button on the top right of the widget.
In the following dialog, enter your piece of code in the "Template" field and click OK. Then save your changes to the asset.
Result
After configuring the Asset picker for a "Related assets" widget, the user will see the Asset picker if he clicks the "Add relation" button in the widget. If an asset type has been defined, he can create an asset with that type in the Asset picker.
After adding the code for the Asset picker to a property widget, the user can use the Asset picker to relate the selected asset using the defined relation type with the current asset.
If necessary, the presentation of entries of the drop-down list or the root query has been adapted according to your needs.