Plan team workload
The "Team workload" widget helps you plan your team's resources.
Prerequisites
Before you can define and plan the team workload, you must add members (asset type "Person") to the team (asset type "Department").
Introduction
Set up and plan the team workload using tasks, availability calendar and working times. You can see how each of your team members is set for time in the schedule. The overview bar provides you with a summary of tasks and events for each member on a given day. A detailed view can give you more information if need be. The "Team workload" widget is available in the "Department" asset.
Key steps for planners
Preparations
The basis for calculating workloads for a team or a department is a "Department" type asset. If such an asset already exists for a team you do not have to create one. You then assign the individual team members to the "Team" asset. The team asset shows all members on the "Workload" tab in a "Team workload" widget. Further information:
If you have more than one team whose workloads you wish to monitor, you can compile the team assets in a company asset. It works just like assigning person assets to a team asset, but you are assigning team assets to a company asset in this case. To do so, go to the "Departments" widget on the "Details" tab of a company asset.
Monitoring team workloads
The "Team workload" widget has an overview line for each member. It shows your workloads for every day of a month or week. If you want to know what events and tasks make up the workload, click the "Detail view" button on the left of the overview line in question. censhare will first calculate the available time for a day and also takes into account any holidays. It then subtracts the time needed for an event, for example, a meeting. The widget then distributes the remaining time to the tasks scheduled for the day in question. Further information:
Adjusting team workloads
You can change a team's workload by assigning individual tasks to other members, or by delegating, changing, deleting or creating new tasks. As soon as you save changes to a task, the widget will update the workload for the member it is assigned to. Further information:
Key steps for users
censhare calculates the delegation of your tasks and the subsequent workload based on your specifications.
Configure your own person asset
In order for censhare to calculate your available working time you need to specify two things. One of those is the amount of working time you generally have available per week. This is defined in the so-called availability calendar. The other is the holidays that apply to your schedule. No tasks will be assigned to you on those days.
For every installation, you can specify a standard availability calendar. If this corresponds to your working time then you don't need to do anything else. Otherwise, you can define your own availability calendar and assign it to your person asset. A person asset compiles a variety of different data for one person in an asset.
Holidays are always established according to a region (Bavaria, Hamburg, etc.) or a country (Germany, Austria, etc.). In your person asset, you can specify which region or country you belong to. censhare then assigns the corresponding holidays. If you select a certain region, then all national holidays will also automatically be applied to you.
Further information:
Events and tasks
To get the most realistic calculation of workloads from your tasks it is important that you enter all of the events related to your working time. This could include meetings, trade shows, a half-day holiday or other events. censhare will then subtract the entered times from the available time for the day in question. To better differentiate and display the information in the "Team workload" widget there are subtypes of the "Event" type asset. If need be, you can even add further subtypes to the system.
Just like events, you can also create and assign tasks in censhare. In addition to the beginning and the end, the duration and the planned working time also play a role here. The latter indicates the cost for the task. Simply put, censhare distributes the working time for a task to the days for which it is planned. The available time, the events and the number of tasks for a given day are all taken into consideration here.
Further information:
Monitor team workloads
Whether it is for projects, work groups or departments, you need to get an overview of team workloads and individual team member workloads. At the same time, the current allocation of tasks forms the basis for scheduling and changes. The team workload widget can help you here. It shows you an overview list for every member of a team and tells you the workloads for the displayed period of time. This makes it easy to see whether a team or an individual member still has availability or whether certain days have overbookings. You can then define new tasks, move or change existing ones, or assign them to other employees. You will immediately see how the workload changes for a team. If an employee is a member of multiple project teams, you can also assign multiple department assets to that employee in censhare. When looking now at the workload of a project team you will always also see for this employee how his/her overall workload shapes up.
If need be, you can place multiple widgets next to one another and monitor multiple team workloads at the same time. For example, if you move tasks between teams you will immediately see whether the situation is made better or whether you need to take additional measures.
The overview line
For every team, there is an overview line. Every day is represented here with a box. The symbol in this box describes the workload for this day. If the entire surface of the symbol is gray then nothing is planned for that day. The smaller the dark-gray surface of the box is, the more that day is filled with tasks or events. You can immediately see the days for which a team member has capacity for additional tasks, has overbooked or is not available at all.
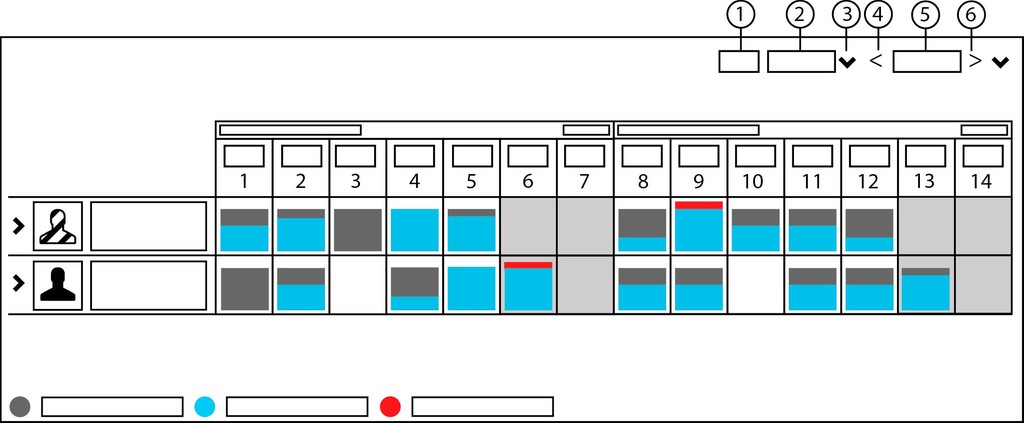
The "Team workload" widget with two members: graphic display of different workload situations. The meaning of the colors: gray (8) - available, blue (7) - task, red (6) - overbooked. The numbers for the workload of each day are not displayed in this simplified view.
Explanation of the examples for different workloads for one day:
Nr. | Symbol | Description |
|---|---|---|
1 | Gray box | The member is available on this day. No tasks are booked for this day. No events are entered. |
2 | Gray box, partially filled with blue | The member has one or more tasks for this day. The more the box is filled with color the less capacity is available for that day. |
3 | No symbol | For that member there is no working time defined for this day. No tasks can be planned for this day. |
4 | Box, completely filled with blue | The task(s) for the day completely fill up the available working time for the member. The workload is at 100 percent. |
5 | Box, completely blue with red bar | The calculated working time for all tasks on this day exceeds the available working time of the member. The working day is overbooked. |
To get the workload of a member for a given day, censhare first calculates how each task contributes to the workload of every day for which it is planned. It then adds the working times together and compares them with the available working time. For one day, for example, three tasks with 2 hours, 3 hours and 1 hour, a total of 6 hours, are planned. The available working time, however, is only 4 hours. In this case, this day is overbooked for this employee.
Display tasks
The working time of a member is established by an availability calendar. This contains the corresponding working times for each day. The working time for a day is taken into consideration when calculating the task times for that day. For a 4-hour day, for example, there is a percentage less time available for every task than for an 8-hour day. Every team member can have his/her own availability calendar. If one is not specified, censhare uses the availability calendar specified for the system.
The overview bar only shows you the workload for each day. Each employee has a detailed view to show which tasks make up how much of that workload. You can see this by clicking the detail view button in the overview bar for the team member in question.
Icon | Meaning |
| Button: Menu |
Team member with detail view of tasks: (1) shows the sum of the assigned tasks (2), (3) and (4). Every task is shown with the icon (13) and name (12). The meaning of the colors: gray (11) - available, blue (10) - task, red (9) - overbooked.
Examples of workload calculations with multiple tasks. A working time of 8:00 to 16:00 is defined for Monday to Friday. For task (2), 20 hours are planned; for task (3), 10 hours; and for task (4), 15 hours:
Nr. | Situation | Description |
|---|---|---|
5 | Overbooking | The sum of the three tasks (2), (3) and (4) exceeds with its 8,7 hours (2 h + 1,7 h + 5h) the available working time of 8 hours. The number in the blue box for tasks indicates the time planned for the task on this day. |
6 | No working time defined | The tasks (2) and (3) extend over the weekend. Because no working time is defined here, the workload is is at 0. The field in the overview bar (1) thus remains empty. |
7 | Multiple tasks | The sum of the workload is taken from the workload from the individual tasks, in this case 3,7 hours (2 h + 1,7 h). |
8 | One task | Only one task is entered for the day. Its workload is also the total workload for the day. |
To see the working time for a task, open the task in an asset page. On the "Overview" tab you will find all of the information related to a task, such as starting point, working time or degree of completion in the "Task" widget.
Take events into account
Sometimes an individual team member may not be completely available or even available at all for the working time indicated in the availability calendar. The cause of this can be holidays, vacation, sickness or meetings. This time must first be subtracted from the working time in the availability calendar. For a holiday an entire day is omitted, as for vacation or sick days normally. It depends on the time entered. By the same token, meeting times will also be subtracted from the available working time. If events are placed outside of the working time, they are shown but not taken into consideration in the calculation.
For every day and for each member, censhare calculates the total time/workload assigned to that member. That total is comprised of the sum of all individual tasks and the total duration of events such as meetings or vacation.
Team member with detail view of his tasks and events: The overview bar (1) shows the sum of the assigned tasks (2), (3) and (4). Add to that a holday (7), a meeting during the working time (6) and a meeting partially during working time (9). Every task or event is shown with the icon (17) and name (16). The meaning of the colors: gray (15) - available, blue (14) - task, red (13) - overbooked, green (12) - holiday, dark blue (11) - meeting.
Explanation of the examples: The basis for the calculation is the weekly working time from Monday to Friday from 8:00 to 16:00. For task (2), 20 hours are planned; for task (3), 10 hours; and for task (4), 15 hours. The holiday day (7) is all day. The meeting (6) runs during the working time (9:00 - 12:00). The meeting (5) begins during working time (15:00 – 22:00):
Nr. | Situation | Description |
|---|---|---|
8 | Meeting during working time | The meeting (6) lasts 3 hours. As a result, only 2 hours are available for the tasks (3), (4) and (5). This time will be allocated evenly for the three tasks. |
9 | Meeting partially during working time | The meeting (5) lasts 7 hours. Of that only one hour (15:00 - 16:00) is during the working time. For this reason, there are 7 hours available for tasks, which are allocated evenly to tasks (2) and (3). |
10 | Holiday | Because of the holiday, the day is not available as a working day. The "8" in the green field for the holiday shows that all 8 hours of the working day are occupied by the holiday. In the fields for tasks (2) and (3) we therefore also see a 0 for each because it is not possible to make plans for this day. |
To get all of the details for a task or event, open the asset in an asset page.
Calculate current and unfinished tasks
When doing the calculation, censhare takes into consideration whether a task is in the future, present or past. At the same time, the percentage of the task that has already been completed also plays a role.
If a task has already begun, the "Team workload" widget no longer uses all of the days of the task for the calculation. The planned working time will now only be allocated within the time from the present to the last day of the task. All days of the task that are in the past are shown but not part of the calculation. The workload displayed for the task on these days is therefore 0 hours.
If the employee has already finished part of the task, the calculation is slightly different. The task saves the degree of fulfillment as a percentage. censhare uses this to calculate the number of hours of the working time that are already completed. These are allocated evenly to the days of the task that have already passed. The leftover working time is then allocated to the days of the task between now and the last day. If the tasks is already completed, censhare allocates the working time evenly among the days that have passed. The current and remaining days of the task will then show a workload of 0 hours.
If a task is completed in the past, but is only 0 percent complete, the widget will post the working time completely to the current day. The actual planned days for the task that are in the past will be shown there, but each with only 0 hours of workload. If the task is already partially completed, the percentage value is used to calculate the already completed working time and allocated to the days in the past. The widget then shows the remaining working time for the current day.
For completed tasks in the past, you will see the working time evenly distributed among the days between the first and last day.
Team member with detail view of his/her tasks at the current time (8): four tasks assigned, three of which ((2), (3) and (5)) are specified for the current time period. The fourth task (4) is in the past but is not yet completed. That is why it shows up for the current point in time (8). Task (5) begins now but is already half completed. Working days with tasks: day in the past (9); marked in red: current day (8); future days (7) and (6). The meaning of the colors: gray (12) - available, blue (11) - task, red (10) - overbooked.
Examples of workload calculations with multiple current respective incomplete tasks. A working time of 8:00 to 16:00 is defined for Monday to Friday. For task (2) and (3) there are 8 hours planned; for task (4) there are 4 hours planned; and for task (5) there are 18 hours planned:
Nr. | Situation | Description |
|---|---|---|
2 | Task already begun | The task is already 50 percent complete. Therefore, 4 hours will be distributed among days in the past, in this case 1 day (9). censhare will evenly allocate the other 4 hours to the current day (8) and the two future days (6) and (7). |
3 | Task not yet begun | The task has not yet begun. The day in the past (9) therefore has 0 hours. censhare evenly allocates the 8 hours of working to the current day (8) and the two future days (6) and (7). |
Task lies in the past | The 4 hours of working time are shown on the current day, here (8). The starting and ending points of the task itself aren't shown here because they are in the past. | |
5 | Task starts on current day | The task is already 50 percent complete. Because the task starts on the current day (8) censhare only shows the 9 hours to be completed on the current day (8) and on the future days (6) and (7). For tasks that are completely in the future, censhare also only shows the allocation for the working time still needed and not the working time already completed. |
Configure and edit team workloads
Basic tasks at the beginning
The basis for calculating workloads for individual employees of a team is formed by the availability calendar(s) and the holidays set up in the system. The availability calendar and the holidays provide the overall available time an employee has to offer.
In the beginning, at least one availability calendar needs to be specified and configured as the default in the system. This then applies for all person assets. If a different availability calendar should apply to a certain person, it needs to be created and assigned accordingly to that person.
In order to take holidays into account for a person, two conditions have to be met. The holidays need to be defined in the system and assigned to the respective countries or regions. In order to then account for these for a certain person, the corresponding region or country must be applied in the person asset. A person can also belong to multiple regions.
The basis for the "Team workload" widget is a "Department" type asset. Every person asset assigned to this department asset will appear in the widget. A person asset can also be assigned to multiple teams or departments. Multiple department assets can also be assigned to a company asset and compiled that way.
Every department asset has a "Workload" tab with a "Team workload" widget. There is also a second version of the "Team workload" widget that you can place on pages for other asset types. For example, you can add an extra tab to a company asset and then add multiple widgets to it. Then you can assign different departments to it and see their workloads in one view.
Plan appointments
To enter an appointment or another event you need to create an asset of the corresponding type. Then you enter the event information including date and time and assign it to the appropriate person. After that, the event will automatically appear in the team workload widget.
Other than the holidays, all other events such as vacations, sicknesses or meetings need to be assigned manually to a person. Other events like trade shows can be defined in the system if need be. They are treated the same as other events as far as the calculations are concerned.
You can open and edit all of the events shown in the widget. Any changes will be immediately shown in the widget after you save them.
Events are always only shown in the months or weeks for which they are defined.
Creating and editing tasks
Like events, you can create tasks as assets with the corresponding type or subtype. It is also possible to define your own subtypes in the system, such as support tasks or development tasks.
Every task needs to be assigned a starting and ending point as well as a working time. Unlike events, the time here does not influence the workload calculation.
You also need to assign the task to a user in the system.
As soon as the task has begun, the percentage of completion can be entered in the task. censhare then recalculates the workload for the task and the overall workload for the task days in question.
Tasks are only shown in the months or weeks for which they are defined. If a task is completed it still will be shown in the team workload widget.
Establishing availability
The overall availability of an employee and the events assigned to him/her (meetings, vacation, etc.) result in the available task time. An employee's tasks are then allocated to the task times.
Overall availability of an employee
The overall availability of an employee is the result of the standard availability calendar or the availability calendar assigned to him/her. The holidays are also taken from that.
Set up the availability calendar
To create your own availability calendar, go to the top navigation and click the "Create new asset" button and then select "New asset from template". An asset chooser dialog with all templates will open. Select the desired template and confirm it with OK or exit with CANCEL. In the dialog that opens you can enter the basic information for the new asset. Complete the action with OK. The asset for the availability calendar will open.
Icon | Meaning |
| Button: "Create new assets" |
Tip: If the standard availability calendar corresponds to your working times then you don't have to define your own availability calendar.
In the "Overview" tab the widget shows the times specified in the availability times. Initially, none are defined. Click the "Edit" button in the widget title bar to create times. A dialog will open containing sections for every day of the week. Click the "Add" button below the day in question in order to create an entry. Now enter the desired times. You can also create multiple entries for a day, for example, to take a lunch break into consideration. Click the "Add" button below the entry in order to create another one. Use the "Remove" button to delete an entry again. Click SAVE to create the times. Select CANCEL to exit the action. The widget now shows the defined times graphically for the week.
Icon | Meaning |
| Button: Edit |
| Button: Add |
| Button: Remove |
The calendar defines a standard working week. A deviation from that for individual calendar weeks is not possible.
After establishing the working times you now need to assign the calendar to your person asset. You can look for it using the quick search or the advanced search. For example, look for the asset-type "Person" and your last name.
Then you open the person asset and go to the "Resource" tab and the "Availability calendar" widget. Click the button "Add relation" in the title bar of the widget. An asset chooser dialog opens with all of the availability calendars. Select your calendar and confirm it with OK or exit with CANCEL.
Icon | Meaning |
| Button: "Add relation" |
The information from the system-wide availability calendar is overwritten by a personal availability calendar.
Holidays
In order to take a holiday into account for the calculation, it must be defined in the system. censhare saves holidays as assets of the type "Event/Holiday". It also defines the countries or regions for which a holiday is valid.
As a user, you don't need to worry about which holidays apply to you. An assignment for this is automatically done through the system. The requirement for this is that the countries and regions are defined in your person asset. You are allowed to belong to multiple regions and countries. If, for example, you regularly commute between Bavaria and Hamburg you can define both Hamburg and Bavaria as regions in your person asset. Combinations of countries and regions are also possible. If, for example, you work in both Bavaria and Austria then you need to define both of those in your person asset. If you define a region in a country, for example, North Rhine-Westphalia, censhare automatically takes into account all holidays in that country, in this case, all national holidays.
To specify the regions or countries for your person asset, look for the asset, for example, the person asset type and your last name and open it. Go to the "Resource" widget on the "Resource" tab. Click the "Edit" button in the title bar of the widget. A dialog opens with the section "Regional holidays" and the field "Regional holiday".
Icon | Meaning |
| Button: Edit |
Click the field. A selection list will open with all countries and regions. Click the entry to select it. To select additional values click the field again. censhare then shows all selected values at the beginning of the field. To remove the entry again click the "x" at the end of the entry in question. Confirm the changes with OK or discard them with CANCEL. For censhare to save the changes permanently, click SAVE or SAVE & CLOSE. CANCEL will discard all unsaved changes.
If you want to know which holidays are defined in your system, you can click the field for the quick search, begin entering "holiday" and then select the suggestion "Type: holiday".
Set up team workloads
The first step in showing the team workload is creating a team asset with the "Department" type that all members of a team can be assigned to. The departments can in turn be linked with a company asset ("Company" type asset). This is how you use a company asset to access different departments or teams and view their workloads.
First search for the desired team using the quick search in the top navigation or using the advanced search. You can use the "Department" asset type as a search parameter here.
If no department asset exists for the team, create one using the "Create new assets" function in the top navigation, selecting "New asset from template" and then choosing a "Department" template. The new asset will be opened in an asset page.
Go to the "Team" widget on the "Overview" tab of the new asset. It shows all of the person assets assigned to the team. You can add members or even remove them from the team. To add a person as a team member click the "Add relation" button. An asset chooser dialog opens with all person assets. You can add multiple persons at once.
Icon | Meaning |
| Button: "Add relation" |
To remove a person from the team move the cursor to the entry in question and click the menu button in the asset action bar. Click the entry "Remove relation". A dialog will appear in which you can confirm the action with OK. Click CANCEL to exit the dialog.
Icon | Meaning |
| Button: Menu |
| Button: "Remove relation" |
Tip: A person asset can be assigned to multiple teams.
For a better overview you can assign multiple department assets to one company asset. If no company asset exists yet, create one by going to the "Create new assets" button in the top navigation, clicking "New asset from template" and selecting the company template. The asset opens on its own asset page. Go to the "Details" tab on the "Departments" widget. Now add the departments to the company.
Icon | Meaning |
| Button "Create new assets" |
Click the button "Add relation" in the widget title bar. An asset chooser dialog opens with all of the available departments. Click the desired department. You can select multiple departments at once. Confirm your selection with OK or exit the dialog with CANCEL.
To delete the assignment for a department again, move the cursor to the entry, go to the widget action menu and then the menu option "Delete relation".
Plan appointments
Because appointments influence the available time for tasks it is important that they are also entered in censhare. To better distinguish between appointments and events there are different subtypes of the "Event" asset type. Among them are vacations, sicknesses, meetings and holidays. Additional subtypes can be defined in censhare by an administrator if necessary.
censhare treats all subtypes equally, except for holidays, which must be assigned to a specific person asset. Holidays are assigned to a region or regions defined for a specific person asset. For more information see the section "Holidays".
Different colors are assigned in order to better distinguish between the event asset type and the subtypes. The administrator does this. For more information, administrators should see the section "Creating appointment and task types". The asset types are also given different colors in the "Team workload" widget.
If you set up appointments within times defined in the appropriate availability calendar, censhare will deduct the time for the appointment from the available time for the weekday in question. If the appointment is only partially within the available time, only the portion within the available time will be deducted.
You can define multiple events per day, such as meetings or a half-day off.
Create and edit appointments
To create a new appointment click the "Create new assets" button in the top navigation and select "New asset from template". An asset chooser dialog with all templates will open. Select the desired event type or subtype and confirm with OK. Or exit the action with CANCEL. If there is only one event template, use it and then select a subtype.
Icon | Meaning |
| Button "Create new assets" |
In the dialog that opens you can enter the basic asset details, in particular a name. If need be, you can select a subtype, for example, meeting or vacation, in the "Type" field. Confirm with OK or exit with CANCEL. After creating the asset, censhare will open it in an asset page.
To enter the details of the appointment, go to the "Overview" tab and then the "Event" widget. Click the "Edit" button in the widget title bar. A dialog will open.
Icon | Meaning |
| Button: Edit |
In the "Begin" field enter the date and time the event should start and in the "End" field enter the date and time it should end. Either enter the date and time directly in the field or click the icon on the right to select the value with a click. To close the selection field again, click once more on the icon. The date and time will be used to calculate the time to be deducted from the available time for tasks.
For the "Show as" field select the option "Busy". If you select "Free" the event will not be taken into account in the calculation of available time. The team workload widget also won't show the event. The "All-day event" field is not currently part of the calculation.
To be sure the event shows up for you or the appropriate person in the "Team workload" widget, you still need to link it to the associated person asset. There are two options for doing this. If you are organizing the event, then enter yourself as the owner. If you are one of the participants, enter yourself as such. The event will show up in the widget regardless of whether a person is entered as the owner or as a participant.
To enter yourself as the owner, go to the "Owner" widget on the "Overview" tab and click the "Add relation" button. An asset chooser dialog will appear with all of the person assets available in the system. Select the desired asset and confirm your choice with OK or exit with CANCEL. To enter a participant go to the "Participant" widget on the "Overview" tab and click the "Add relation" button. In the asset chooser dialog you can select multiple people because an event is allowed to have multiple participants. Click OK to confirm or CANCEL to exit.
Icon | Meaning |
| Button: "Add relation" |
If one or both widgets are not available on the asset page you can add it yourself. Click the "Asset menu" button on the right of the tab bar and select "Add widget". A dialog will appear with all of the available widgets. Select the "Asset list based on related assets" widget and confirm with OK or exit with CANCEL. Now click in the title bar of the widget on the button "Widget menu" and select "Configure widget".
Icon | Meaning |
| Button: "Asset menu" |
| Button: "Widget menu" |
A dialog will open. In the "Relation or Reference" section select the "Type" field. Click the cursor in the field and enter "Event". Two entries will be available for selection. Select either "Event owner" or "Event attendee" depending on which person you wish to see and select in the widget. Click OK to confirm or CANCEL to exit.
Then click SAVE or SAVE & CLOSE to save all of your entries permanently.
To edit an existing appointment you need to open it in an asset page. You can do this in the "Team workload" widget, for example. If the desired appointment is shown below a team member, double click the icon on the left or the name of the appointment to open it.
Delete appointments
There are a few options for deleting appointments. If it is displayed in the "Team workload" widget or an asset list, move the cursor to the entry in question. An asset action list will appear. Then move the cursor to the "Asset action menu" button and select either "Move to trash" or "Delete". In the dialog that appears, confirm your action with OK or exit the dialog with CANCEL. If you have opened a task in an asset page you can find the commands in the asset menu of that page.
Icon | Meaning |
| Button: "Asset action menu" |
| Button: "Move to trash" |
| Button: Delete |
Plan tasks
Whenever you add, edit or delete a task you immediately see the change in workload for the team member in question. To help organize things, subtypes with different colors can be added to the "Task" asset types you already have. This plays no role in the workload calculation, however, because censhare treats all asset subtypes (Task/SUBTYPE) equally. Only administrators can set up new subtypes and their colors.
Creating and editing tasks
To create a new task click the "Create new assets" button in the top navigation and select "New asset from template". An asset chooser dialog with templates will open. Select the desired event type or subtype and confirm with OK. Or exit the action with CANCEL.
Icon | Meaning |
| Button "Create new assets" |
In the dialog that opens you can enter details about the task. In addition to the name of the task in the "Basic data" section, information about the task itself is located in the "Planned" and "Current" sections.
Now you can enter the start and end dates for the task in the "Planned" section. Either enter the date and time directly in the field or click the icon on the right to select the value with the mouse. To close the selection field again, click once more on the icon.
Alternatively, you can just enter the start respective the end date and the duration of the appointment. To do this you need to select a unit for the duration: working hours, days, weeks or months.
While the start and end dates determine the period of time in which the task is to be completed, the working time indicates the work involved in the task. As such, both entries must be made in order to calculate the workload. You also have to select the desired unit for the working time.
If the actual execution deviates from planning, you can enter information about that in the "Current" section. This information will not have any effect on the calculation.
If part of the task is already complete, enter the percentage in the "Completed" field.
Confirm your entries with OK or discard them with CANCEL. After creating the asset, censhare will open it in an asset page.
For planning, you need to assign the task to a user in the system. This refers to a login account in the system, not a person asset. The reason for this is that a person asset does not necessarily relate to a user set up in the system who will actually carry out the task. To do this go to the "Task" widget on the "Overview" tab. Click the "Edit" button in the widget title bar. A dialog will open. In the "Planned" section you will now find the "Assigned" field. Click the field and start entering the desired name. censhare will show possible names as you type. Click the desired name to select it. Confirm your selection with OK or exit with CANCEL.
Icon | Meaning |
| Button: Edit |
Tip: The assignment of a login account to a person asset is done in the account in question. If the events of a team member appear in the widget but not the tasks, please contact your administrator.
If you wish to edit a task later, open it in an asset page. You can find all information about a task itself in the "Task" widget. You can edit the name of the task or asset in the "General" Widget.
To permanently save your entries click SAVE or SAVE & CLOSE. CANCEL will discard any entries you made.
Search for tasks
To find the desired task you can also enter "Task" in the quick search and then select "Type: task". Then you enter the name of the person whose task you are looking for. From the suggestions, select "Workflow target: NAME".
Delete tasks
There are a few options for deleting tasks. If it is shown in a team workload widget or in an asset list, move the cursor to the entry in question. An asset action list will appear. Now move the cursor to the asset action menu and select either "Move to trash" or "Delete". In the dialog that appears, confirm your action with OK or exit the dialog with CANCEL. If you have opened a task in an asset page you can find the commands in the asset menu of the asset page.
Icon | Meaning |
| Button: "Asset action menu" |
| Button: "Move to trash" |
| Button: Delete |
Team workload widget
Buttons for navigating in the "Team workload" widget calendar: "Today" (1), current calendar view (week, month) (2); "Calendar view" (3); "Current calendar unit" (week/month) (5); "Calendar unit backward" (4); "Calendar unit forward" (6).
To navigate in the calendar you can use the month or week view. In the month view, the widget will always show you an entire month. It also shows you the weeks in which the month begins and ends. If tasks in the previous or current month are in those weeks, the widget will show those as well. The week view only shows one week at a time.
Using the "Calendar view" button you can always switch between the two views. Using the "Calendar unit back" and "Calendar unit forward" buttons you can move one month or week backward or forward in the calendar.
Icon | Meaning |
| Button: "Calendar view" |
| Button: "Calendar unit back" |
| Button: "Calendar unit forward" |
To specifically select one month or week click the "Current calendar unit" button. A selection field will open. In the week view you can select the weeks available in the month being shown. Using the left and right arrows of the selected month you can move back and forth between the months. In the month view, you can jump directly to a specific month within the currently shown year. Using the arrow buttons you can move forward and backward one year. The "Today" button brings you back to the current week or month.
In the settings, you can also select different day as the beginning of the week. When doing so, the last two days of a week will be shown as the weekend. Click in the top navigation on the "User account" button on the right and select the "Settings" option. In the dialog go to the section "Calendar settings", click the "Week begins with..." field and select the desired day. Confirm your change with OK or discard it with CANCEL. To make the changes visible you have to refresh the asset page.
Compare different teams
You can set up multiple "Team workload" widgets on an asset page or on the home page and use that to display them at the same time. For a better overview, we recommend creating your own tab on the page.
Create your own widget for every team you wish to see. To do that, click the "Asset menu" button on the right of the tab bar and select "Add widget". A dialog will appear with all of the available widgets. Select the "Team workload for a department" widget and confirm it with OK. Click CANCEL to not create a widget.
Icon | Meaning |
| Button: "Asset menu" |
In the second step, you specify the department that the widget should display. You can store the desired department on the pinboard. For more information see the article Working with the pinboard. Click the pinboard button below the client. The pinboard will open. Now pull the department asset from the pinboard to the dotted area of the widget. As soon as the area's color changes, release the asset. Finally, move the cursor to the lower-left corner of the widget and pull it to the desired size as soon as the cursor changes. Alternatively, click the dotted area. An asset chooser dialog opens with the available department assets. Select the desired asset and confirm it with OK. Select CANCEL to exit without selecting an asset.
Icon | Meaning |
| Button: Pinboard |
Follow that procedure for every team you wish to display.
To see a different team in a "Team workload" widget you first have to remove the previous team from the widget. To do that go to the widget title bar and click the "Widget menu" button on the right. Select the entry "Reset asset". Now you can select the new team.
Icon | Meaning |
| Button: "Widget menu" |
Administration
Creating appointment and task types
You can use the admin client in censhare to create further subtypes for tasks and events. All asset types are defined in censhare in the admin client in the folder "Master data" in the "Asset types" table. By double-clicking, you can open the table in the admin client.
In order to show all of the asset types for tasks, select as a parameter "ID" in the search field above the table and enter "task" in the search field. If you want to create another subtype click the "+" button in the bar above. In the dialog enter the ID in the form of "task.SUBTASK.". In SUBTASK select an appropriate term. The ID must begin with "task.", otherwise a subtype won't be created. You also need to enter an English and German name for the new task type. For files select "Files allowed". A task can then be linked with a file but does not have to be. For the "Asset application" field specify "Meta data". To select a color click the button next to the "Color" entry. The color appears automatically in the legend for the "Team workload" widget. Click OK to create the asset type. Select CANCEL to exit the dialog.
Icon | Meaning |
| Plus button |
In order to show all events, enter "event." as the ID in the search field. When creating a subtype, the ID must have the form "event.SUBEVENT.". Everything else is the same as for a task.
Default availability calendar
First, you need to create an availability calendar and define the general working times there.
To define a standard availability calendar in censhare Web, you first need to search for the system asset. To do that you can search for the "System" asset type, for example. In every censhare installation, there is always only one asset.
Open the system asset. On the "Overview" tab you will find the "Default availability calendar" widget. If you haven't yet defined a "Default availability calendar", click the "Add relation" button in the widget action bar. An asset chooser dialog opens with all of the availability calendars in the system. Select the desired calendar and confirm it with OK or exit with CANCEL.
Icon | Meaning |
| Button: "Add relation" |
If you have already defined a "Default availability calendar" you need to remove that one first before you can set up another one. To do that, move the cursor to the entry for the "Default availability calendar". An asset action list will appear. Click the "Menu" button on the right and select the entry "Remove relation". Confirm your selection with OK or exit the action with CANCEL. Now you can select a new "Default availability calendar".
Icon | Meaning |
| Button: Menu |
| Button: "Remove relation" |
Tip: You should definitely set up a default availability calendar.
Define holidays and regions
You can create a holiday using the function "New asset from template". Select a template with the "Holiday" type or select a general event template. For the latter, in the "Edit meta data of the new asset" dialog, specify the subtype "Holiday" in the "Type" field.
After censhare has opened the new asset in an asset page, go to the "Holiday" widget and click the "Edit" button in the title bar of the widget. For the begin and end enter the desired date and time. Use the time to specify half-day holidays as well. The "All day event" field is not used currently. In the "Display as" field select "Busy". In the "Holiday region" field enter all regions for which the holiday is valid. When you select a country, the holiday is also automatically assigned to a user if the user is assigned to a region of the country without the country even being specified. In the end, confirm your entries with OK or discard them with CANCEL.
Icon | Meaning |
| Button: Edit |
The region is defined in censhare as an asset feature. You can find all features in the admin client below the "Master data" folder in the "Features" table. Double click the table to open it. To find the feature, select ID as a search parameter in the search field and enter "holiday". Double click the feature to open it.
Scroll down to the "Values" section. Here you find all of the defined values for the features. These possess the value type "Hierarchical value list (string)". If you want to create a new country, click the entry "Root" and then click the "+" button above the list. For a new region, first, click the entry for the country in question.
Icon | Meaning |
| Plus button |
Assign person assets to users in the system
To assign a person asset to a user, the ID of the person asset needs to be entered in the account entry of the user. First, search for the person asset and open it. You will find the ID in the "General" widget in the "Overview" tab.
Now go to the admin client, to the "User" table in the "Master data" folder. In the search bar, look for the last name as a criterion and enter the desired name in the search field. Double click the entry to open it.
In the "General" section, in the "Asset ID" field, enter the ID of the person asset. Confirm with OK or exit with CANCEL.
Define working hours
The team workload calendar uses the working times defined in the censhare Admin Client to display the availability and calculate the workload. For the duration and working time for a task, censhare uses "Working hour(s)" as the basic unit. You can define conversion factors for "Working day(s)", "Working week(s)" or "Working month(s)" or use the default factors.
Content
Related articles
Error rendering macro 'contentbylabel'
Invalid label: " working-times"