Typical installation procedures for the Java-based Censhare Client and Admin Client.
Target groups
-
System administrators
-
Users (on self-managed workstations)
Context
The installation process for all Censhare client applications is similar. This article focuses primarily on the Censhare Client and Admin-Client.
Prerequisites
Version parity required between Censhare Java-based clients and Censhare Server when Keycloak is used as identity broker
You can only connect with a Censhare Java-based client (Censhare Client, Admin Client, Render Client) 2022.1.x via Keycloak to the Censhare Server of the same version 2022.1.x. Older clients do not work and the following error message displays:
UnrecognizedPropertyException: Unrecognized field "socket-timeout-millis"
Exception: Keycloak with the Censhare standard authentication
(1) Oracle has ended support for their Java Web Start software. For more information see, Simple client deployment.
(2) Protected and debug versions of the Censhare Client are available on request only.
For more information, contact your Censhare project manager.
Introduction
The Java-based Censhare Client and Admin-Client are installed on the computer of the Censhare user and connect to the Censhare Server.
The following client software is available for download:
-
The censhare Client and censhare Web are designed for end-users
-
The censhare Admin-Client handles administrative tasks
-
The censhare Render-Client provides server functionality for InDesign
-
The censhare Service-Client provides additional tools such as ImageMagick, Ghostscript, and more.
JDK
censhare officially supports Java 17 and Amazon Corretto 17, a distribution of the Open Java Development Kit (OpenJDK). OpenJDK is an open-source implementation of the standard-edition Java platform (Java SE) and does not impose license fees. Censhare client applications are bundled with Amazon Corretto 17.
VFS
You use the Java-based censhare Client with a virtual file system (VFS). censhare-Client installers always include the VFS. Your hosts.xml settings determine whether the VFS is activated. Since the standard censhare-Client installation uses VFS, unless otherwise specified in the settings, the VFS is activated. For more information, see Virtual File System (VFS).
The Java-based Censhare Admin-Client is a system-customization and monitoring tool that administrators use to maintain a Censhare system. The Admin-Client does not use a VFS.
Download Censhare software
The Censhare Product Portal is the central location for all censhare-related information. Downloads for Censhare clients are available from the Download Portal of the Censhare Product Portal.
Individual download files are available for each client version and operating system. All Censhare clients are available for macOS and Windows 64-bit:
-
censhare software for macOS is distributed in the DMG file format.
-
censhare software for Windows is distributed in the ZIP file format.
You need a Censhare ID to download Censhare software. When you access the Download Portal for the first time, you are asked to register. Enter your credentials and confirm. You can then log in to the Download Portal with your credentials and download the software.
-
Go to the censhare Product Portal.
-
Click the menu and select Download Portal.
-
You are prompted to log in with your Censhare ID. If you have not registered yet, you are asked to do so. please register and proceed.
The Download Portal opens -
To locate the required download, use the filter options to search. You can combine multiple filters:
-
Client Software: Filters for a specific type of Censhare client, installer, or Java version.
-
Operation system: Filters for Censhare clients that run on macOS, Windows 32 bit (pre-2019 only), or Windows 64.
-
Software version: Filters for specific censhare-client releases.
-
File Format: Filters for downloads of a specific file type.
-
-
From the list of search results, click

The Downloads dialog opens.
-
In the Downloads dialog, click Master (size of download) to begin the download.
Unpack and install Censhare software
After you download the client-software package that you need, extract the ZIP package on Windows or mount the DMG file on Mac to start the installation. There are two basic types of installations: client software with an installer and client software without an installer. In general, we recommend that you use the installers.
Install on Windows (without installer)
-
To install the Censhare Client manually, go to the ZIP file that you downloaded and extract the files.
-
Move the censhare [Software client] [Software version] folder that you downloaded to the default application directory. When this file is placed in the default application directory, one installation is sufficient for all users of the computer. If multiple Censhare clients are installed, create a Censhare subfolder in the application directory.
-
The installation folder contains a Censhare executable file (.exe). From the executable file, you can create links to the desktop, start menu, or taskbar as desired.
The Censhare Admin-Client and Service Client do not include an installer for Windows. You can use the steps that are described in this procedure for any Censhare client that does not include an installer for Windows.
Install on Windows (with installer)
Installers contain the Censhare Client, virtual file system (CBFS forWindows), and Amazon Corretto 17.
censhare version 2019.1 and higher require a newer Windows virtual file system (CBFS). The new virtual file system uses a different schema for the version numbers. The new schema begins with a year.
-
To install the Censhare Client with an installer, go to the ZIP file that you downloaded and extract the files.
-
Click the censhare Client [version] installer.msi file and follow the steps of the installation wizard as directed.
The installer automatically de-installs the older version of the VFS/CBFS and installs the current version. To use different client and VFS/CBFS versions in parallel, re-install CBFS versions as needed. Censhare provides separate installer packages for each CBFS version.
Windows installer known issue
On Windows, the installer may fail and require some workaround. The reason is that the installer fails to validate the certificate associated with the VFS driver. You will see the following error message:
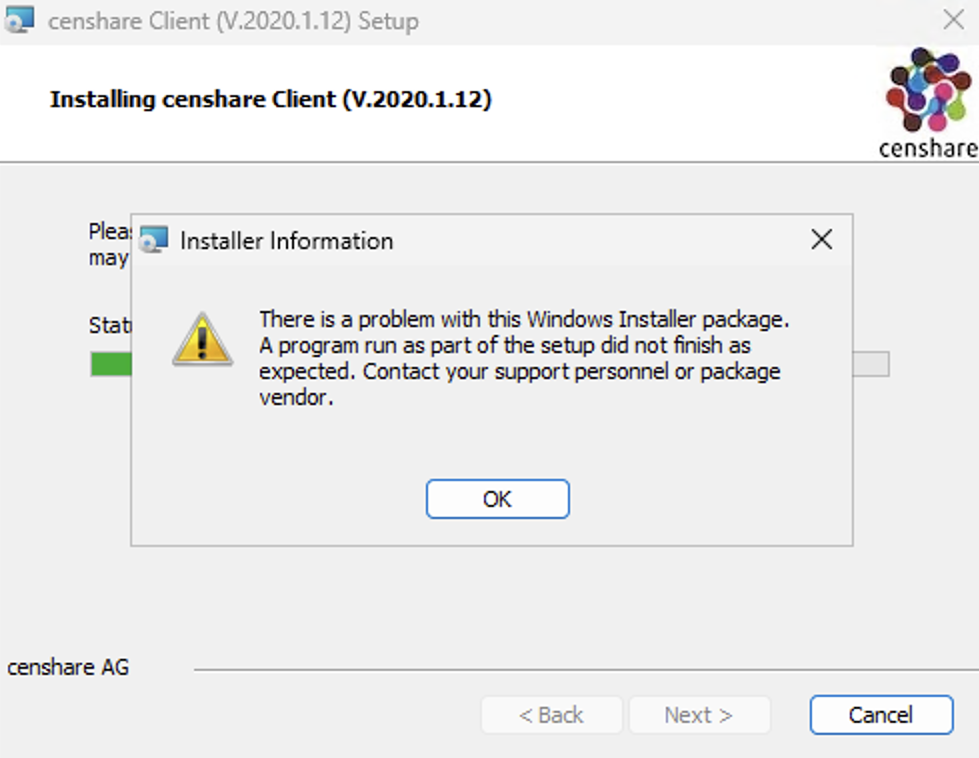
What to do
-
The first thing to try is to cancel the installation and start it again.
-
If the installation fails again, you need to install the certificate manually.
Manual VFS driver certificate installation
-
download the attached public certificate
-
double-click on it
-
click Install certificate
.png?cb=8a6f3c8133e26c7649309541ea9590e5)
-
select Local machine
.png?cb=3ab23be6a9c20981a51a2356e0916e31)
-
select the correct place for the certificate, which is Trusted Root Certification Authoritiesbrowse your certificate stores
.png?cb=ea5497bb8648746e6f852a64c12a9749)
-
-
select Trusted Root Certification Authorities and proceed with saving the certificate
-
.png?cb=cbe29244e3bd457ee6fd0759fd6f77ab)
.png?cb=97014be6384477d2a2d62c3d3f64b91e)
.png?cb=e896c47af40895484ef05222131a227d)
-
after the successful import of the certificate, try the installation again
The installer will be able to proceed successfully.
Install on macOS (without installer)
-
To install the Censhare Client on macOS, double-click the DMG file to mount it to the desktop.
-
Locate the Censhare Client icon in the mounted volume. Move the application file (.app) to the default application directory. When you place the Censhare application in the default application directory, one installation is sufficient for all users of the computer. If multiple Censhare clients are installed, create a Censhare subfolder in the application directory.
-
Create aliases from the client application or add the application to the Mac Dock as desired.
Install on macOS (with installer)
-
To install the Censhare client on macOS, double-click the DMG file to mount it to the desktop.
-
To open the installer, double-click the censhare Client installer.pkg. The installer guides you through the installation process.
Based on the selected macOS, the installer automatically de-installs the older version of the VFS and installs the VFS version that the macOS requires.
Prepare local folder
The local folder provides temporary storage for files that are currently checked out. All versions of the Java-based Censhare Client require a local folder.
If a local folder is not present from a previous installation of a Censhare client, you must create the folder in the operating system (Explorer/Finder) of the destination computer. The Censhare client creates a sub-directory in this local folder automatically. To name the sub-directory, the Censhare client uses the server name or database name that is defined in your hosts.xml file.
Some special characters are automatically replaced with an underscore in the sub-directory name.
Place the local folder in the home directory of the user. Since the user does not need to access or view the local folder, the folder can be located deep within the home-directory hierarchy. The local folder can be named as desired.
When no local folder is assigned, the user must select a local folder the first time that the Censhare Client requires storage. A dialog in which the user must select a local folder opens automatically. This dialog is untitled and can cause confusion on the part of the end-user. The location that the user selects as the local folder is where the Censhare Client creates a sub-directory. To ensure a good user experience, always create and define the local folder during the installation process.
You can assign the local folder manually or with the Censhare Server.
To ensure the best possible performance, place the local folder on a network device that has the adequate speed for your intended use case.
The user must have sufficient permissions to access the location of the local folder on the system. If you use an administrative account for the installation procedure, verify that the user can write to the local folder.
Assign local folder (manually)
The first time the Censhare Client launches, a dialog to enter general settings opens. Define the name and location of the local folder in this dialog. The Censhare Client stores the location of the folder in the preferences file of the Censhare Client.
-
To define the location of the local folder manually, launch the Censhare Client application.
-
In the File menu, select Preferences| General.
A dialog to enter general settings opens.
-
In the Assets area of the dialog, define a folder location in the Local folder field.
Click Select to browse locations on the local computer or enter a path manually. For example, on macOS: Macintosh HD/Users/<USERNAME>/censhare-local-folder. For example, on Windows: C:\Users\<USERNAME>\censhare-local-folder .
-
To save your changes, click OK.
Assign local folder (with the Censhare server)
-
To define the location of the local folder with the Censhare server, open the Censhare Admin-Client.
-
Navigate to Configuration | Modules | Clients | Client | and open the desired Client preferences.
A [New] Client Preferences dialog opens.
-
In the [New] Client Preferences dialog, select Edit XML-File.
The Client Preferences XML file opens.
-
In the Preferences XML file, locate the asset tag.
In the asset tag, add a create-local-folder="true" attribute and a local-folder="file:///${user.home}/censhare-local-folder/" attribute.
Standard-server settings override any manual settings that are present.
Define connection parameters
The first installation of a Censhare client requires communication parameters to access the application server. Define the communication parameters in a hosts.xml file. Install the hosts file in the correct location before the initial launch of the Censhare Client.
If you install a Censhare client on multiple computers, distribute the hosts.xml to the required computers to ensure consistency. Do not set communication parameters individually on each computer. For more information, see The hosts.xml file and Client Preferences (partner login required).
When the Censhare client cannot locate a valid hosts.xml file, a dialog to create a host definition opens. The Censhare client generates a hosts.xml file from the host name and connection string (URL) that you enter in the dialog.
Define preferences
The Censhare client follows and stores the preference settings that you define. You can enter preference settings manually in a configuration dialog or install predefined preference files. Some parameters in the preference settings are essential for production. The installation procedure must ensure that all production-critical preference settings are accurate.
Test the newly-installed client
Each newly-installed Censhare client must be tested to ensure proper operation for the end-user. Testing is necessary, even when preferences, local folder, and communications presets are available from a previous censhare-client installation.
Perform a quick fitness test:
-
Launch the application.
-
Log in with a user account.
-
Perform a quick search and an expert search.
-
Save and open an asset that includes a master file. For example, an image.
-
Open, edit, and save a layout document with InDesign (if applicable on your system). For example, place a local image onto a layout and save the changes (installed InDesign plug-in is required).
-
Drag an asset with a file to the desktop to verify that the VFS functions (if applicable). For example, drag an Image, Layout, or Text asset to the desktop.
-
Drag one asset to another asset to create an assignment relation.
Completion of these operations (without any error messages) verifies correct network setup, local folder configuration, and client/server compatibility. For technical support, submit a support ticket on the web-based or Java-based Tracker support system.
Result
You can successfully install the desired Censhare client.