Custom mapping
How to set up your custom mapping.
Make sure that your custom changes apply to all required users and to the required extent. It may be easier to create customizations before creating the users.
Please read How mapping works before you proceed with any changes.
Incorrect or missing mapping will lead to the lack of any permissions right for the user. Consequently, they won‘t be able to see or use any content.
Purpose
Custom mapping is strictly required when:
You create any custom roles and domains in Censhare.
You want to use LDAP/AD or other identity provider for managing your users.
Limitations
Please keep in mind that authorization mapping does not create any new roles, domains, user groups, or user attributes. Therefore, everything that is supposed to be mapped, needs to be created in the Censhare system and, to certain extent, in Keycloak.
Choosing the right method
Authorization mapping can be customized by either touching the XSLT transformation (1) or through the Keycloak UI (2). The last method will also require some configuration in the Admin Client.
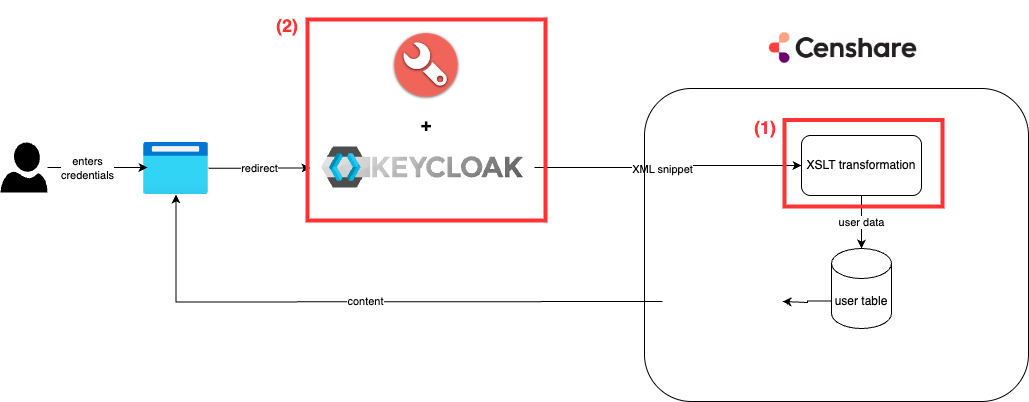
Which method is the best for you, depends on how many users should be affected by the changes.
Affected users | 1: XSLT transformation | 2: Keycloak + Admin Client UI |
|---|---|---|
Selected users | X | |
Keycloak user groups | X | X |
Censhare user groups | X | X |
All users | X |
Adjusting XSLT transformation is highly recommended for the initial setup of the mapping. Most of the time, you should not need to do any custom changes at a later point in time. But if you do, you can use Keycloak UI after the main setup has been done through XSLT.
The Keycloak method allows for more granular changes, but also implies more manual work.
Method 1: Adjusting the XSLT transformation
Where to find
Any Censhare installation comes with an XML template for the authorization mapper XSLT transformation. It can be found in the Censhare system by searching for:
the asset Keycloak Party Mapping OR
resource key:
censhare:keycloak-party-mapping
Before you start
Create roles and domains in Censhare
Create user groups in Keycloak
Create a Resource Replace variant for the transformation asset
XML template explained
In the asset Keycloak Party Mapping, you will find a lot of inline comments that help you to understand what should be changed and how. Below we provide a brief summary of main elements and parameters that can be customized.
Fallback mapping (default mapping)
We do not recommend touching the default – or fallback – mapping. It is applied to any user where no other match has worked out.
<xsl:variable name="defaultDomain">root.global-share.</xsl:variable>
  <xsl:variable name="defaultDomain2">root.</xsl:variable>
  <xsl:variable name="defaultRole">no-permissions</xsl:variable>
  <xsl:variable name="defaultEmailNotification">1</xsl:variable>
Default mapping is set to the most restrictive rights.
Synchronization scope
Quite at the top of the XML template you will find the element attribute-set with the name defaultPartyAttributes. It is responsible for the synchronization scope.
  <xsl:attribute-set name="defaultPartyAttributes">
    <!-- Default values for auth_extern, auth_standard and sync_extern.
         Note that those values won't be used (by Java code) if the user already exists.
         This ensures that those values are never changed by the XSLT for existing users. -->
    <xsl:attribute name="auth_extern" select="1"/>
    <xsl:attribute name="auth_standard" select="0"/>
    <!-- 0: no synchronization, 1: synchronize basic information but not roles and groups, 2: complete sync -->
    <xsl:attribute name="sync_extern" select="1"/>
    <xsl:attribute name="isgroup" select="0"/>
  </xsl:attribute-set>
In the above sample, the authentication is set to basic.
Syncronization scopes and their values for the XSLT transformation
Value in the XML template | Meaning (and value in the Admin Client UI) |
|---|---|
0 | no synchronization (don’t synchronize) |
1 | basic synchronization |
2 | complete synchronization |
Mapping Censhare roles and domains to Keycloak user groups
This is the most important part of the customization.
If you use the XSLT method, you map Keycloak user groups to combinations of Censhare roles and domains.
Such mapping is done by adding a new group-role-mappingelement. Below is an example of such.
<group-role-mapping group-name="Media Consumer">
  <main-role>
    <party_role role="consumer" domain="root.solution-admin.organization.media." domain2="root." enabled="1"/>
  </main-role>
  <roles>
    <party_role role="consumer" domain="root.common-resources." domain2="root." enabled="1"/>
    <party_role role="consumer" domain="root.solution-admin.organization.media." domain2="root." enabled="1"/>
    <party_role role="specialist" domain="root.global-share." domain2="root." enabled="1"/>
    <party_role role="specialist" domain="root.solution-admin.organization.share." domain2="root." enabled="1"/>
  </roles>
</group-role-mapping>
The main-rolemust always be specified, but the roleselement may remain empty if only one combination is to be mapped to the Keycloak group. Indeed, you can add more role-domain combinations – as party_roleelements – to the roleselement.
Mapping Keycloak user groups to Censhare user groups
This kind of mapping is also done in the group-role-mappingelement, but inside the groupselement.
    <group-role-mapping group-name="sysadmin">
      <main-role>
        <party_role enabled="1" domain="root." domain2="root." role="admin"/>
      </main-role>
      <roles>
      </roles>
      <groups>
        <!-- If a key (= column login) is set on a group, use attribute "parent_login" preferably.
        Otherwise, assign a key to the group in Admin-Client first or use attribute "parent_id". -->
        <parent_partyrel parent_login="_admin" enabled="1"/>
        <!--parent_partyrel parent_id="2" enabled="1"/-->
      </groups>
    </group-role-mapping>
parent_partyrel is the element where you can specify the corresponding Censhare user group. The latter can be indicated by its key or its ID. Using the key is a recommended was, as matching by the ID may fail sometimes. The key is set in the parent_login parameter.
Method 2: in Keycloak and Admin Client UI
Optionally, create Censhare user groups in Censhare
None of those will be synched to Censhare if you only create it in Keycloak.
Fallback mapping (default mapping)
Fallback mapping cannot be defined or adjusted using the UI. It needs to be done in the XSLT and is not recommended anyway.
Synchronization scope(s)
If you want to change the scope without touching the XSLT or only change it for selected users, you can do it in the Admin Client.
Go to the Master data
Open Users
Double-click on the user
Scroll down to Authentication and set the desired scope.
Repeat this for all users that need to be affected.
Keep in mind that the “Don’t synchronize” option won't sync any Keycloak user data back to Censhare. However, you need such sync if you want to proceed with the mapping using the Keycloak UI.
Mapping Censhare roles and domains
This is done using attributes: key-value pairs that can be set on the user or user group level in Keycloak.
Keycloak vs XSLT (XML) mapping
Attributes set in Keycloak take precedence over the mapping specified in the XSLT.
If no attribute is set in Keycloak, the mapping will be performed based on the matches in the XSLT.
Mapping Censhare main role and domain to Keycloak users
Mapping of the main role, domain, and second domain needs to be done on the user level, i.e., for each user one by one.
For this, you need to set user attributes. Attributes are key-value pairs.
In Keycloak, go to the censhare realm
From the side navigation, select Users
Select an existing user or create a new one
Select the Attributes tab
Enter the following keys and add the respective value for each key. The values should be identical to the corresponding values in the Censhare system. Keys:
cs_main_rolecs_main_domaincs_main_domain2cs_locale: the locale which will be set to the language of the user.
cs_locale can only be synched for users already existing in Censhare, but not for the new ones.
Mapping Censhare roles and domains to Keycloak user groups
To map other roles and domains to Keycloak user groups from the Keycloak UI, you need to use Keycloak group attributes as a bridging solution. First, you need to add all affected users to the proper group and then add attributes to the group (or the other way around).
In Keycloak, go to the censhare realm, the User section and select the user.
For the user, select the Groups tab. From Available groups, select a group and click Join.
From the Keycloak side navigation, go to Groups and select the group you just assigned.
For the selected group, select the Attributes tab.
Enter the following keys and add the respective value for each key. The values should be identical to the corresponding values in the Censhare system. Keys:
cs_rolecs_domaincs_domain2
After that is set, you will also be able to see a new party_role element in the XSLT transformation. This is created by the authorization mapper.
Mapping Keycloak user groups to Censhare user groups
For this mapping, you need Censhare group ID or key.
Once you have them, do the following:
In Keycloak, go to the censhare realm, select the User section and select the user.
For the user, select the Groups tab. From Available groups, select a group and click Join.
From the Keycloak side navigation, go to Groups and select the group you just assigned.
For the selected group, select the Attributes tab.
Enter the information you copied from the Censhare system:
Recommended: enter
cs_group_keyas the attribute key and the key copied from the Admin Client as its valueNot recommended:
cs_group_idas the key and the Censhare group ID as the value