
Getting started
Follow this guide to install the Insights solution on your local machine for testing purposes.
For a local installation, you need to follow all steps. If you want to start using the Insights application in production, only follow the steps marked with PRODUCTION
Step 1 - IN CLI TOOL | LOCAL & PRODUCTION
Step 2 - IN CLI TOOL | LOCAL & PRODUCTION
Step 3 - IN KEYCLOAK | PRODUCTION
Step 4 - IN INSIGHTS WEB APP | PRODUCTION
Step 5 - IN INSIGHTS WEB APP | PRODUCTION
Step 6 - IN INSIGHTS WEB APP | PRODUCTION
Step 7 - IN ADMIN CLIENT | PRODUCTION
Important Information About Keys
Step 1: API microservice
IN CLI TOOL
To install and run the API microservice, follow the steps below.
Clone the project:
BASHgit clone git@git.censhare.com:microservices/insights-api-microservice.gitInside the folder
insights-api-microservice, generate the JAR with the command:BASHmvn clean install- In a directory of your choice, create a new folder where you want to install the server, for example:
insights-api. - Copy the file
target\insights-api-microservice-<x.x.x>.jarto the folderinsights-api. - Copy the file
\src\main\resources\application.ymlto the folderinsights-api. - Edit the copied file
application.ymland configure it to match with your database. In your CLI tool, cd into
insights-apiand start the server:BASHjava -jar insights-api-microservice-<x.x.x>.jar
Step 2: Web application
IN CLI TOOL
To install and run the web application, follow the steps below.
Clone the project:
BASHgit clone git@git.censhare.com:frontend/insights-webapp.gitIn your CLI tool, run:
BASHnpm install -g @angular/cli commandCd into
insights-webappand run:BASHnpm installStill in the
insights-webapp, run:BASHng sIn your browser, access the application using:
BASHhttp://localhost:4200
Step 3: Keycloak configuration
IN KEYCLOAK | PRODUCTION
Done by censhare IT
As a partner, you need the following information to proceed with the Insights setup:
- a public authentication key
- exact names of the partners, clients, and clusters
Step 4: Adding partners in the web app
IN INSIGHTS WEB APP | PRODUCTION
Next, you need to add partners in the web application. This can be done in the Partner tab on the left side of the GUI.
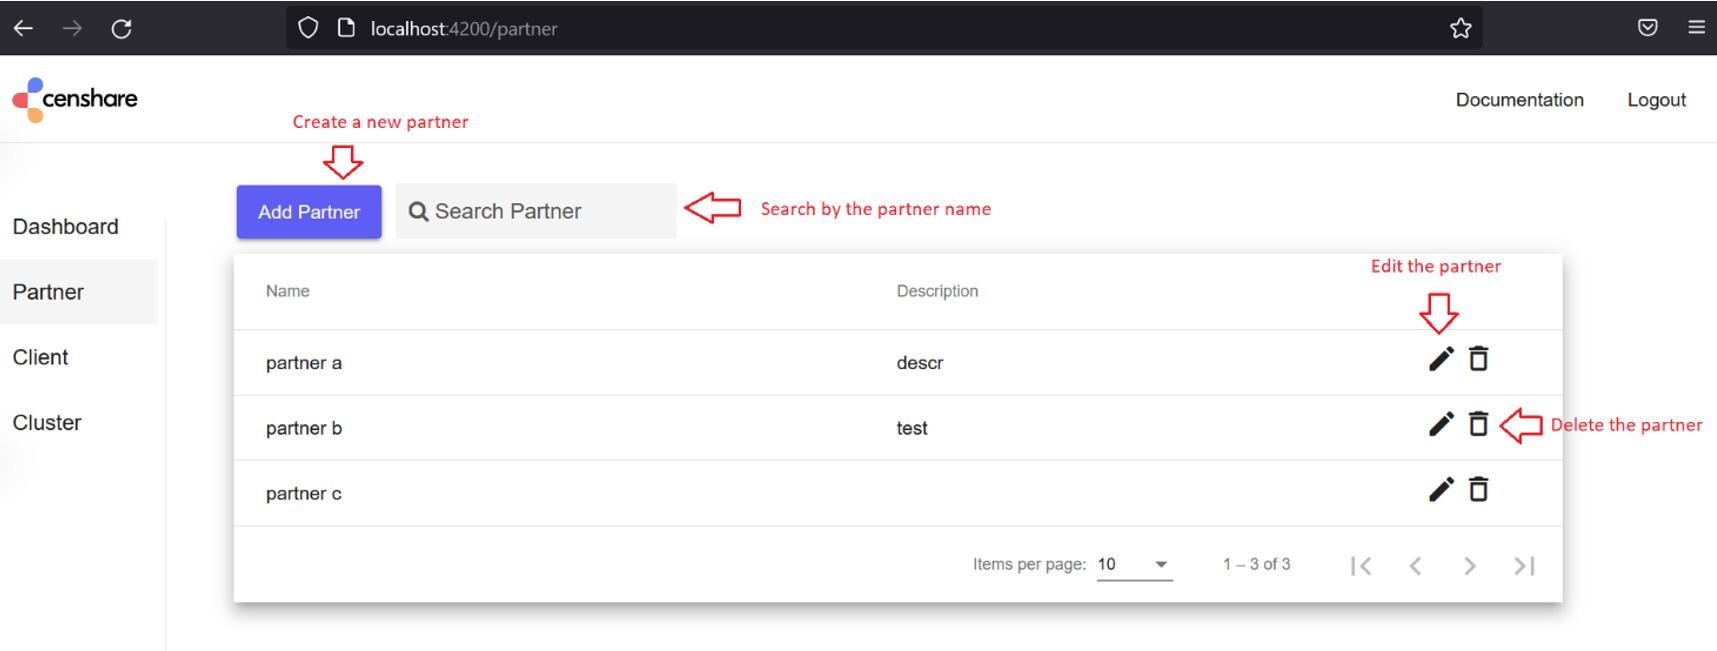
The menu allows to create, modify, and delete partners. Important things to remember:
- The partner name must be unique and match with the Keycloak group name for this partner. In case you try to add an already existing partner name, the error message “duplicate partner” appears.
- The name will be saved in lower case characters.
Warning
- If you add a new partner or modify its name in the Insights web application, you must also update the corresponding Keycloak group (and the other way around), i.e., inform the censhare IT
- If you delete a partner, all clients, clusters, servers, and metrics associated with it will also be deleted.
Step 5: Adding clients in the web app
IN INSIGHTS WEB APP | PRODUCTION
Then you need to add clients. This is necessary to add server clusters later. You can manage clients in the Client navigation tab. Before you can add a new client, you need to select the correct partner.
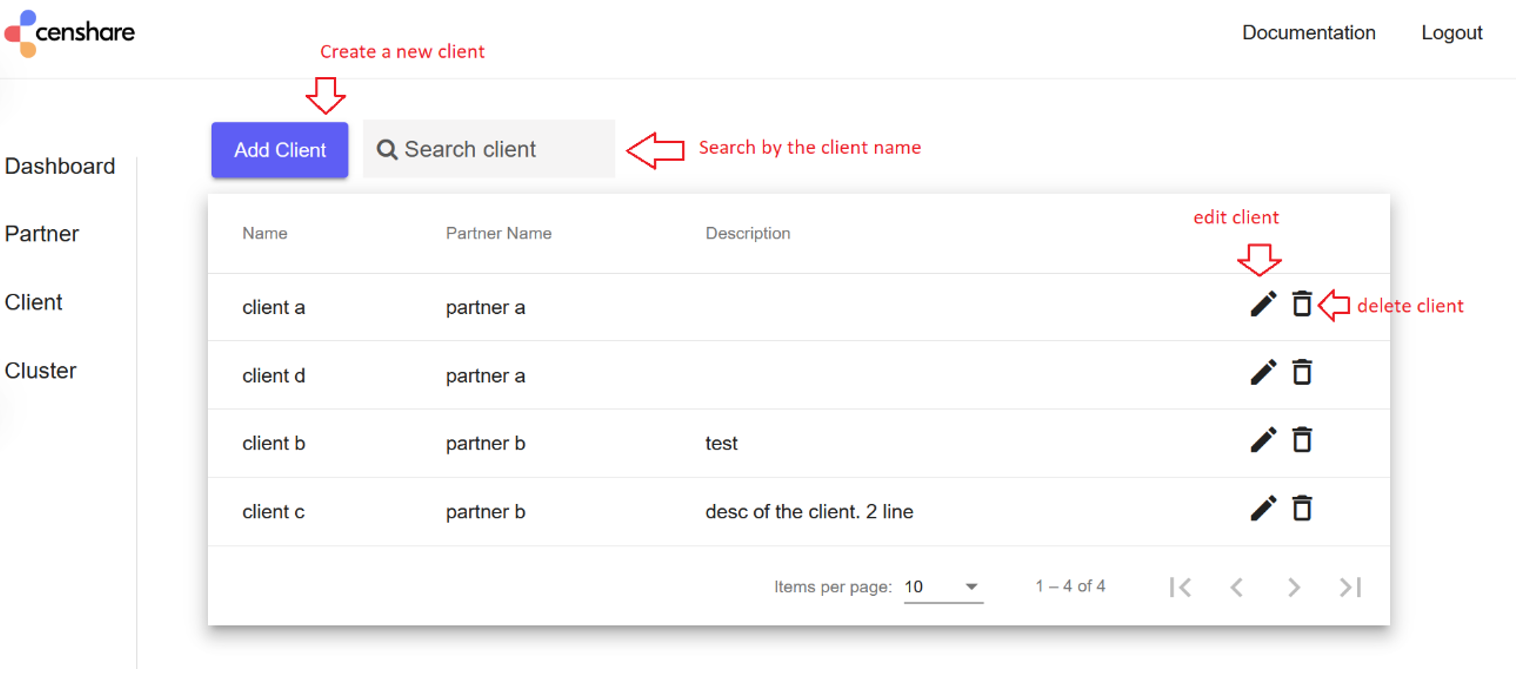
The menu allows to create, modify, and delete clients. Important things to remember:
- The client name must be unique. In case you try to add an already existing client name, the error message “duplicate client” appears.
- The name will be saved in lower case characters.
Warning
If you delete a client, all clusters, servers and metrics associated with it will also be deleted.
Step 6: Adding clusters in the web app
IN INSIGHTS WEB APP | PRODUCTION
Now you need to move to the last navigation tab on the left – Cluster – to add your server clusters.
A cluster is an aggregation of censhare Servers. The web application should replicate the same cluster structure the client has. Therefore, you need to be familiar with this structure.
Before you can add a new cluster, you need to select the correct client.
The menu allows to create, modify, delete clusters, and clean up clusters. Important things to remember:
- The cluster name must be unique. In case you try to add an already existing cluster name, the error message “duplicate cluster” appears.
- The name will be saved in lower case characters.
- Upon cluster creation, you need to generate a key pair to be used on next steps.
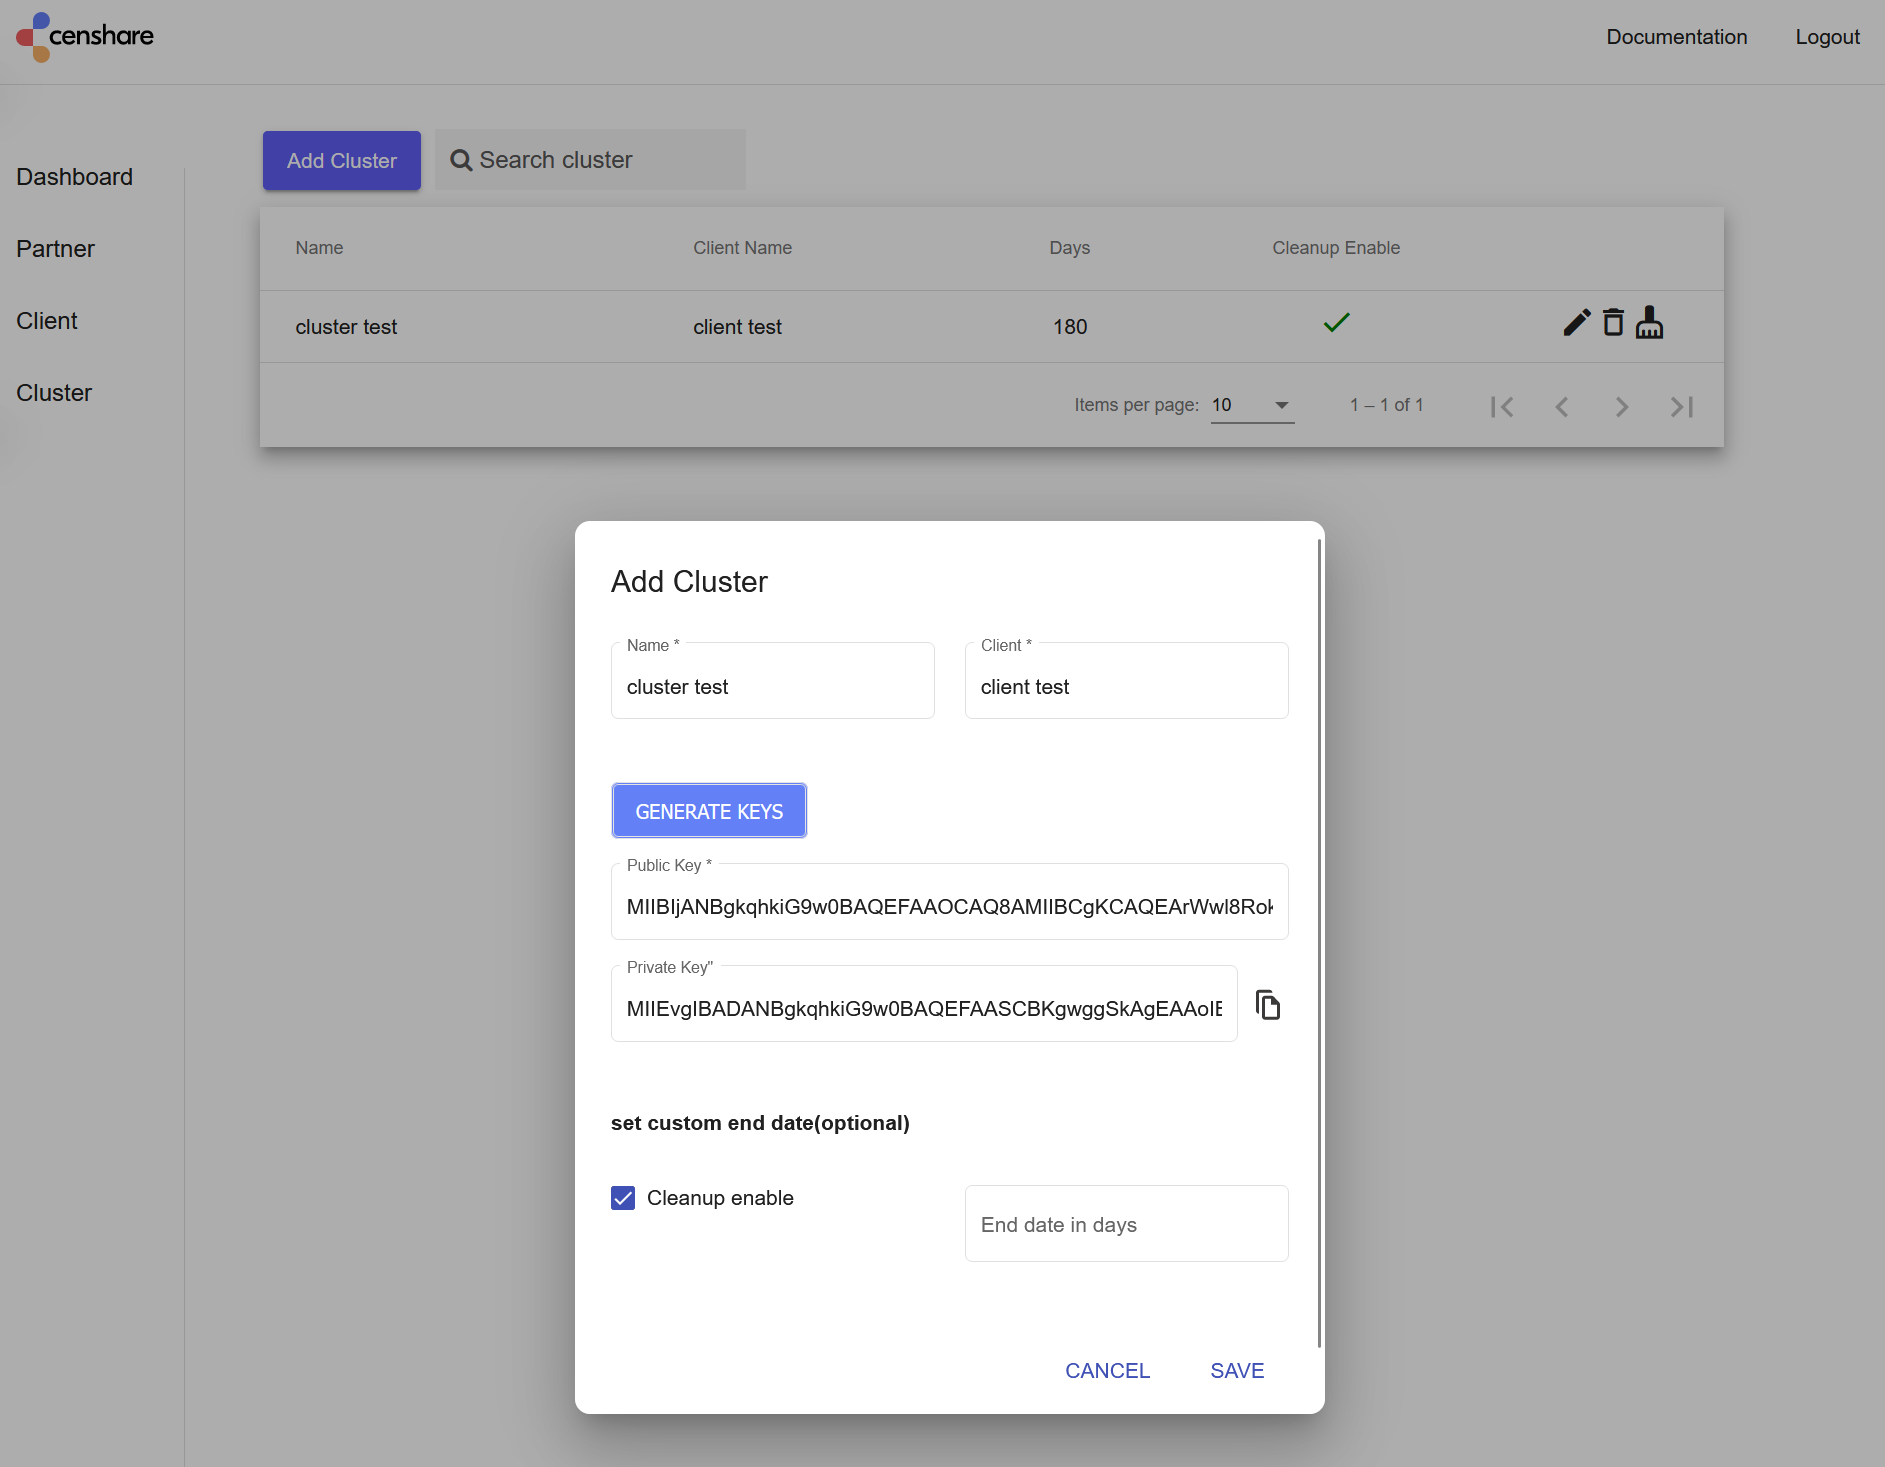
DO NOT HIT SAVE YET
Save the private key first. It won‘t be visible later and you will need to regenerate both keys. For this, in the dialogue window above, copy the private key to the clipboard or to a file on your PC.
Warning
If you delete a cluster, all servers and metrics associated with it will also be deleted.
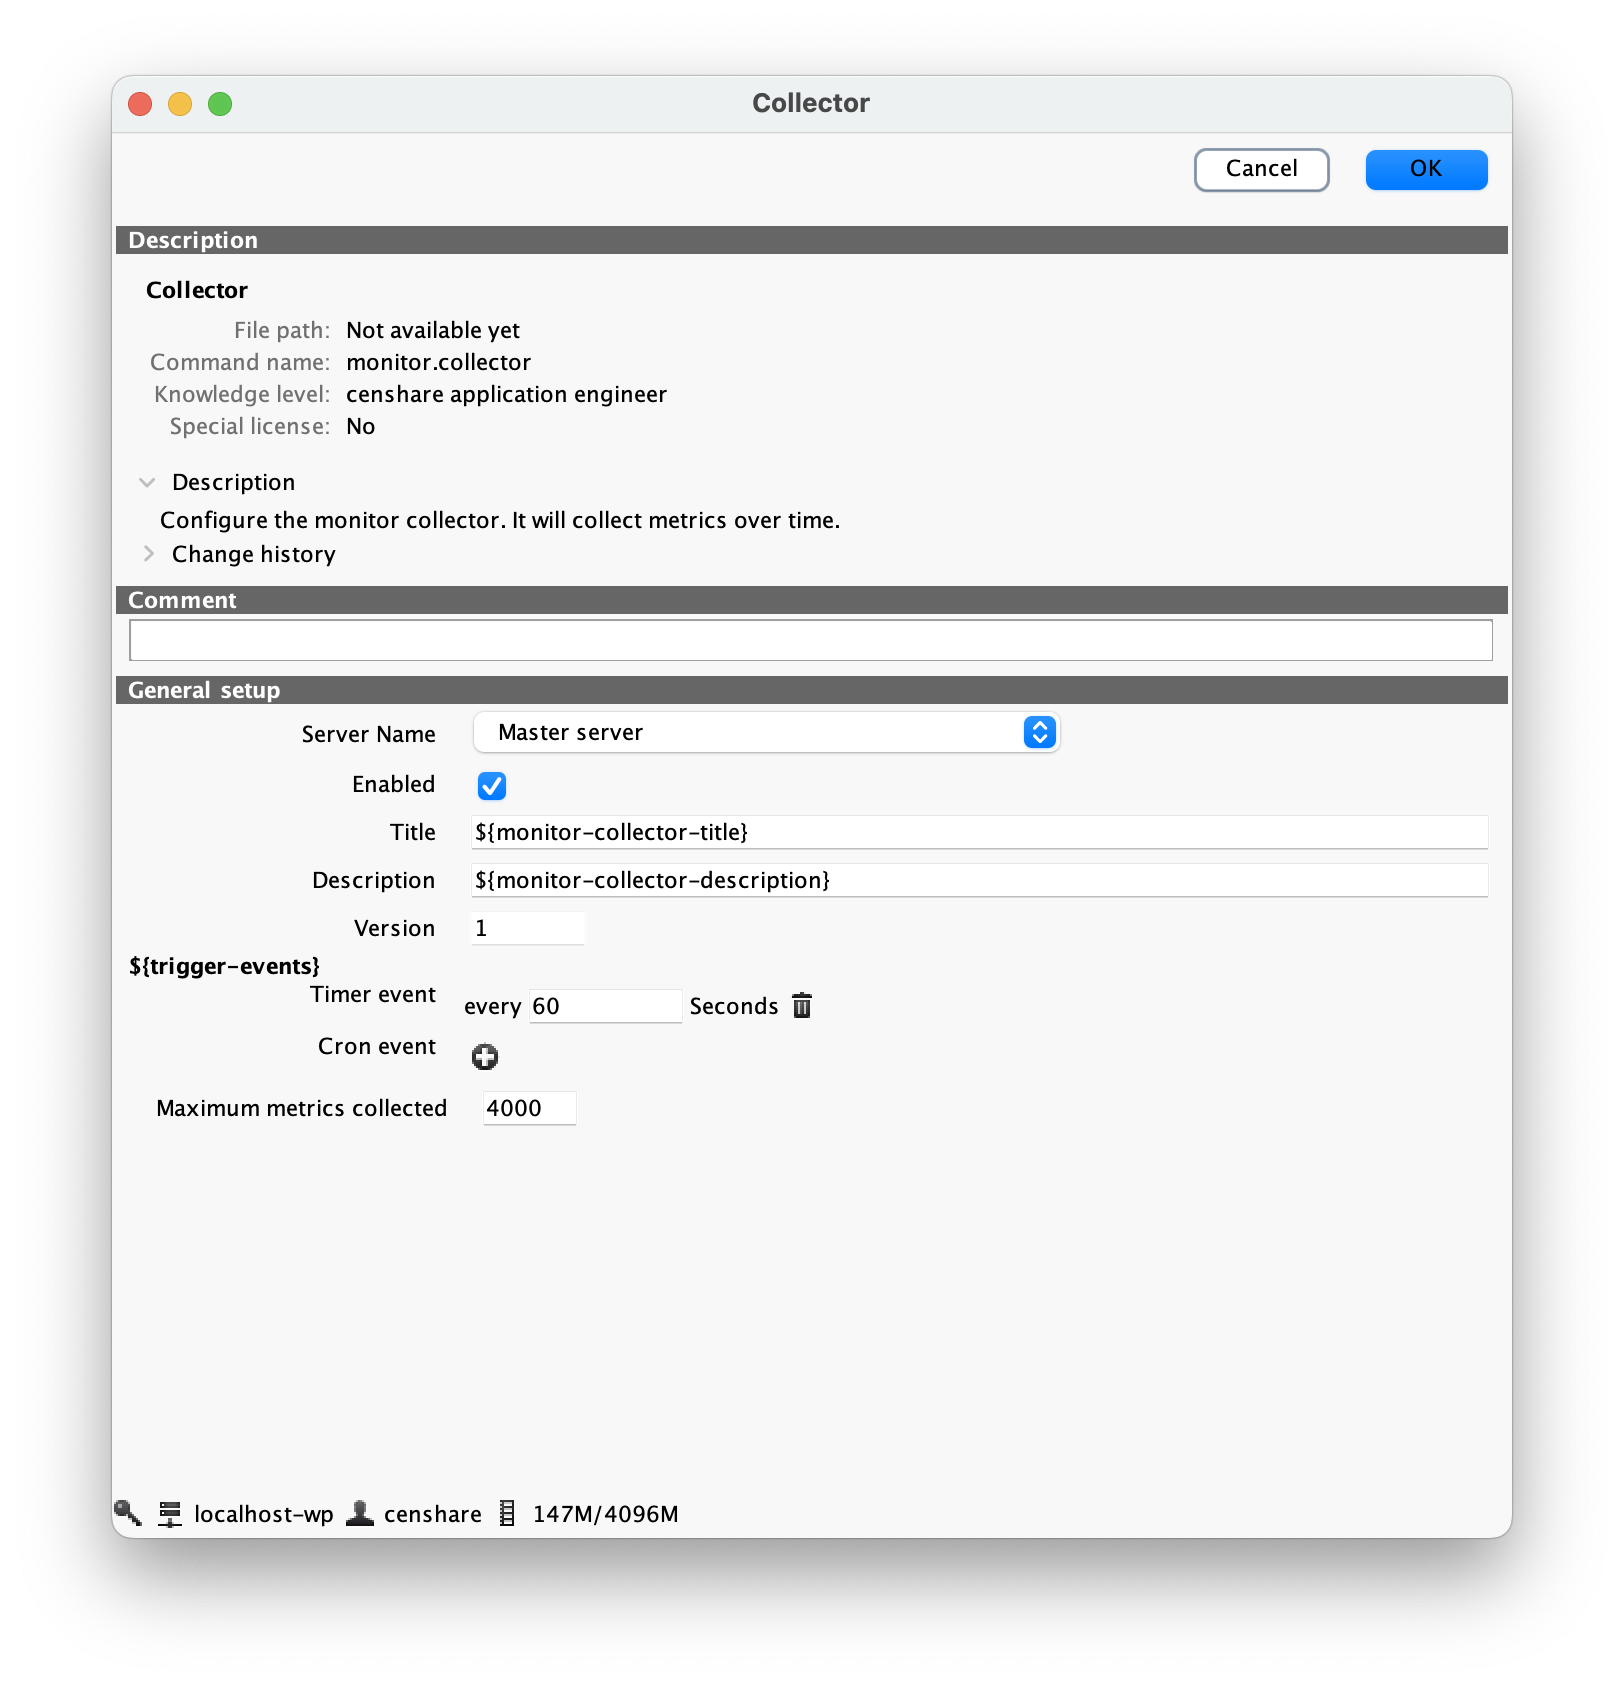
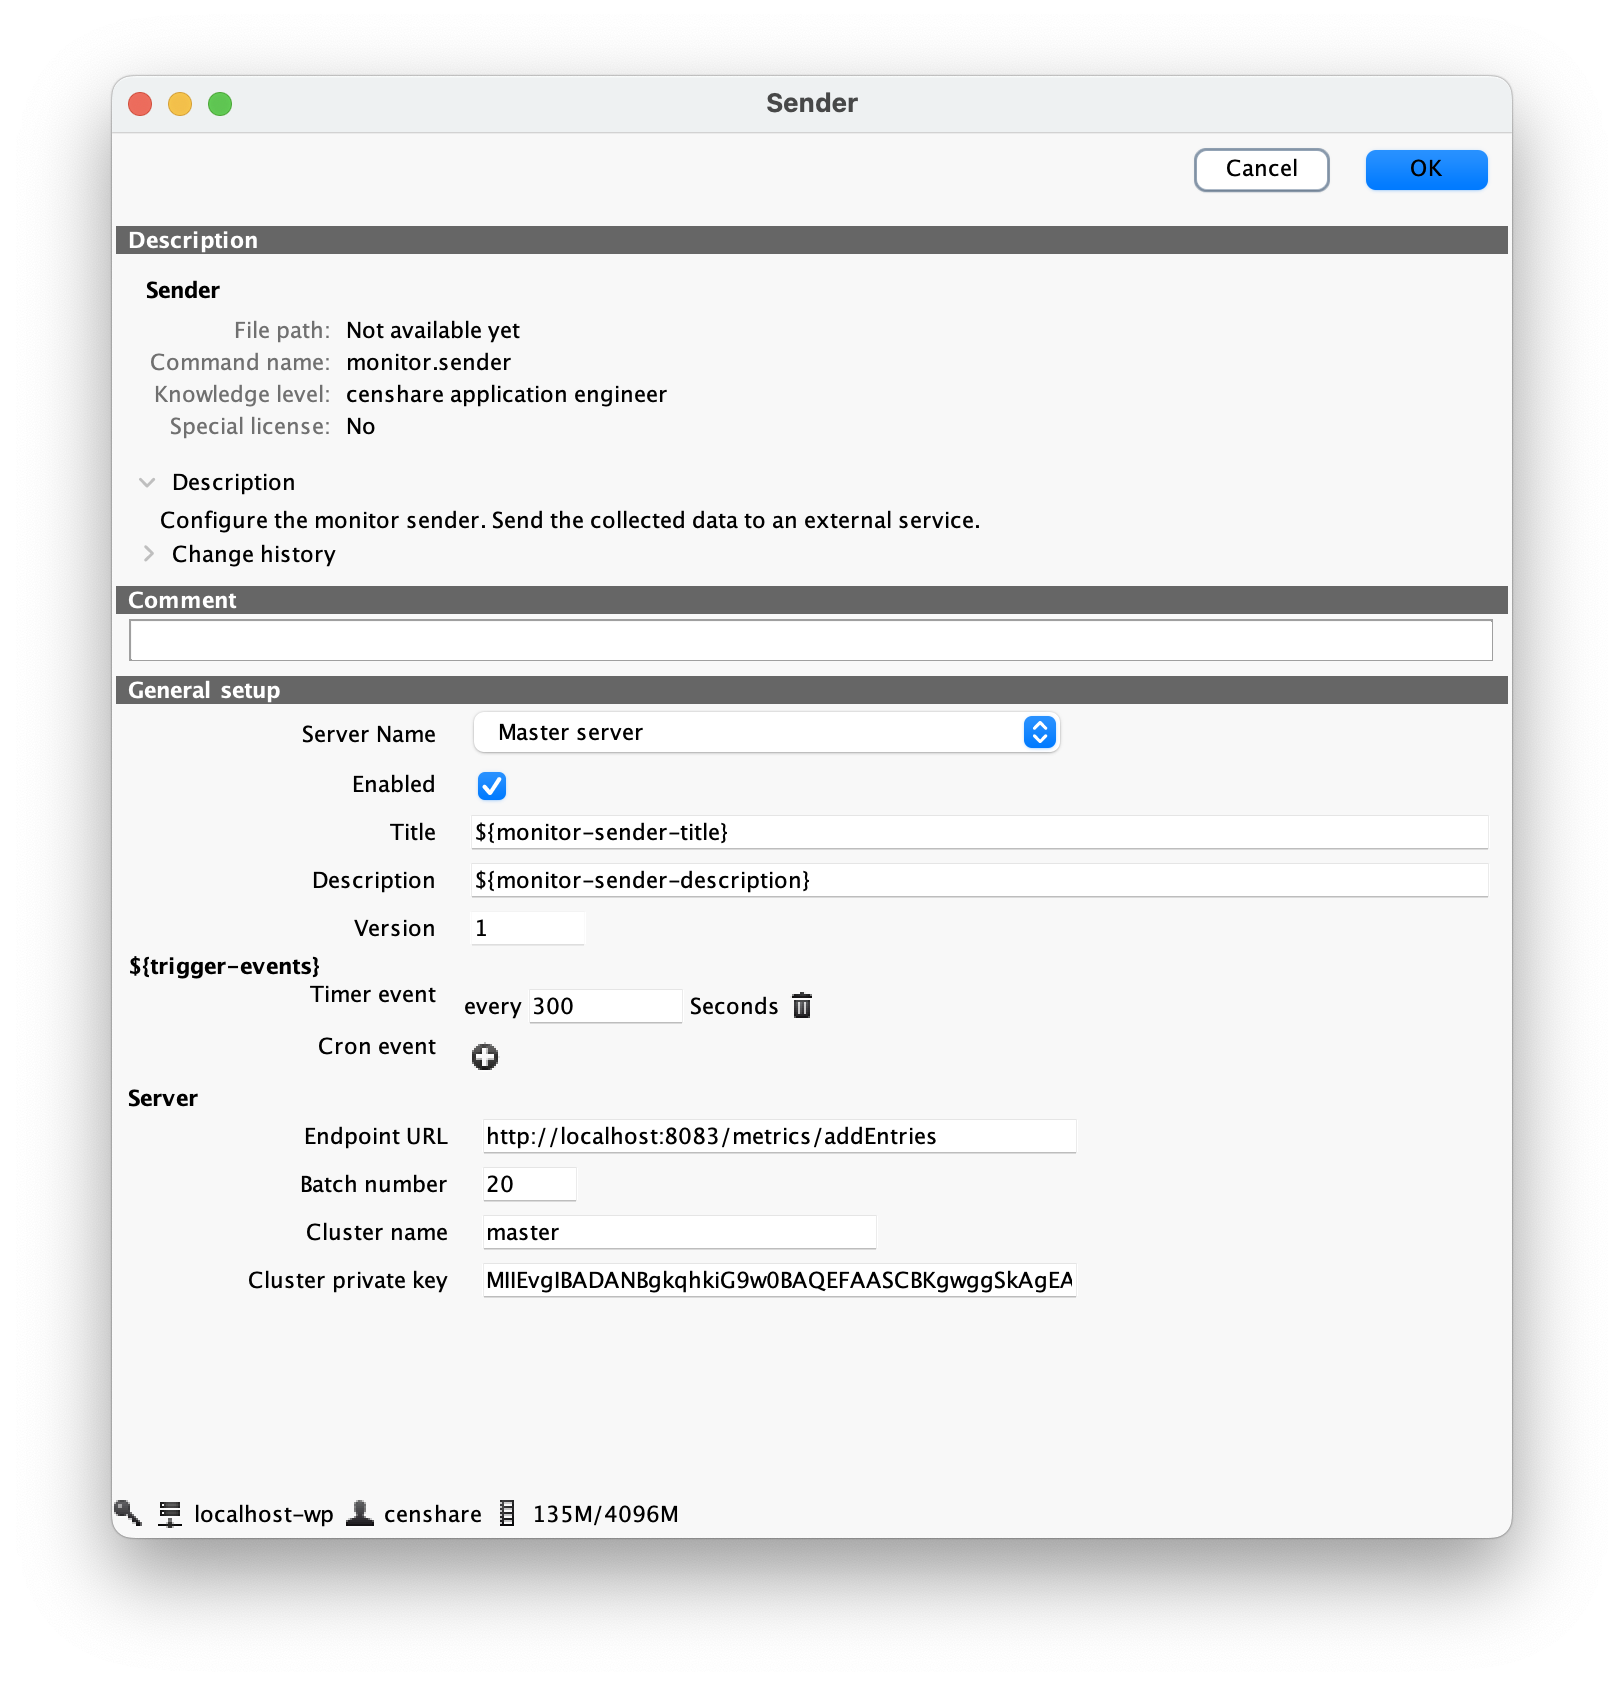
Step 7: censhare Collector and Sender
IN ADMIN CLIENT | PRODUCTION
censhare Collector and Sender are delivered as a part of the censhare Server. They are compiled at runtime. However, you need to configure them in the censhare Admin Client.
They can be found under:
- Configuration → Modules → Monitor → Collector
- Configuration → Modules → Monitor → Sender
as shown on the screenshot below:
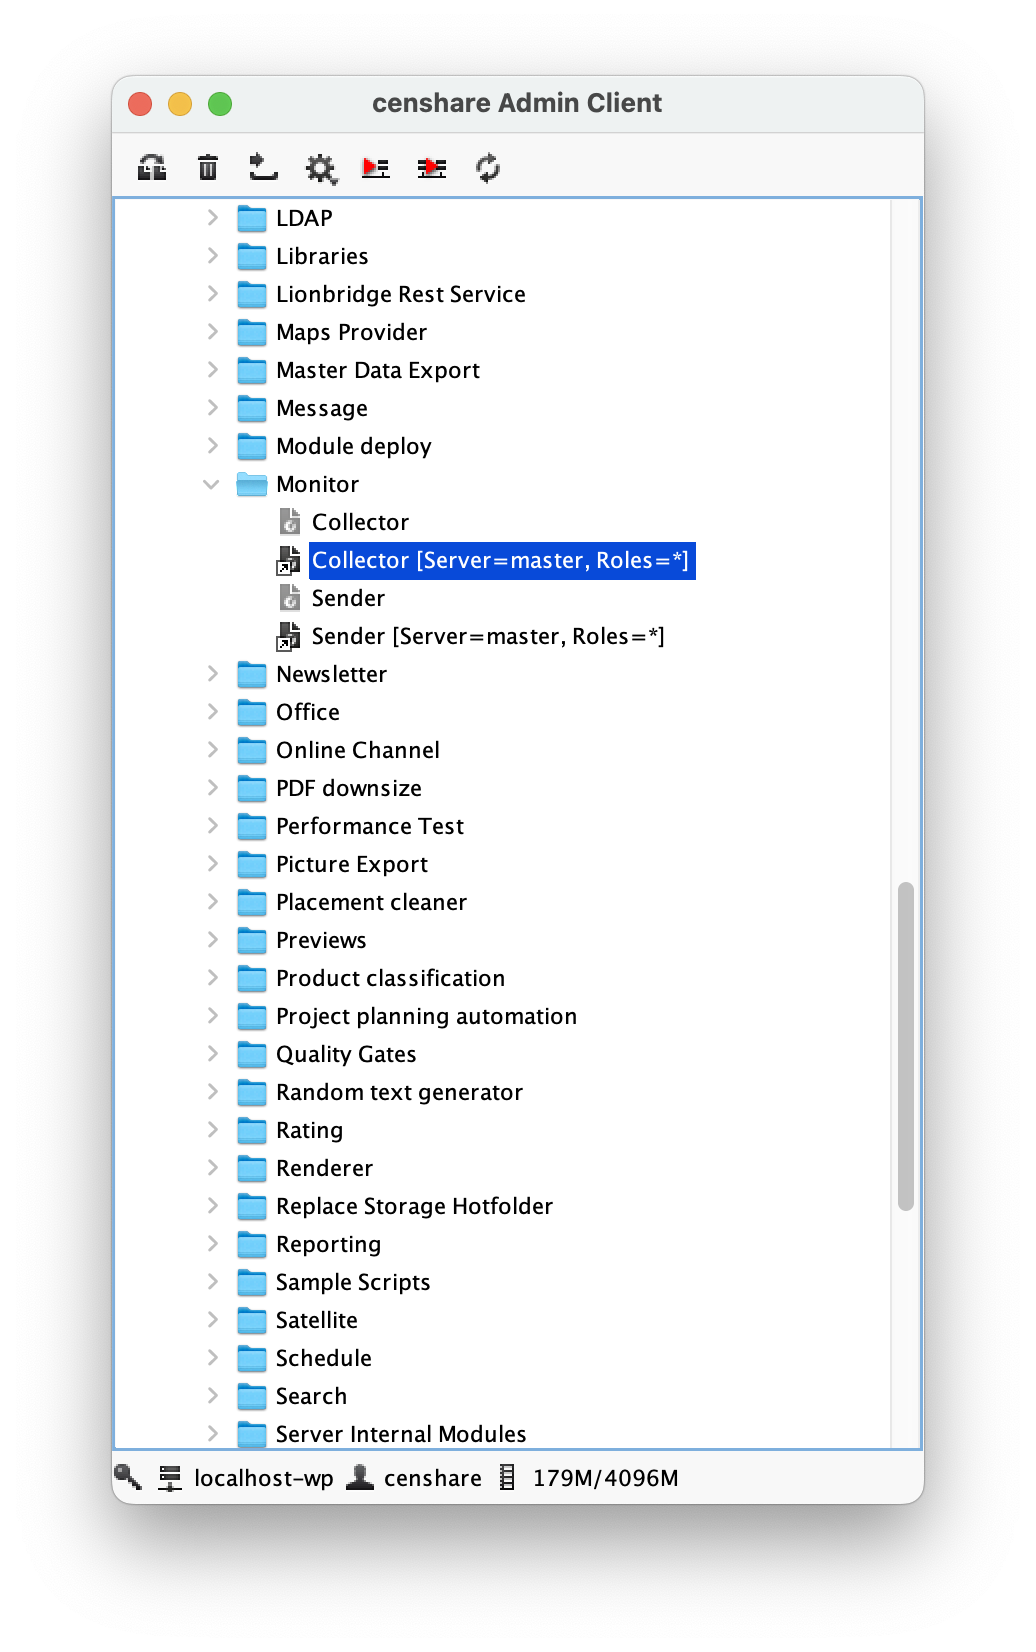
Collector
- Select the server name from the dropdown
- Check Enabled
- Add a time event (how often the data should be collected; we recommend to set it to one minute)
Sender
- Select the server name from the dropdown
- Check Enabled
- Add a time event (how often the data should be sent; we recommend to set it to five minutes)
- Enter the endpoint, which is
http://localhost:8083/metrics/addEntriesfor a local installation - Enter your private key that you generated in the web application on the previous step
Important Information About Keys
- In case you lost the private key, or you suspect the private key has been compromised, you can generate a new pair. Click the editing icon next to the cluster, regenerate the keys, copy the private key, and save the changes. Propagate the new private key to the cluster: add it to the Sender client on each server in the cluster.
You can use the same key pair on all clusters of a client:
- Generate the key pair when creating the first cluster.
- When you create the next clusters, only set the public key and leave the private key empty.