Configure asset list views
Asset list views are used to show search results or pre-configured queries in widgets. You can configure, which properties besides from the asset name display in a list view. censhare Web offers multiple standard views that are used in different contexts and for different purposes. This article describes the concept and how to customize these list views.
Introduction
The censhare Web workspace provides a customizable web frontend and user interface to retrieve and display assets and asset properties. Asset lists - and widgets that display asset lists - are a proper tool to display huge amounts of data in a condensed list view. Therefore, list views only display the essential properties of an asset, that are needed in the respective context. For custom solutions, the asset list views can be customized. This is necessary:
To display other than the default properties in a given context.
To display custom properties that are not part of the censhare standard Master data.
List view modes
The standard workspace of censhare Web contains four different view modes:.
List view
Gallery view
Column view
Relation view
Widget lists
The Table view mode of asset lists uses a table configuration. The Table view configuration is not part of this article.
The displayed properties and their order can be customized separately for each of the different view modes. For example, you can specify which data displays in which order and which location in an asset list entry. You can create custom list views for different asset types or MIME types. You can create custom lists for different user roles that show different asset details according to the permissions of the user.
Each view consists of display areas, so-called slots. All slots of a view mode define the overall layout of a view. Each slot can display one or multiple items, so-called snippets.
A snippet retrieves and outputs an asset property or an asset relation. The output can be the value of an asset property, or the name of the relation type and/or the related asset. You can also use a transformation to create the desired output. For example an icon, a red, yellow or green traffic light, or a calculated value.
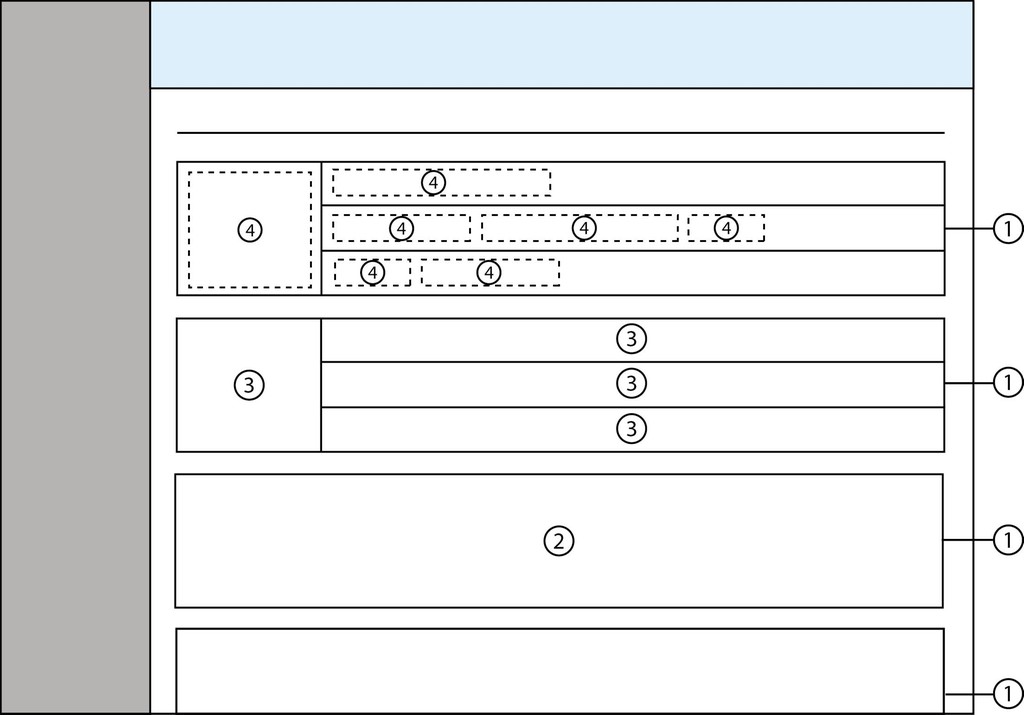
Example of an asset list view:
(1) List entries
(2) List view
(3) View slots
(4) Snippets
If multiple snippets are assigned to one slot, the snippet output displays in the order in which the snippets are assigned to the slot. If the snippet cannot retrieve any data from the asset (for example, if an asset property is not available), the snippet is skipped.
Concept
The asset list views are configured in the System asset, in the Workspace views widget. The respective Module assets are assigned in the following sequence:
Workspace views
A workspace view defines how a single asset is previewed, or how asset lists display multiple assets in the censhare Web user interface. For this purpose, the following view types are available:
The view type is stored in the View name feature of a Workspace view asset. The view types are hard-coded and cannot be changed. Values other than the view types from the list above are ignored!
Each view type is configured via View slots. The layout, number and type of slots for each view type are fixed and cannot be changed. For more details see the following sections.
A Workspace view can be applied to all asset types, or to a certain asset type and MIME type only. For this purpose, an Asset type filter and/or a MIME type filter value can be defined. Filters are notated as path and can contain wildcards. For example, the asset type filter audio.* matches all Audio assets and subtypes. Multiple filters can be added as a comma-separated list.
If Workspace views for the same asset type and/or view type exist in the System asset and in the Workspace asset, censhare uses the workspace view. Otherwise, the view that is defined in the System asset is applied.
Preview
The preview type contains only one slot that shows a preview of an asset or asset file. You can customize the previews. For more information, see Customize asset previews.
Asset List Large
The Asset List Large view consists of the following slots:
Slot name: thumbnail | Slot name: title |
Slot name: description | |
Slot name: extra |
Asset List Medium
The Asset List Medium view consists of the following slots:
Slot name: thumbnail | Slot name: title |
Slot name: description |
Asset List Small
Slot name: thumbnail | Slot name: title |
Asset Query List
Slot name: thumbnail | Slot name: title |
Slot name: description | |
Slot name: extra |
Asset Query Gallery
Slot name: preview |
Slot name: title |
Asset Query Card
Slot name: preview |
Slot name: title |
Slot name: description |
Slot name: extra |
Workspace view slots
Workspace view slots are placeholders that are arranged in a fixed layout. Each slot can display a single piece of information or a set of information about the respective asset. This can be an asset property, an asset relation, or the result of a transformation/calculation.
Within the base layout of a view type, each slot is addressed by a slot name. For example, the slot at the top right of the Asset Query List view is called title. To display anything, one or multiple Workspace view snippets must be assigned to a slot.
The following slot name values are available:
preview
thumbnail
title
description
extra
Not all slot name values are available in all views. See the list above for details.
Workspace view snippets
Workspace view snippets retrieve data from an asset and create an output that can be displayed in Workspace view slot. Optionally, a snippet can apply a transformation or calculation and output the result. For example, count the number of likes that an image received and output this number.
Not every feature of an asset is available in every asset type. As a result, you can specify a condition in the template before actually showing it. Only if this condition is fulfilled will the HTML be shown.
To access data outside of the asset you have to use a macro. Macros use XPATH to retrieve an asset property, or XSLT for more complex transformations.
Create reusable macros using Data source assets. This increases clarity and simplifies changes.
Customize views
To customize individual slots or snippets, you must create a Resource replace variant from the default view. A Resource replace variant can be applied to an asset type or MIME type using the respective filter.
To create a custom view, do the following:
1. Create a Workspace view
Open the System asset and go to the Workspace views widget in the Overview tab.
To customize a standard view, open the desired Workspace view asset and create a Resource replace variant. Otherwise, click
 and create a new Workspace view asset from scratch.
Open the new Workspace view asset.
Edit the Resource properties widget and enter a resource key.
To apply the view only to a given asset type and/or MIME type, enter the filter terms in the respective fields.
If you created a new Workspace view asset from scratch, edit the Workspace view properties widget, and enter the desired View name. Only values from the Workspace views list are allowed!
Save your changes.
2. Add the Workspace view slots
If you created a Resource replace variant, remove all assigned view slots from the View slots widget.
Click
in the View slots widget and create new Workspace view slot assets.In each Workspace view slot, edit the View slot properties widget and enter a Slot name. Be aware that not all slot types are available in all view types. For details, see the list above.
Save your changes to each Workspace view slot, and to the Workspace view.
3. Add the Snippets
In each Workspace view slot, add and configure the desired snippets as follows:
Open the desired Workspace view slot asset.
In the Snippets widget, click
.Select an existing snippet, or create a new snippet from scratch.
The output values display in the slot in the selected order. To put the snippets in the desired order, use the
 and
and  buttons.
Save your changes.
4. Configure snippets
The Master file of the Workspace view snippet stores the template that retrieves the asset data (asset properties, asset relations) and creates the output. There are different ways to create a template.
Important
As of censhare 2019.3, the implementation if asset list views and asset relation widget views changed. To ensure a high performance and limit the server load, only the standard traits are available the frontend by default. If your want to extend your asset views to display custom traits, these must be explicitly declared before you can access them in a Snippet. For more information see the Declare custom traits section at the end of this article.
AngularJS expressions
The simplest usage of a snippet template retrieves and outputs an asset property using an AngularJS expression. The following example outputs an asset property as an inline HTML element:
inline:<span>{{data.traits.[TRAIT_NAME].[PROPERTY_NAME]}}</span>The AgularJS expression accesses the censhare logic model. It provides asset data in a JSON structure. The parts of the expression refer to the following elements:
Expression part | Description |
|---|---|
data | Accesses the data of the context asset. In asset list views, the context is the current list item. |
traits | Accesses the available traits of the context asset. (1) |
[TRAIT_KEY] | A trait comprises a set properties. (2) |
[PROPERTY_KEY] | References the asset property. (3) |
(1) The available traits are limited as of censhare 2019.3. You must declare custom traits to access them.
(2) To look up a trait key, go to the censhare Admin Client, open the Master data/Features table, and in the definition of the desired feature look for the Trait key.
(3) To look up a property key, go to the censhare Admin Client, open the Master data/Features table, and in the definition of the desired feature look for the Property key.
To output a property that does not exist in all assets, use a conditional expression in your template. The following example checks whether the asset has a master file and shows the file size:
condition:data | csStorageItemFilter, inline:<span>{{(data | csStorageItemFilter).traits.file_meta_data.fileLength | bytes}}</span>The AngularJS condition command evaluates the following condition. To the expression that creates the output, the csStorageItemFilter check is added. If the context asset has a master file, the expression is rendered (trait key: file_meta_data, and property key: fileLength). The result is passed via a pipe to be formatted as bytes. Otherwise, the expression is skipped and nothing is output.
Metdata directives
The censhare metadata directives provide modules that use a set of AngularJS directives. For more information, see censhare Metadata directives. To use a directive, you must declare the associated module in the snippet. To do this, use the Snippet dependency. For example, Snippet dependency=csImageAssetPreview. This directive displays a preview image of an asset. It is used, for example, in the snippet asset "Snippet Default Asset Thumbnail" ("Name of Snippet"="csDefaultAssetThumbnailSnippet"). This is connected via the "Slot Thumbnail" asset with the "View Asset View Query List" view asset. The name of the directive and the module do not need to match.
A snippet template that uses a censhare metadata directive, looks as follows:
inline:<cs-image-asset-preview asset="data" cs-no-zoom="true"/>Macros
Macros expand the data that you can use in a snippet template. For example, a macro can search all child-assets of an Issue and calculate the number of planned layouts. The result is output in a snippet in the parent Issue.
To define a macro, do the following:or a macro is "Module/macro".
Create a new Module / Macro asset.
Enter a Resource key.
Edit the Properties widget and select the Type:
Groovy: Select this value to create a Groovy script macro. Go to the Editor tab, select Groovy from the drop-down, and click CREATE RULE to add the Master file.
User interface: Select this value to create a macro rule based on a logical expression. Go to the Editor tab, select User interface from the drop-down, and click CREATE RULE to open the editor.
XSLT: Select this value to create an XSLT macro. Go to the Editor tab, select XSLT from the drop-down, and click CREATE RULE to add the Master file.
XPath: Select this value to create a macro with an XPath expression. This type does not require a Master file. Enter the desired XPath expression directly in the Expression (XPath) field in the dialog. For example:
/asset/*/*/asset_feature[@feature='censhare:address.first-name']CODEThis expression retrieves the first name of the address.
Enter a Result identifier. The Result identifier is necessary to access the macro output in a Snippet.
Open the Snippet in which you want to use the Macro.
In the Overview tab, in the Macro widget, click
 and add the Macro that you created. This creates a Macro reference and declares the macro in the snippet.
In the snippet template you can now access the macro using the Result identifier of the macro. For example:
inline:<span>First name from macro: {{data.aspects.macro.firstName.asset_feature.value_string}}</span>CODE
Data sources
Data sources encapsulate the access to data in censhare. This makes the code clearer and easier to reuse. To create a Data source, do the following:
Create a new Module / Data source asset.
Enter a Resource key. The resource key is required to declare the data source in a macro.
Add a Data source name. The Data source name is required to address the data source in the macro code.
Note: This must be done in the censhare Client!
To retrieve the data you can either use an XPATH expression or an XSLT snippet:
To add an XPATH expression, open the Data source in the censhare Client, add a Data source expression (XPath) feature, and enter the XPath expression. For example:
asset/cs:child-rel()[@key = 'user.author.']CODETo add an XSLT snippet, edit the Data source in the censhare Client, and add the snippet in the dialog. The following example retrieves the first name of an address:
<xsl:stylesheet xmlns:xsl="http://www.w3.org/1999/XSL/Transform"
		xmlns:xs="http://www.w3.org/2001/XMLSchema"
		xmlns:xd="http://www.oxygenxml.com/ns/doc/xsl"
		xmlns:xi="http://www.w3.org/2001/XInclude"
		xmlns:fn= "http://www.w3.org/2005/xpath-functions"
		xmlns:cs="http://www.censhare.com/xml/3.0.0/xpath-functions"
		xmlns:map="http://ns.censhare.de/mapping"
		xmlns:temp="http://ns.censhare.de/elements"
		xmlns:func="http://ns.censhare.de/functions"
		exclude-result-prefixes="xs xd fn xi cs map temp func" version="2.0">

<xsl:output indent="yes" method="xml" omit-xml-declaration="no" encoding="UTF-8"/>

	<xsl:template match="/">
		<xsl:value-of select="asset/*/*/asset_feature[@feature= 'censhare:address.first-
			name']/@value_string"/>
	</xsl:template>
</xsl:stylesheet>
CODE
To ingest the data source in a macro, you must declare it in the macro asset. To do this, edit the Properties widget of the Macro, and in the Data source reference field, select the desired Data source asset.
In the macro, you can access the data source as follows (XSLT example):
<xsl:stylesheet xmlns:xsl="http://www.w3.org/1999/XSL/Transform" xmlns:xs="http://www.w3.org/2001/XMLSchema" xmlns:xd="http://www.oxygenxml.com/ns/doc/xsl" xmlns:xi="http://www.w3.org/2001/XInclude" xmlns:fn="http://www.w3.org/2005/xpath-functions" xmlns:cs="http://www.censhare.com/xml/3.0.0/xpath-functions" xmlns:map="http://ns.censhare.de/mapping" xmlns:temp="http://ns.censhare.de/elements" xmlns:func="http://ns.censhare.de/functions" exclude-result-prefixes="xs xd fn xi cs map temp func" version="2.0"> <xsl:output indent="yes" method="xml" omit-xml-declaration="no" encoding="UTF-8"/> <xsl:param name="csExample" as="element()*" tunnel="yes"/> <xsl:template match="/"> <xsl:value-of select="$csExample"/> </xsl:template> </xsl:stylesheet>CODENotes(1) The <xsl:param/> element defines a a global variable csExample that contains a list of element nodes. The tunnel attribute must be set to "yes" to pass the parameter from the template recursively to every other template that is queried.
(2) The <xsl:value-of select="$csExample"/> element accesses the data source. The value of the select attibute ($csExample) references the Data source name of the data source.
Declare custom traits
If you want to add asset properties from your custom traits to a Workspace view, you must declare these traits before you can access them in a Workspace view snippet. The available traits are declared in two Transformations that are part of the censhare standard product.
The following standard traits are declared by default:
'access_rights', 'checked_out', 'created', 'default', 'display', 'domain', 'facebook', 'file_meta_data', 'ids', 'modified', 'resource_asset', 'resource_planning', 'state', 'type', 'twitter', 'usage_rights', 'versioning', 'workflow', 'youtube'To declare a custom trait, do the following:
In censhare Web, open the Detailed search and go to the Advanced tab.
In the Resource key field, enter censhare:cs5.query.asset.listWithRelationInfo.
The search shows one result. Open the asset and go to the Editor tab.
In the XSLT snippet, look for the global variables, and there look for the <variables name=addedTraits/> element.
In the <variables name=addedTraits/> element, add your custom traits to the select attribute.
Save your changes.
Open a new Detailed search, and in the Advanced tab, in the Resource key field, enter censhare:cs5.query.asset.list.
Repeat the steps above to add your custom traits.
Result
Asset list views display your custom data.
Content
Related articles
-
Page:
-
Page:
-
Page:
-
Page:
-
Page:
-
Page:
-
Page:
-
Page:
-
Page:
-
Page:
-
Page:
-
Page:
-
Page:
-
Page:
-
Page: