Overview
The Bulk Replace feature extends the existing drag-and-drop replace workflow of the Censhare Client to multiple assets at once. Instead of replacing the master storage item of one asset at a time, you can do it now in a single operation:
-
Select several assets.
-
Drop the matching number of files onto the selection
-
Replace all of them.
The system automatically pairs each dropped file with one of the selected assets based on file name similarity and file type compatibility. Then, it shows a preview dialog where you can review and adjust the assignments before executing the replacement.
Why this feature matters
An editorial workflow may look like this:
-
You export a batch of assets from Censhare to your local file system. For example:
-
a dozen product images that need retouching
-
a set of InDesign documents that go out to an external agency
-
a group of text files that must be translated
-
-
The files are edited, retouched, translated, or otherwise processed outside of Censhare.
-
The updated files come back.
-
The original assets must be updated with the new master storage files.
Before this feature, step 4 had to be performed one asset at a time:
-
Locate each asset
-
Drag its updated file onto it individually
-
Confirm the replacement.
This a tedious and error-prone process when dozens of files are involved.
With Bulk Replace, you can now complete the step of updating the assets with the changed master files in a single gesture:
-
Select all the assets that have been originally exported.
-
Drag the entire set of updated files from the Finder/Explorer onto the selection.
-
Confirm the auto-matched pairings in the preview dialog.
-
Click Replace.
-
All master storage items are updated in one operation.
When is Bulk Replace triggered
The Bulk Replace workflow starts automatically when all of the following conditions are true:
|
Condition |
Required Value |
|---|---|
|
Files dropped onto the Censhare Client |
2 or more |
|
Selected assets in the query list |
2 or more |
|
Number of files |
Equals the number of selected assets |
|
Dropped files |
All within the configured size limit |
If the number of files does not match the number of selected assets, the standard import dialog opens instead. This preserves the existing behavior for use cases where you actually want to import new assets rather than replace existing ones.
Special cases
|
Scenario |
What Happens |
|---|---|
|
You drop exactly 1 file. |
Standard single-file replace dialog is shown. This happens regardless of how many assets are selected (unchanged behavior). |
|
You drop files without an asset selection. |
Standard import dialog is shown (unchanged behavior). |
|
You drop N files onto M selected assets (N ≠ M) |
Standard import dialog is shown (unchanged behavior). |
|
You drop N files onto N selected assets |
The new Bulk Replace dialog opens. |
How automatic matching is working
When the Bulk Replace workflow is triggered, each selected asset is paired with one of the dropped files before the preview dialog appears. The matching is based on a fuzzy, two-phase algorithm that combines file name similarity with file type (MIME type) compatibility.
Name normalization
Normalization is important because the dropped files have typically been exported from Censhare in a previous step.
Asset names can have characters which are not valid in file names on the operating system, or that are considered unsafe. During export all invalid characters in the asset name are replaced with spaces, underscores, or similar substitutes.
Without normalization, an asset named Invoice <1>/final would no longer match its exported file Invoice _1__final.pdf on return, even though they refer to the same content.
To bridge this gap, both asset names and file names are normalized before they are compared, so that minor differences in spelling or formatting do not prevent a match.
The normalization is doing the following:
-
Convert names to lowercase
-
Remove accents and diacritics, for example,
é→e. -
Replace punctuation and symbols with spaces.
-
Collapse consecutive whitespace to a single space.
As a result, names such as "Invoice #1 (final).pdf", "Invoice_1_final.pdf", and "invoice 1 final.pdf" are considered as equivalent.
Two-Phase matching
There are two basic matching rules:
-
Each file can only be assigned to one asset.
-
Exact full-name matches always win over fallback matches that ignore file extensions.
There are two phases of matching:
-
Full name + compatible file type: This is the preferred match.
-
The asset name and the dropped file name (including extension) match after normalization.
-
The file's MIME type is compatible with the asset.
-
-
Base name + compatible file type: This is used if the full name does not match.
-
The file extension is stripped from both the asset name.
-
If file name has a dot present and the suffix contains no whitespace, the extension is also stripped.
-
The two base names must now match.
-
The file's MIME type is compatible with the asset.
-
File type (MIME) compatibility is a precondition in both phases: A file is never auto-matched to an asset whose file type does not match.
Assets that find no file name to partner with, remain unmatched. They appear in the Pending section of the preview dialog, together with any dropped files that have been not consumed by a match.
File type compatibility
-
If the asset has no existing master storage item, any file type is accepted. The dropped file becomes the new master.
-
If the asset already has a master storage item, the dropped file's MIME type must exactly match the existing master's MIME type.
-
Files with an incompatible MIME type are never matched automatically, even if the name matches. Both, the asset and the file then appear separately in the Pending section. You can still pair them manually if required. For more information, see Manual adjustment via Drag and Drop below.
The preview dialog
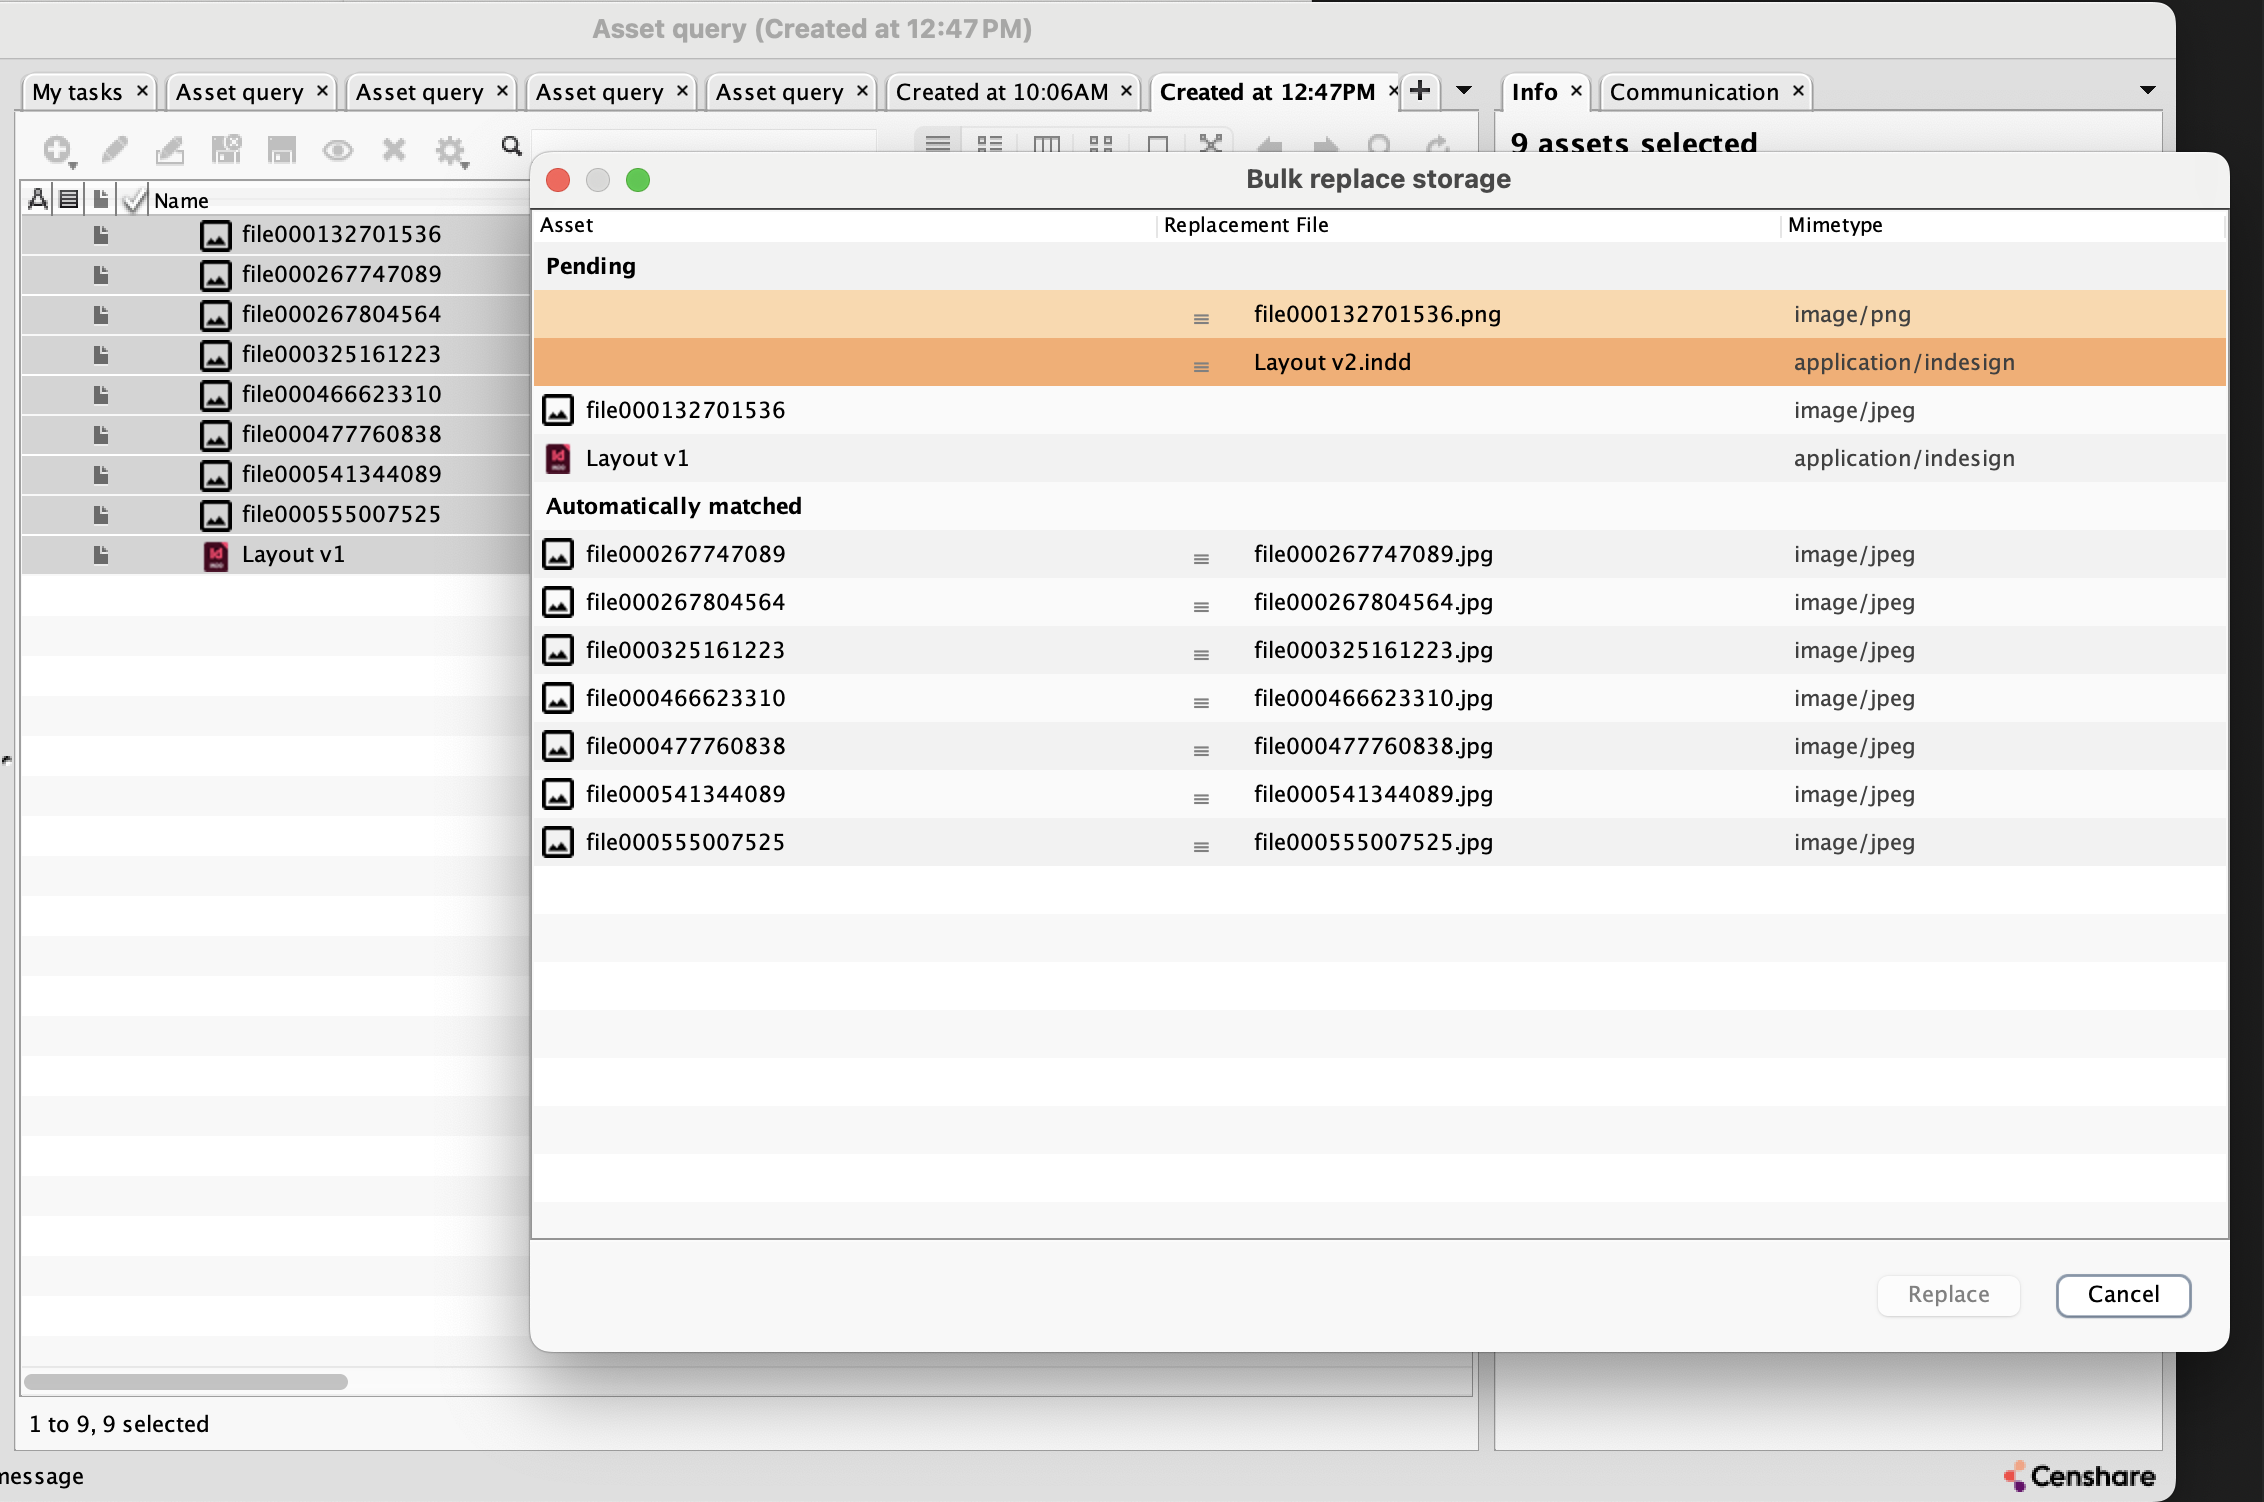
After matching, the Bulk replace storage dialog opens. It shows all selected assets and all dropped files in a single scrollable table with three columns:
|
Column |
Content |
|---|---|
|
Asset |
Asset name with a 16 px asset icon |
|
Replacement file |
File name with a drag handle (≡) for reordering |
|
Mimetype |
The MIME type of the file, or of the asset if no file is assigned |
The table is organized into two visual sections, each marked by a bold section header row:
Pending section
Highlighted with an amber background, the Pending section lists all rows that are not ready for replacement:
-
Dropped files that were not consumed by any match: The rows contain no asset on the left side.
-
Selected assets for which no compatible file has been found: The rows contain no file on the right side.
Files which names match with an asset but have incompatible file type are not paired automatically. Both, asset and the file appear here as separate rows. You can assign files manually by using drag-and-drop.
Automatically matched section
The Automatically matched section shows all pairs which were matched automatically and that have compatible file types. After this initial matching, all pairs in the Automatically matched section are ready to be replaced.
Manual adjustment via Drag and Drop
If the result of the automatic matching does not fit to you, you can rearrange file assignments directly in the dialog:
-
Locate the file which you want to move in the Replacement File column.
-
Click and hold the drag handle (the three horizontal lines
≡) on the left side of the file cell. Dragging only starts from the handle. If you click anywhere else in the row, the drag is not initiated. -
Drag the file to the row that contains the target asset.
-
Release the mouse button to drop.
What happens when you drop a file onto another row:
-
The file is moved to the target row.
-
The file previously assigned to the target row is swapped back to the source row: The assignments are exchanged, not overwritten.
-
A manual assignment made via drag-and-drop is always accepted as-is. The system does not re-check whether the file name or the MIME type actually match the target asset. It trusts your decision.
-
The dialog updates instantly to reflect the new file assignments, and the new MIME type is shown in the MIME type column.
-
The target row with the asset that received the file loses its amber highlight. It is now considered a valid assignment regardless of name or type match.
The left column with the assets is fixed and cannot be reordered: You move files onto assets, not the other way around.
Executing the replacement
Once, you are satisfied with the pairings:
-
Click Replace (the default button, also triggered by Enter). Otherwise, click Cancel to abort.
-
All assigned pairs are replaced in a single batch operation.
The Replace button is enabled only when every selected asset has a file assigned.
All files are assigned when the Pending section no longer contains any highlighted (Amber) asset rows. As long as at least one asset is still waiting for a file, the button stays disabled. Use drag-and-drop (see Manual adjustment via Drag and Drop) to assign files to the remaining assets,
Internally, every affected asset walks through the full change workflow:
-
check-out
-
replace
-
check-in
This same process as for any regular single-asset storage replacement. To keep the operation efficient, however, all assets are processed together and only two server round-trips are required:
-
Check-out and replace transaction: In the first round-trip, every selected asset is first checked out and then its master storage item is replaced with the assigned file. Check-out and storage replacement are combined into a single server transaction. So, either all assets are successfully checked out and replaced, or none of them.
-
Check-in transaction: In the second round-trip, every affected asset is checked in, committing the new master storage as a regular asset content version.
Both transactions are atomic within themselves. If the check-in step fails for any reason, all check-outs opened by the previous step are automatically aborted in a third transaction: No asset is left in a checked-out state.
Once you click Replace, the Bulk Replace dialog closes immediately and the operation continues in the background. Progress is not shown in a separate pop-up window. Instead, look at the status bar at the bottom of the parent window. Typically, this is the asset query window from which you triggered the drop. Once the status is gone, the operation has completed.
Files with an incompatible MIME type
If you manually assigne a file which MIME type does not match the asset's existing master storage, the replacement is still performed. The system trusts the manual override.
You are responsible to ensure that the dropped files match with their target assets!
Cancelling
To abort the operation and leave all assets unchanged, click Cancel or close the dialog window. No replacement is performed, and no server transaction is sent.
Permissions
To use Bulk Replace, you must have the respective permission key in your user role. The permission is checked when the replace action is executed. Without this permission, the operation fails with an error. No asset is changed.
For admins: Set permission
Users must have the replace-storage permission key added to their role to execute.
For more information, see:
Good to know
-
Bulk Replace is available in the Censhare Client (Java) only. Censhare Web is not affected by this change.
-
The feature requires the number of dropped files to be exactly equal to the number of selected assets. There is currently no way to trigger Bulk Replace with an unequal count.
-
Files exceeding the configured file size limit are filtered out before the count check which may cause the flow to fall back to the standard import dialog. If files are still not yet counted, contact your system administrator if a system-wide maximum file size has been defined.
For admins: check file size limit
The Maximum file size (bytes) is defined in the system asset and applies to Censhare Web and Censhare Client. You find the parameter on the Overview tab in the File upload section. For more information, see Configure the system asset - Censhare Web.