[]
Target groups
-
Administrator (Web)
Context
Online channel instances have to be installed on a delivery server. For performance and security reasons the delivery server is in general not the same hardware as the Censhare server.
Prerequisites
Operating system
The following platforms (current versions) are supported for the delivery server:
-
Debian 64-Bit-PC (AMD64) - recommended
-
Ubuntu Server LTS 64-bit
-
SUSE Linux Enterprise Server 64-bit
-
openSuse 64-bit
-
Red Hat Enterprise Linux for Servers 64-bit
-
CentOS (64-bit)
Installed Software
The following software has to be installed on the delivery server:
-
Oracle Java SE Development Kit (JDK) Version 8 - for versions up to 2019.01
-
Oracle Java SE Development Kit (JDK) Version 11 - for version 2019.2 and later
-
Amazon Corretto or Oracle Java SE Development Kit (JDK) Version 17 - for version 2022.2 and later
Applications
-
Administrator rights
-
root / corpus access on delivery server
-
censhare-Client (java)
-
censhare-AdminClient (java)
Installation
Preparing the Censhare Server
The Censhare OnlineChannel is already installed?
Start the Censhare Admin Client and connect to the Censhare Server. Open the following configurations and make sure that the check box "Service enabled" is checked for the following services on the server. You will connect the OC Satellite to:
-
Configuration/Services/Satellite management service
-
Configuration/Services/Online channel data store service
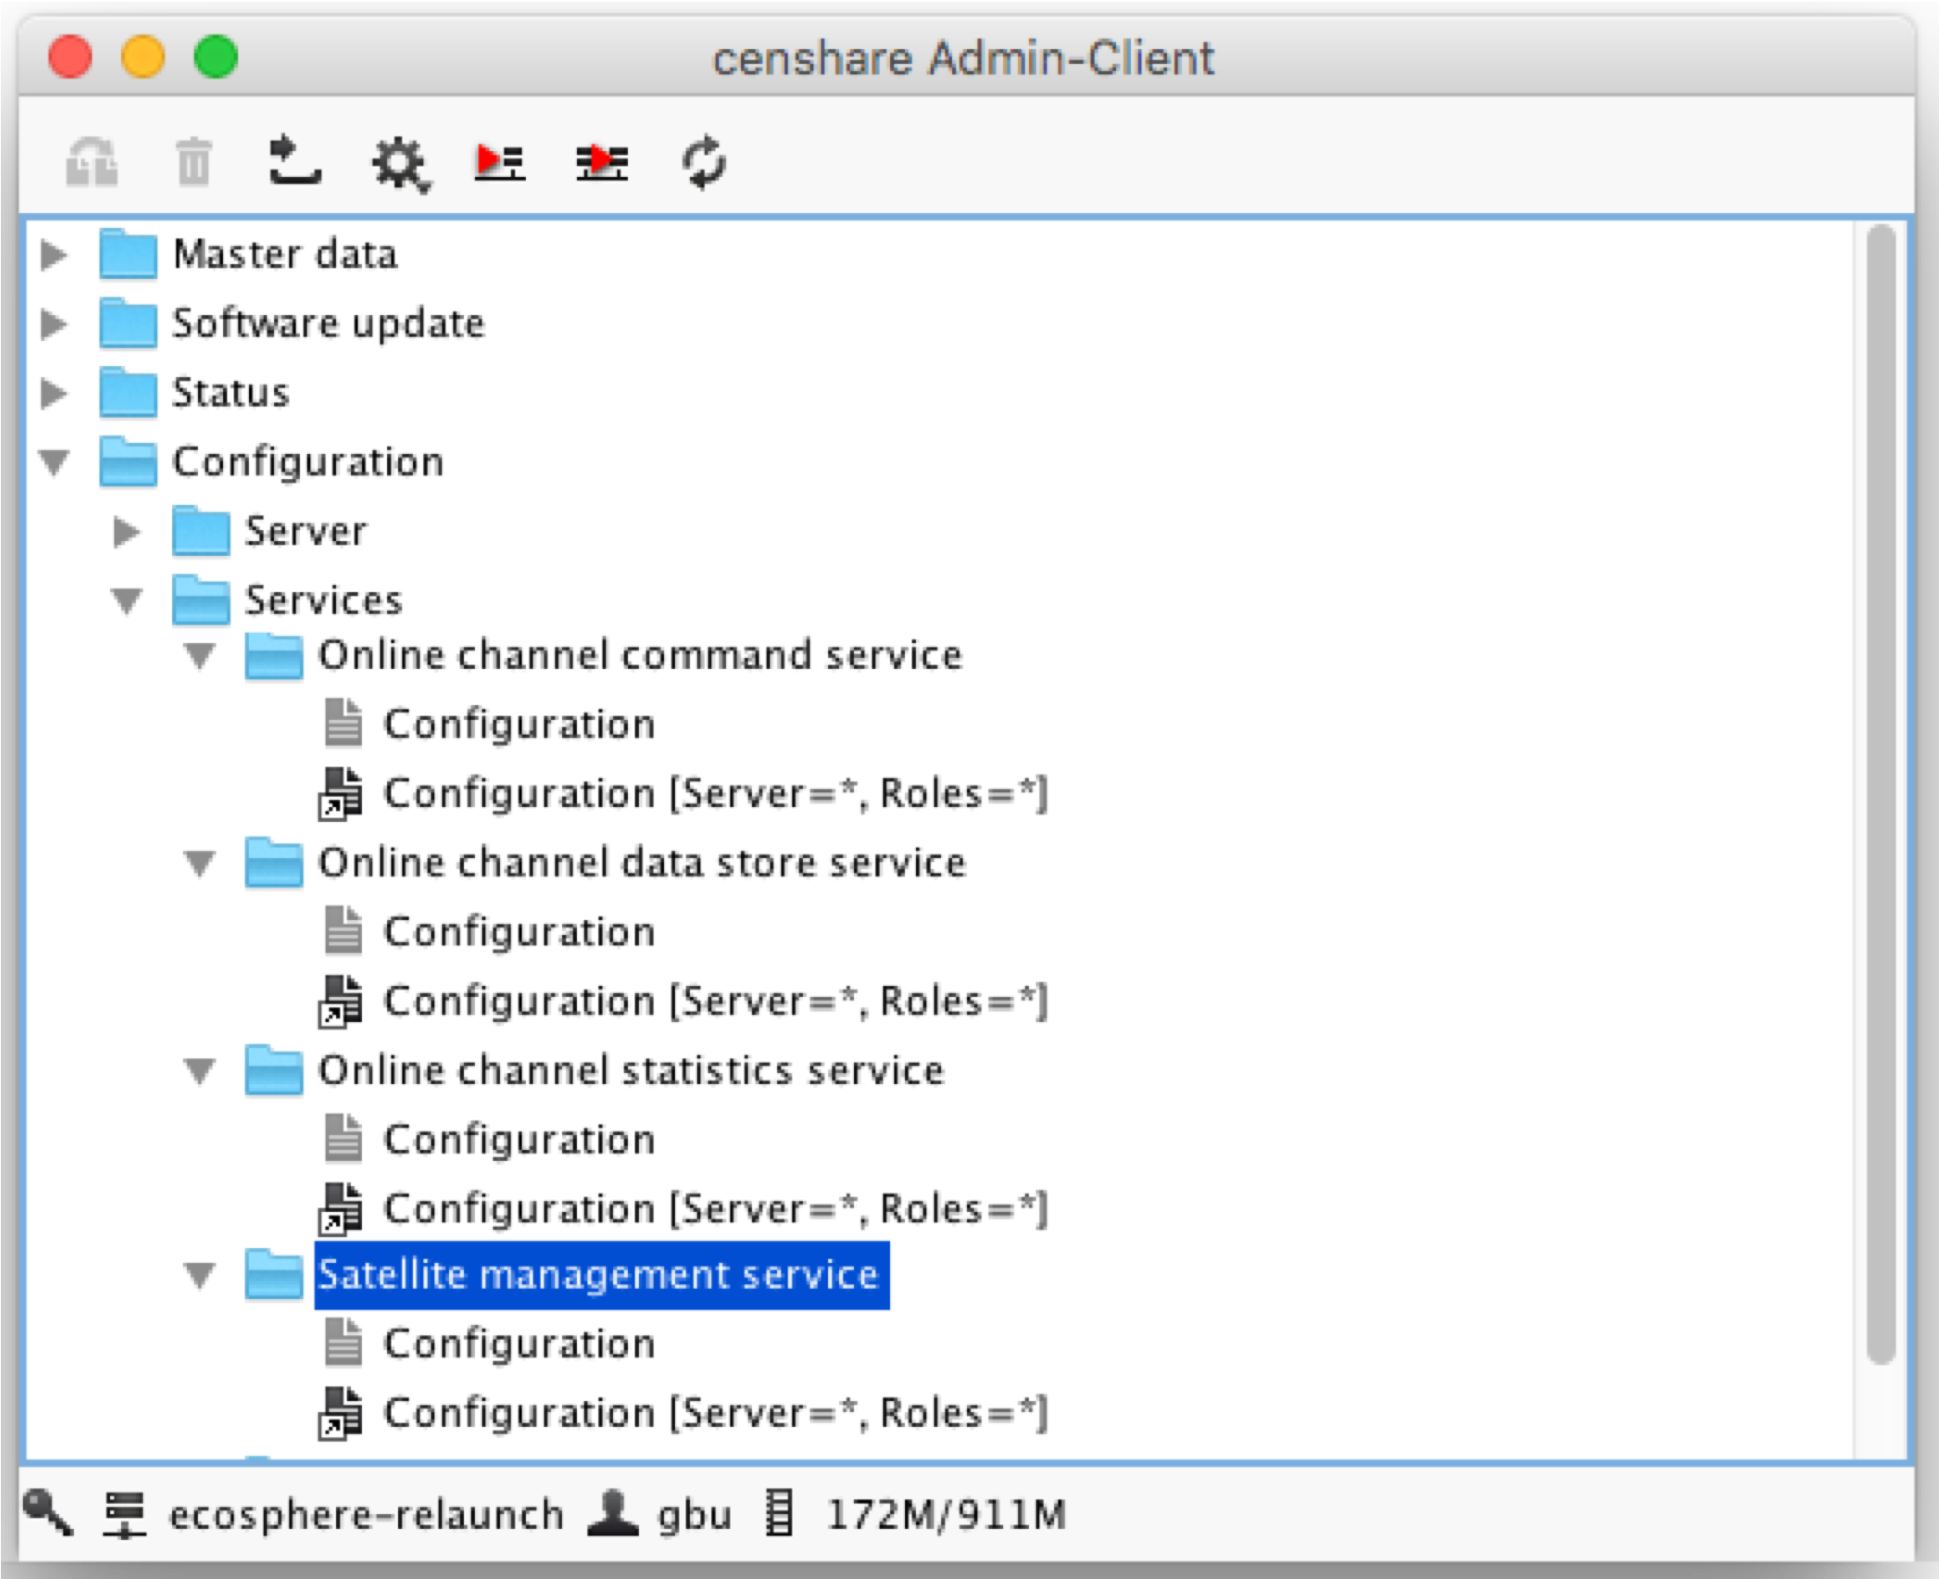
You need to activate the changes by pressing "Update server configuration" and if you are in a multi-application server environment you also need to call "Synchronize remote servers" afterwards.
Adding Delivery Servers
Please ensure the delivery servers can reach the application server via Java RMI (preferably 'frmis')
By the time being some steps of the installation require the use of the censhare Java Client.
Please ensure the user logged in has sufficient rights.
Install Satellite Software on Delivery Server
The OnlineChannel distribution contains multiple installation artifacts.
-
censhare-Satellite-Installer-X.Y.Z.sh
Self-extracting shell script for automatic satellite installation. -
censhare-Satellite-X.Y.Z.tar.gz
Alternative Satellite installation package for manual installation. -
censhare-Satellite-X.Y.Z.zip
Alternative Satellite installation package for manual installation.
Download the latest censhare-Satellite-Installer-${version}.sh from the download site.
Repeat the steps in this section for each delivery server you want to add to the project.
After downloading, copy the installer to the target machine and mark it as executable.
chmod +x censhare-Satellite-Installer-${version}.sh
The installer and the start script Satellite.sh must be executed with the same user that the process will be running under later. It is highly recommended to not run it as root (Censhare default is to 'corpus').
./censhare-Satellite-Installer-${version}.sh
The Installer will ask you a couple of questions:
-
Enter the target directory (default /home/corpus/satellite.satellite1): Specifies where the satellite will be installed. Accept default by pressing return or enter a custom path. If the destination folder name starts with satellite. the rest of the folder name is automatically be proposed as the satellite-id in the next step.
-
Enter satellite id (default satellite1): Specifies the id under which satellite will appear in the management ui. Accept default by pressing return or enter a custom id. It is recommended that the satellite id reflects the project, environment and satellite instance (${CUSTOMER_HANDLE}-${PROJECT_NAME}-${SERVER_TYPE}[-${HOST_SPECIFICATION}]), e.g. acme-corporate-website-testing-staging-satellite-1.
-
Enter server (default rmis://localhost:30546/corpus.RMIServerSSL): The RMI-URL of the Censhare Server the satellite will connect to. Usually it is the same URL as used by the production and admin client.
-
Use RMI public key authentication? (default 1): Press return to enable public key authentication. The installer will later create a public/private key that will be used to authorize the connection towards the Censhare Server.
-
Validate Server SSL Certificate? (default 1):If you are unsure that the necessary setup has been implemented enter 0 and press return.
-
Download & Pin Server Certificate? (default 0): If you are unsure that the necessary setup has been implemented enter 0 and press return.
-
Enter Java home (default ): The JVM used to execute the OC satellite can be specified here. If no JVM is specified the default environment is used.
-
Start satellite afterwards? (default 1): Enter 0 and press return to prevent the immediate start of the satellite.
Adding the Satellite to the Configuration
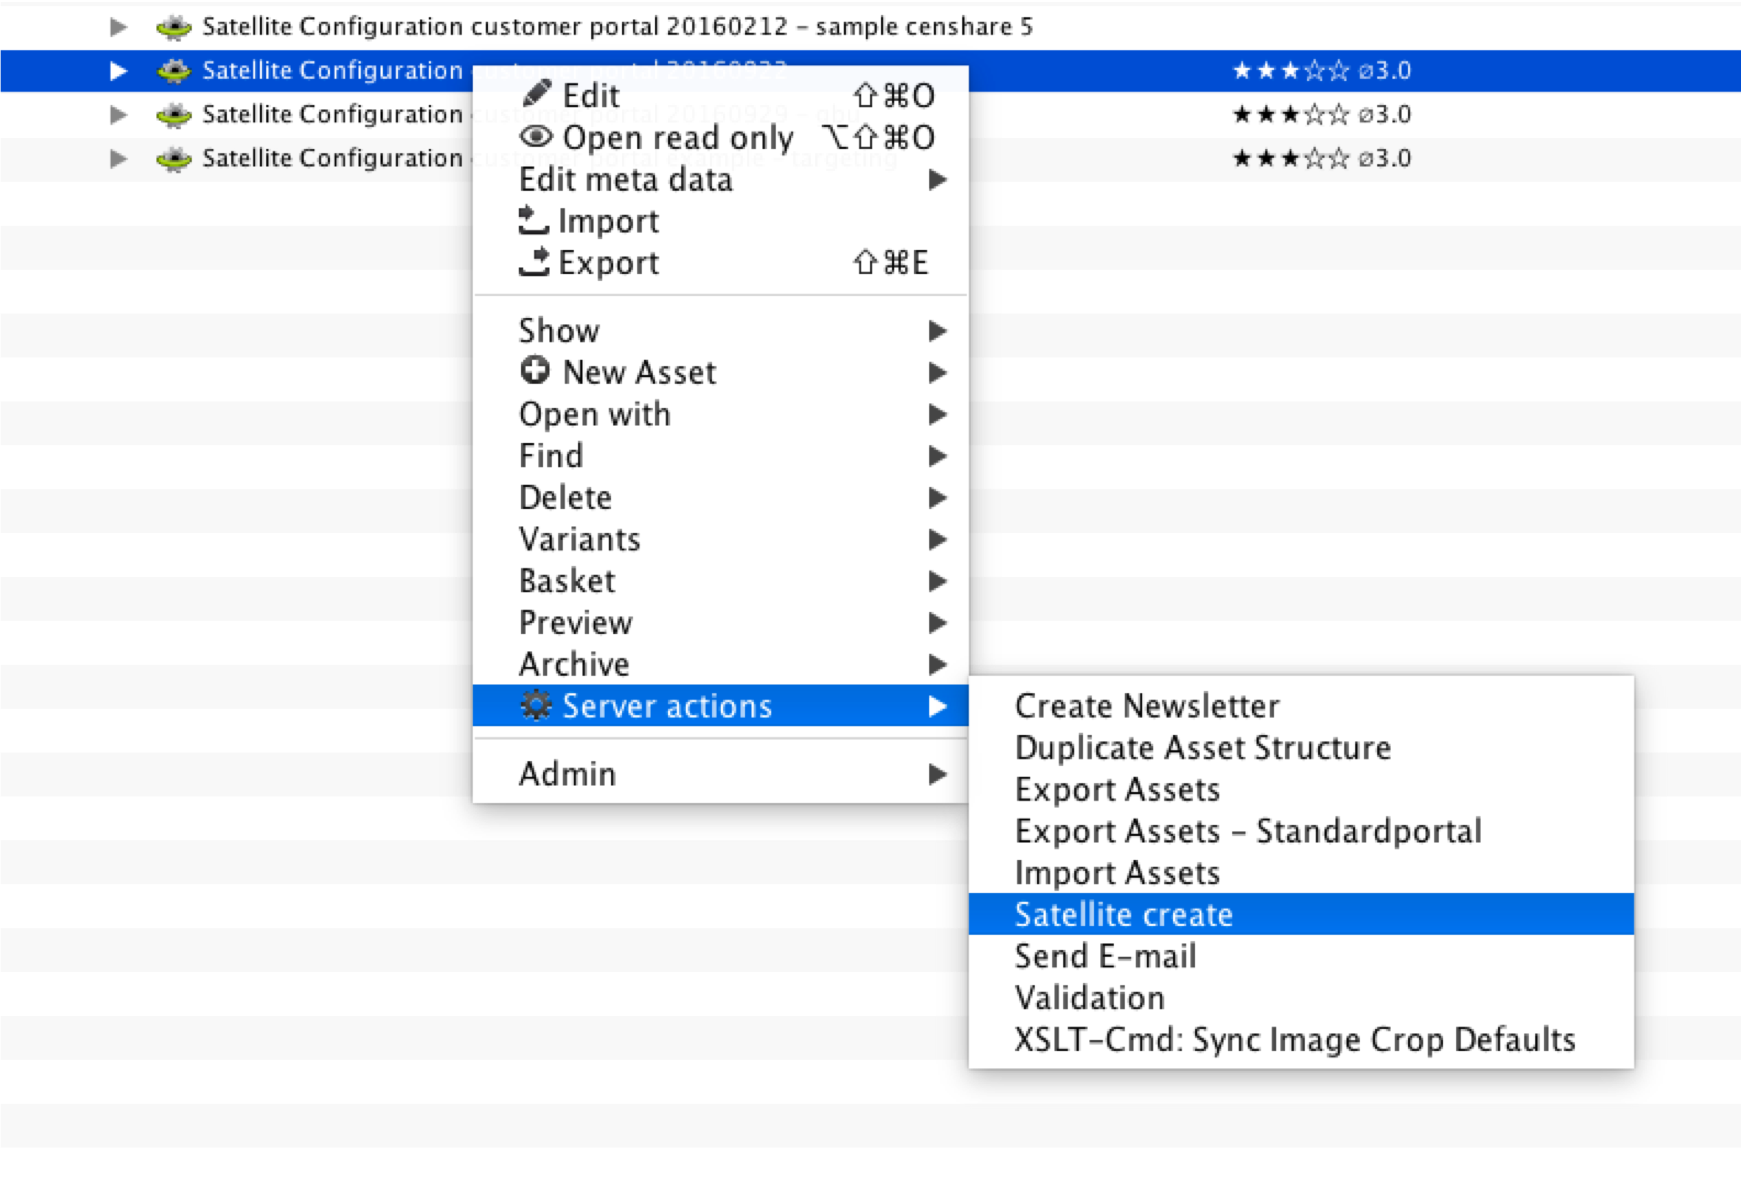
Connect via cenhare-java-Client and select a "Satellite Configuration Group". Start the server action "Satellite create".
In dialog window that comes up select "with certificate file" and click "OK". In the next step you are asked to select the certificate. Pick the certificate file satellite.cer from the satellite installation target folder. Alternative you can copy the content of satellite.cer to the clipboard and select option "with certificate text".
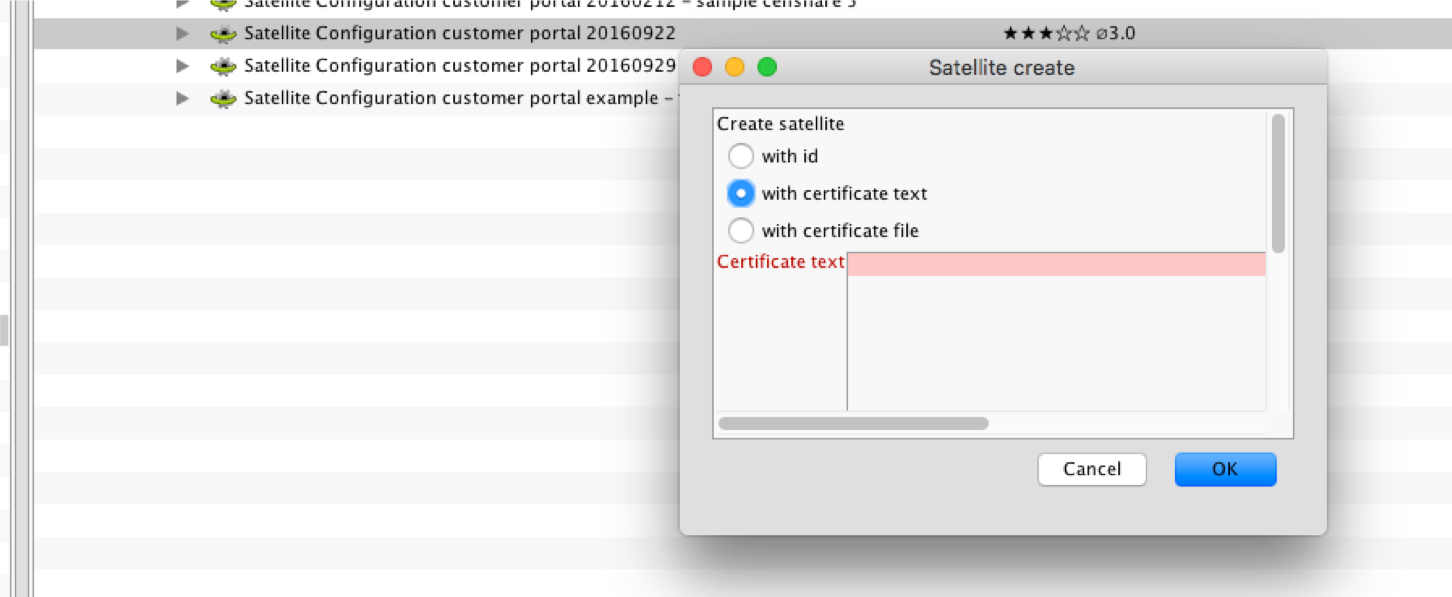
As result a satellite asset with the attached certificate is created. After the corresponding satellite instance is '→started' it will download and activate the configuration of the group. Once a satellite is attached to a configuration group all changes to the group are immediately be propagated to it.
Verify the Satellite Installation
Switch to the command line and navigate to the installation target directory. Start the satellite with bin/Satellite.sh start.
You can follow the satellites log in the filelogs/satellite.log. You can observe the following messages indicating progress and state of services:
data store [id=customer-portal]         : service-missing
session manager [id=portal-manager]     : service-available
bouncer session manager                 : service-not-required
request limiter [id=customer-request-limiter]: service-available}
Following message indicates that satellite did connect to the application server and received the data from its assigned configuration group.
2018.06.29-15:52:30.616 INFO DataStoreConnectionCheck (datastore) c.c.o.d.i.synchronisation.Pipeline - datastore, #A: unknown -> , unknown ( speed: ?? ) -> DB Com.: to mod./add: 0, to del.: 0, modified/added: 0, deleted: 0 -> Change-Events: polls: 0, events: 0, duration: 0
Next is indicating that the datastore synchronization is active.
2019.05.24-09:53:08.886 INFO DataStoreConnectionCheck (customer-portal) c.c.o.d.i.synchronisation.Pipeline - customer-portal, #A: 0 -> no storage items to download -> DB Com.: to mod./add: 0, to del.: 0, modified/added: 0, deleted: 0 -> Change-Events: polls: 0, events: 0, duration: 0
Wait for the satellite is in sync with the server data.
This is indicated by datastore log shows only zero-numbers. Numbers higher than zero indicate the number of operations until synchronization is complete.
After the satellite's synchronization is complete and cached tables are loaded the satellite is ready to activate sites
2019.05.24-09:50:51.101 INFO Commit (customer-portal) c.c.o.s.service.impl.OCServiceImpl - Starting online channel (site id: acme-corporate-website instance id: acme-corporate-website)
You can now connect to the delivery server on the port provided by WebserverConfiguration.
In case of problems
-
verify certificate was copied with lines -----BEGIN CERTIFICATE----- and -----END CERTIFICATE----- and these are start end end (no newline)
-
create a new, pure, no-child 'satellite configuration' asset and attach the satellite's asset to it; check log, if satellite has connected and is doing nothing now the connection is up and you can try to move the satellite's asset to the real target group
-
check the file 'configuration.properties' for conspicuous entries
Starting and Stopping the Satellite
You can manually start, stop or check if the satellite is running with
bin/Satellite.sh start, bin/Satellite.sh stop and bin/Satellite.sh status
respectively from the satellite directory.
Starting the Satellite on system startup
If you want the satellite to start automatically in the future, you can use one of the generated start scripts available in the bin subdirectory of the satellite directory.
-
systemd based distributions
-
Navigate to the satellite directory as the root user
-
Copy bin/censhare.satellite.<satellite-id>.service to /etc/systemd/system
-
Execute systemctl enable censhare.satellite.<satellite-id>.service
-
-
Debian/Ubuntu before systemd
-
Navigate to the satellite directory as the root user
-
Copy bin/css_satellite.<satellite-id> to /etc/init.d
-
Execute update-rc.d css_satellite.<satellite-id> default
-
-
RedHat/CentOS before systemd
-
Navigate to the satellite directory as the root user
-
Copy bin/css_satellite.<satellite-id> to /etc/init.d
-
Execute chkconfig --add css_satellite.<satellite-id>
-
Upgrading Delivery Servers (Satellites)
Warning: before upgrading, check whether the new version requires upgrade of JDK (typically to 2022.2). If it does, the JDK needs to be upgraded first as a separate action:
-
Install the new JDK version to the machine (by whatever method appropriate to the distribution).
-
Find the new JAVA_HOME directory.
-
Shut down the satellite.
-
Edit the config.properties file in the satellite directory:
-
Find the line com.censhare.satellite.launcher.Java$home=<old JAVA_HOME> and change the value (after = sign) to the new JAVA_HOME directory.
-
Note that if the satellite is still running at this point, it can potentially overwrite this file and discard changes (especially when the com.censhare.satellite.launcher.Java bundle is used).
-
-
Optional: start the satellite again.
-
Continue the upgrade process.
The upgrade process is similar to the installation, the beginning is the same:
-
Download the installer and ensure it's executable (see above).
-
Run the installer: ./censhare-Satellite-Installer-${version}.sh
-
Answer the first question by entering the directory of already-existing satellite:
-
Enter the target directory (default /Users/tn/satellite.satellite1):
-
-
At this point, the installer automatically detects that the satellite already exists and proceeds with upgrade (instead of new installation).
-
It won't ask any further questions, because everything is already know.
-
The satellite can be even running; the installer correctly shuts it down and starts the new upgraded version, as needed.
-
-
If needed, start the satellite again (necessary when the satellite has been manually shut down).