Introduction
A Macro in Censhare is a special feature that adds new, derived features to an asset based on existing features. This article explains:
-
where to find the Macro UI Editor
-
how to prepare asset features
-
how to test macro execution using the Preview widget
Where to find the Macro Editor and create a Macro Asset
Use Censhare Web to create a Macro asset and open the Macro UI Editor.
Steps:
-
Go to Censhare Web.
-
Create a new Macro asset:
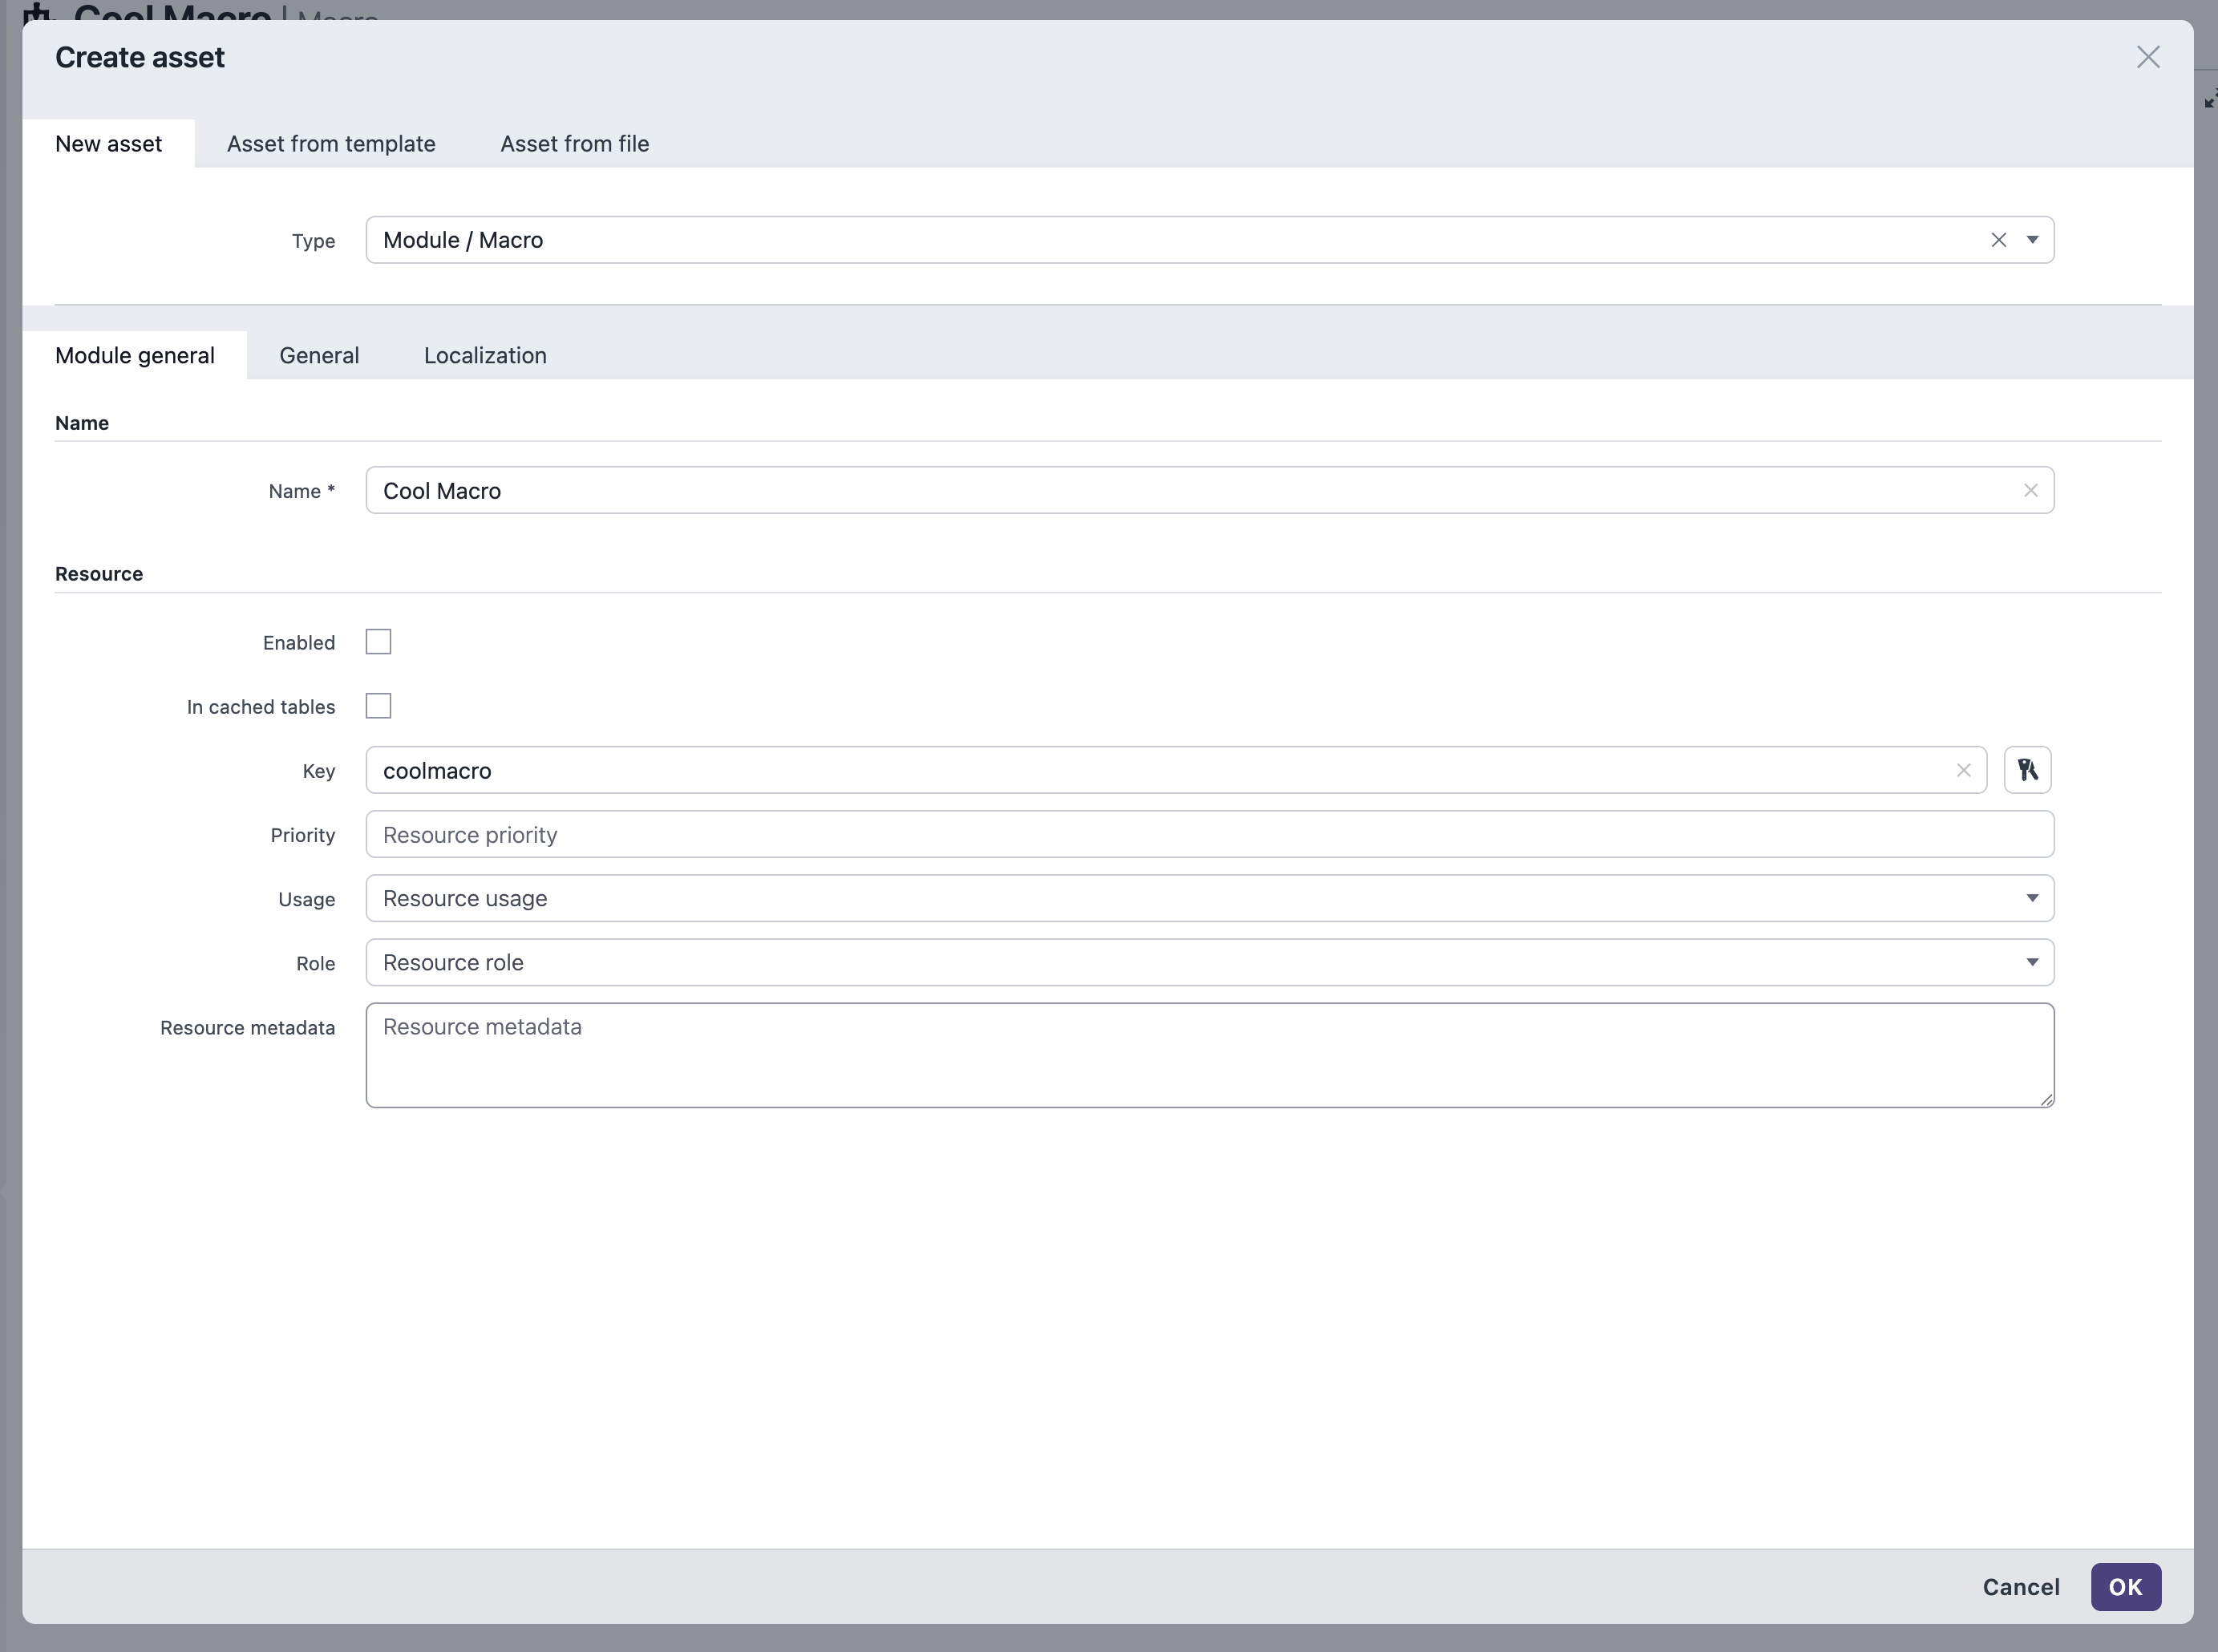
-
Open the Macro asset and go to the Editor tab.
-
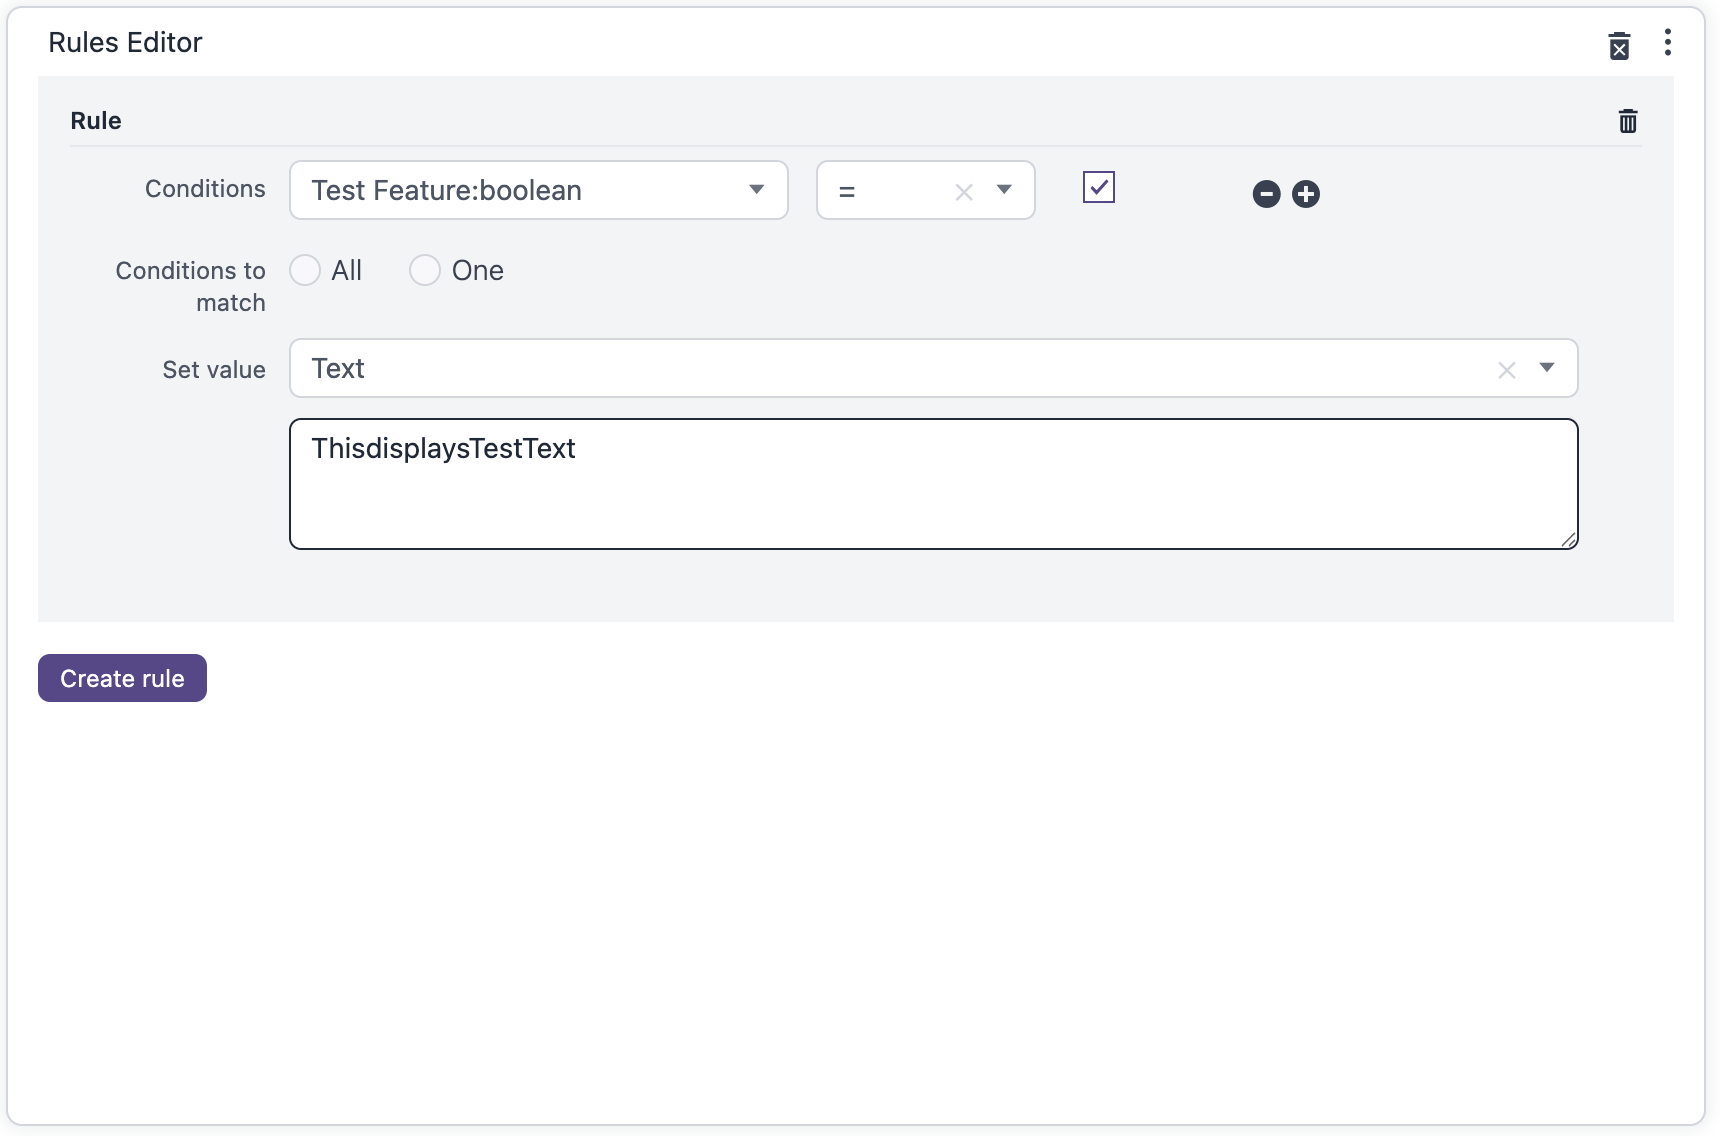
In the Rules Editor window, select User Interface as type of text.
-
Click Create rule below.
-
The Rules Editor opens:
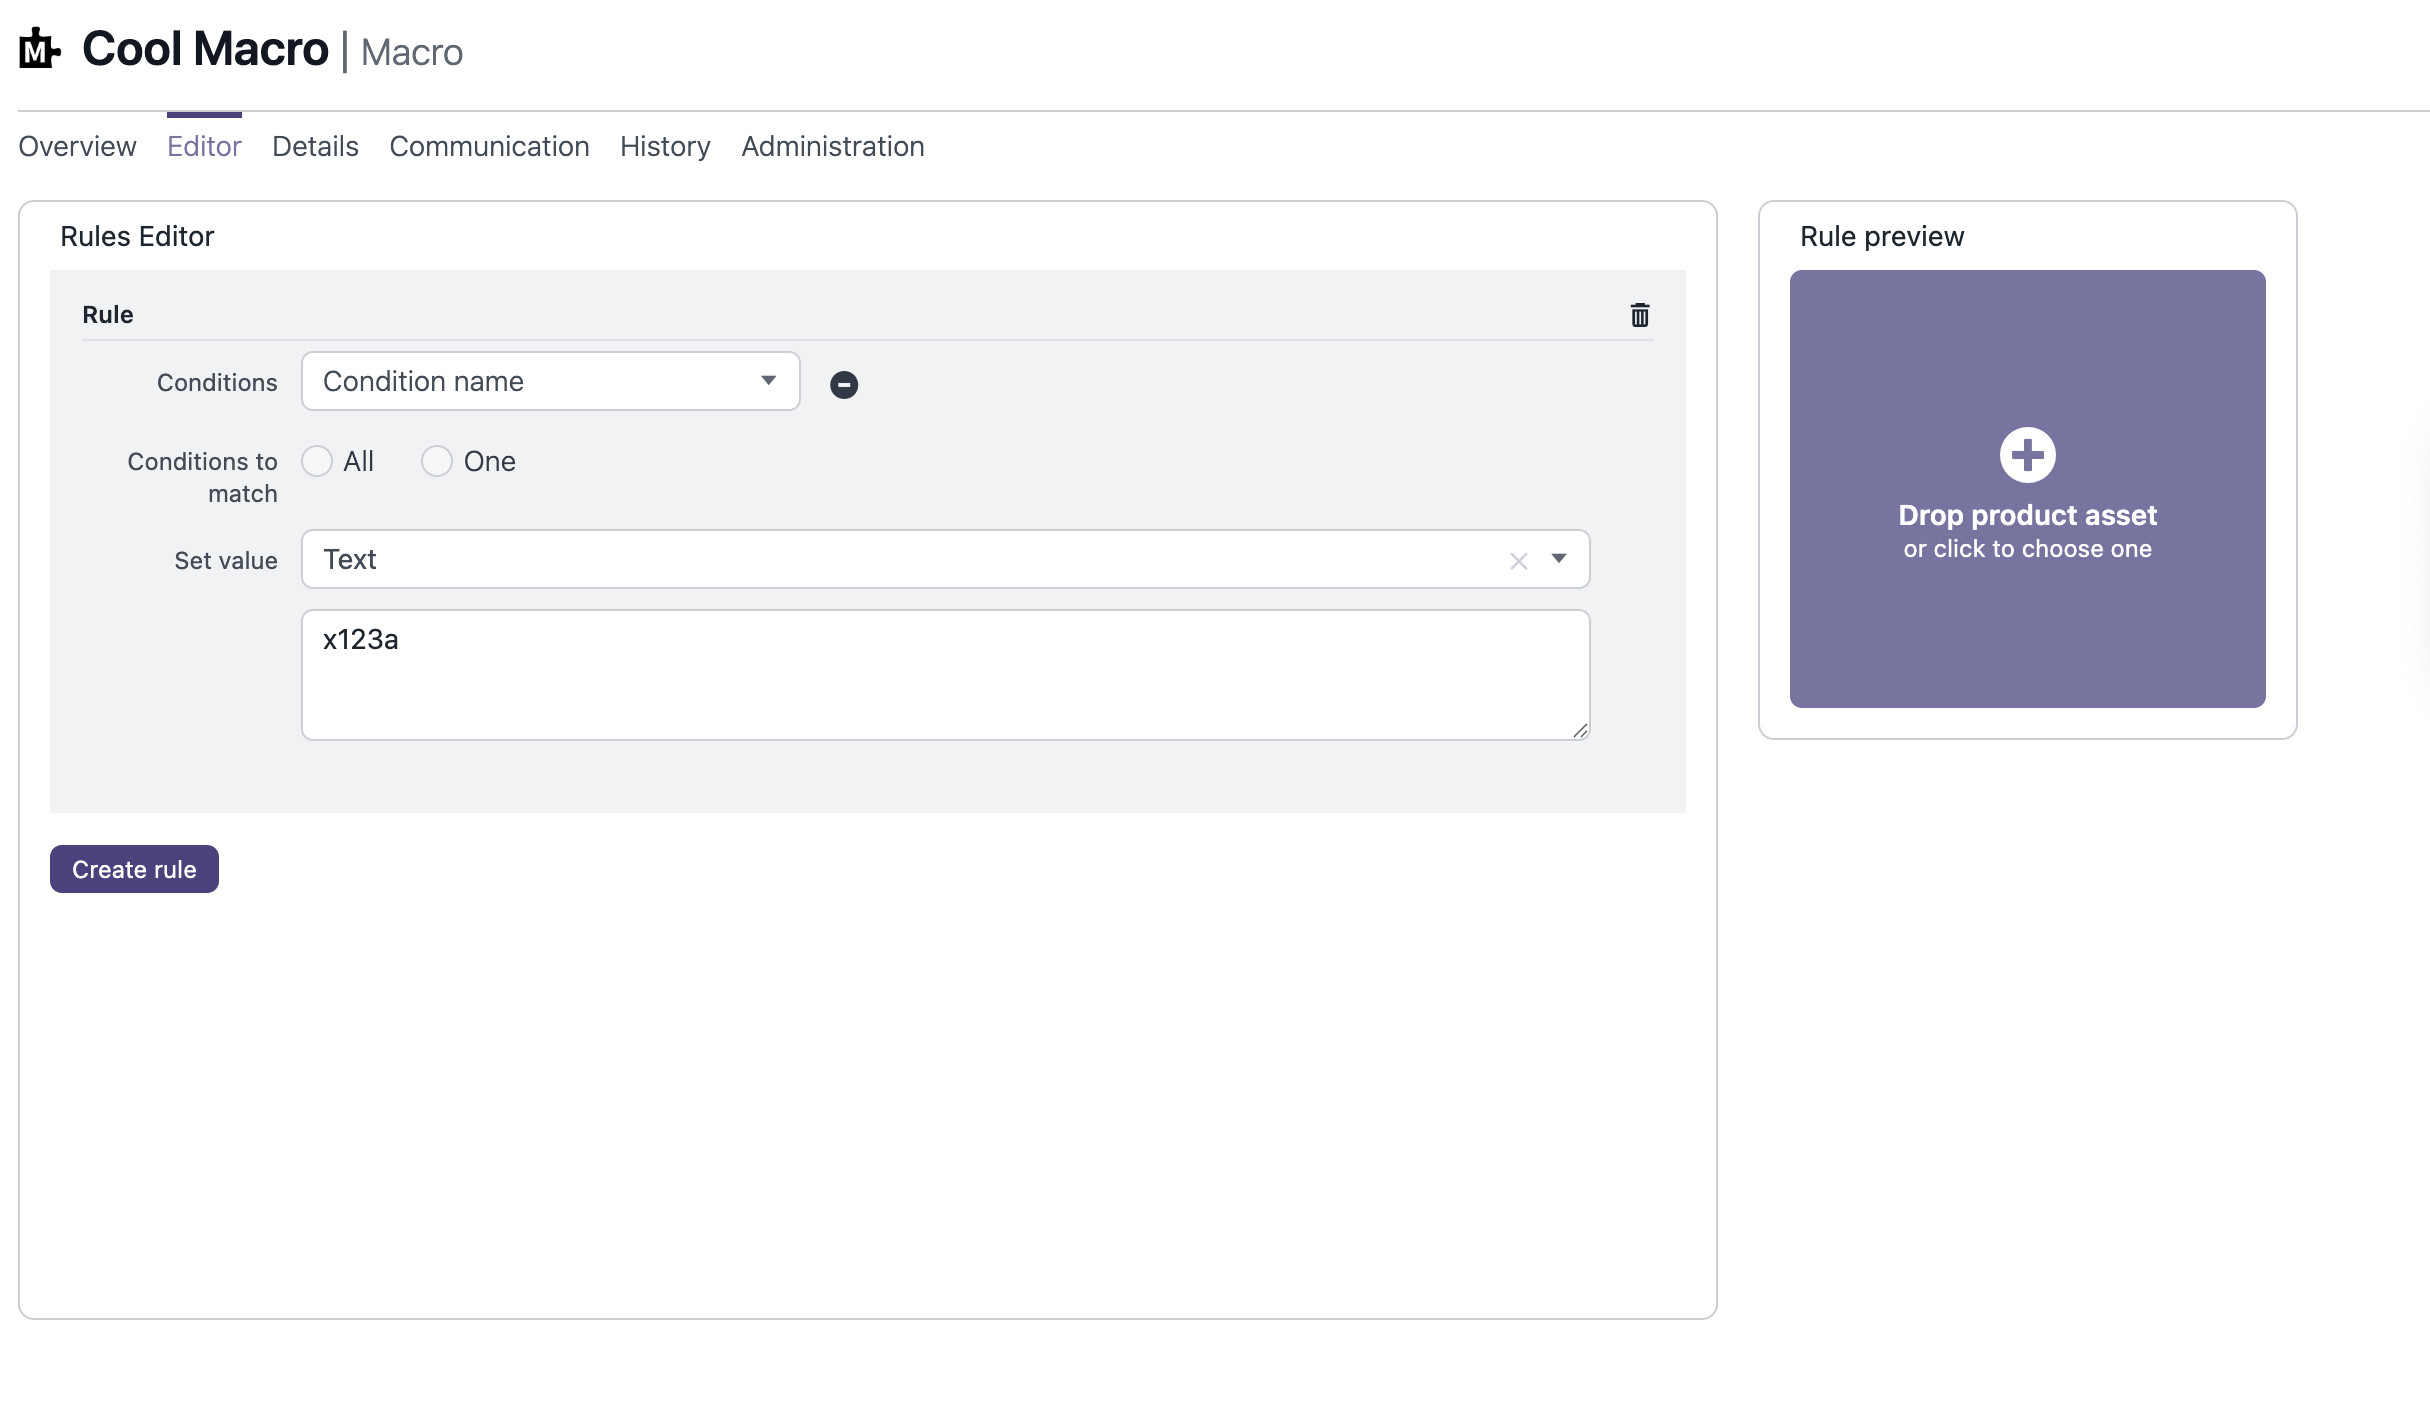
Note that in the screenshot the conditions still needs to be added.
Notes:
-
The Macro UI Editor is available in the Censhare Web. A specific role is likely required. This depends on your system configuration. The Admin role is not mandatory.
-
If the Macro UI Editor is not visible, verify your user role or contact an administrator.
Checklist:
- Censhare Web access confirmed.
- Macro asset created.
- UI Editor is visible.
Prepare asset features to use in the Macro UI Editor
This preparation has two parts:
Create Asset Features in the Censhare Admin-Client
Use the Censhare Admin-Client to define features in the Master data that your macro will use.
Steps:
-
Open the Censhare Admin-Client.
-
Navigate to the Features table in Master data:
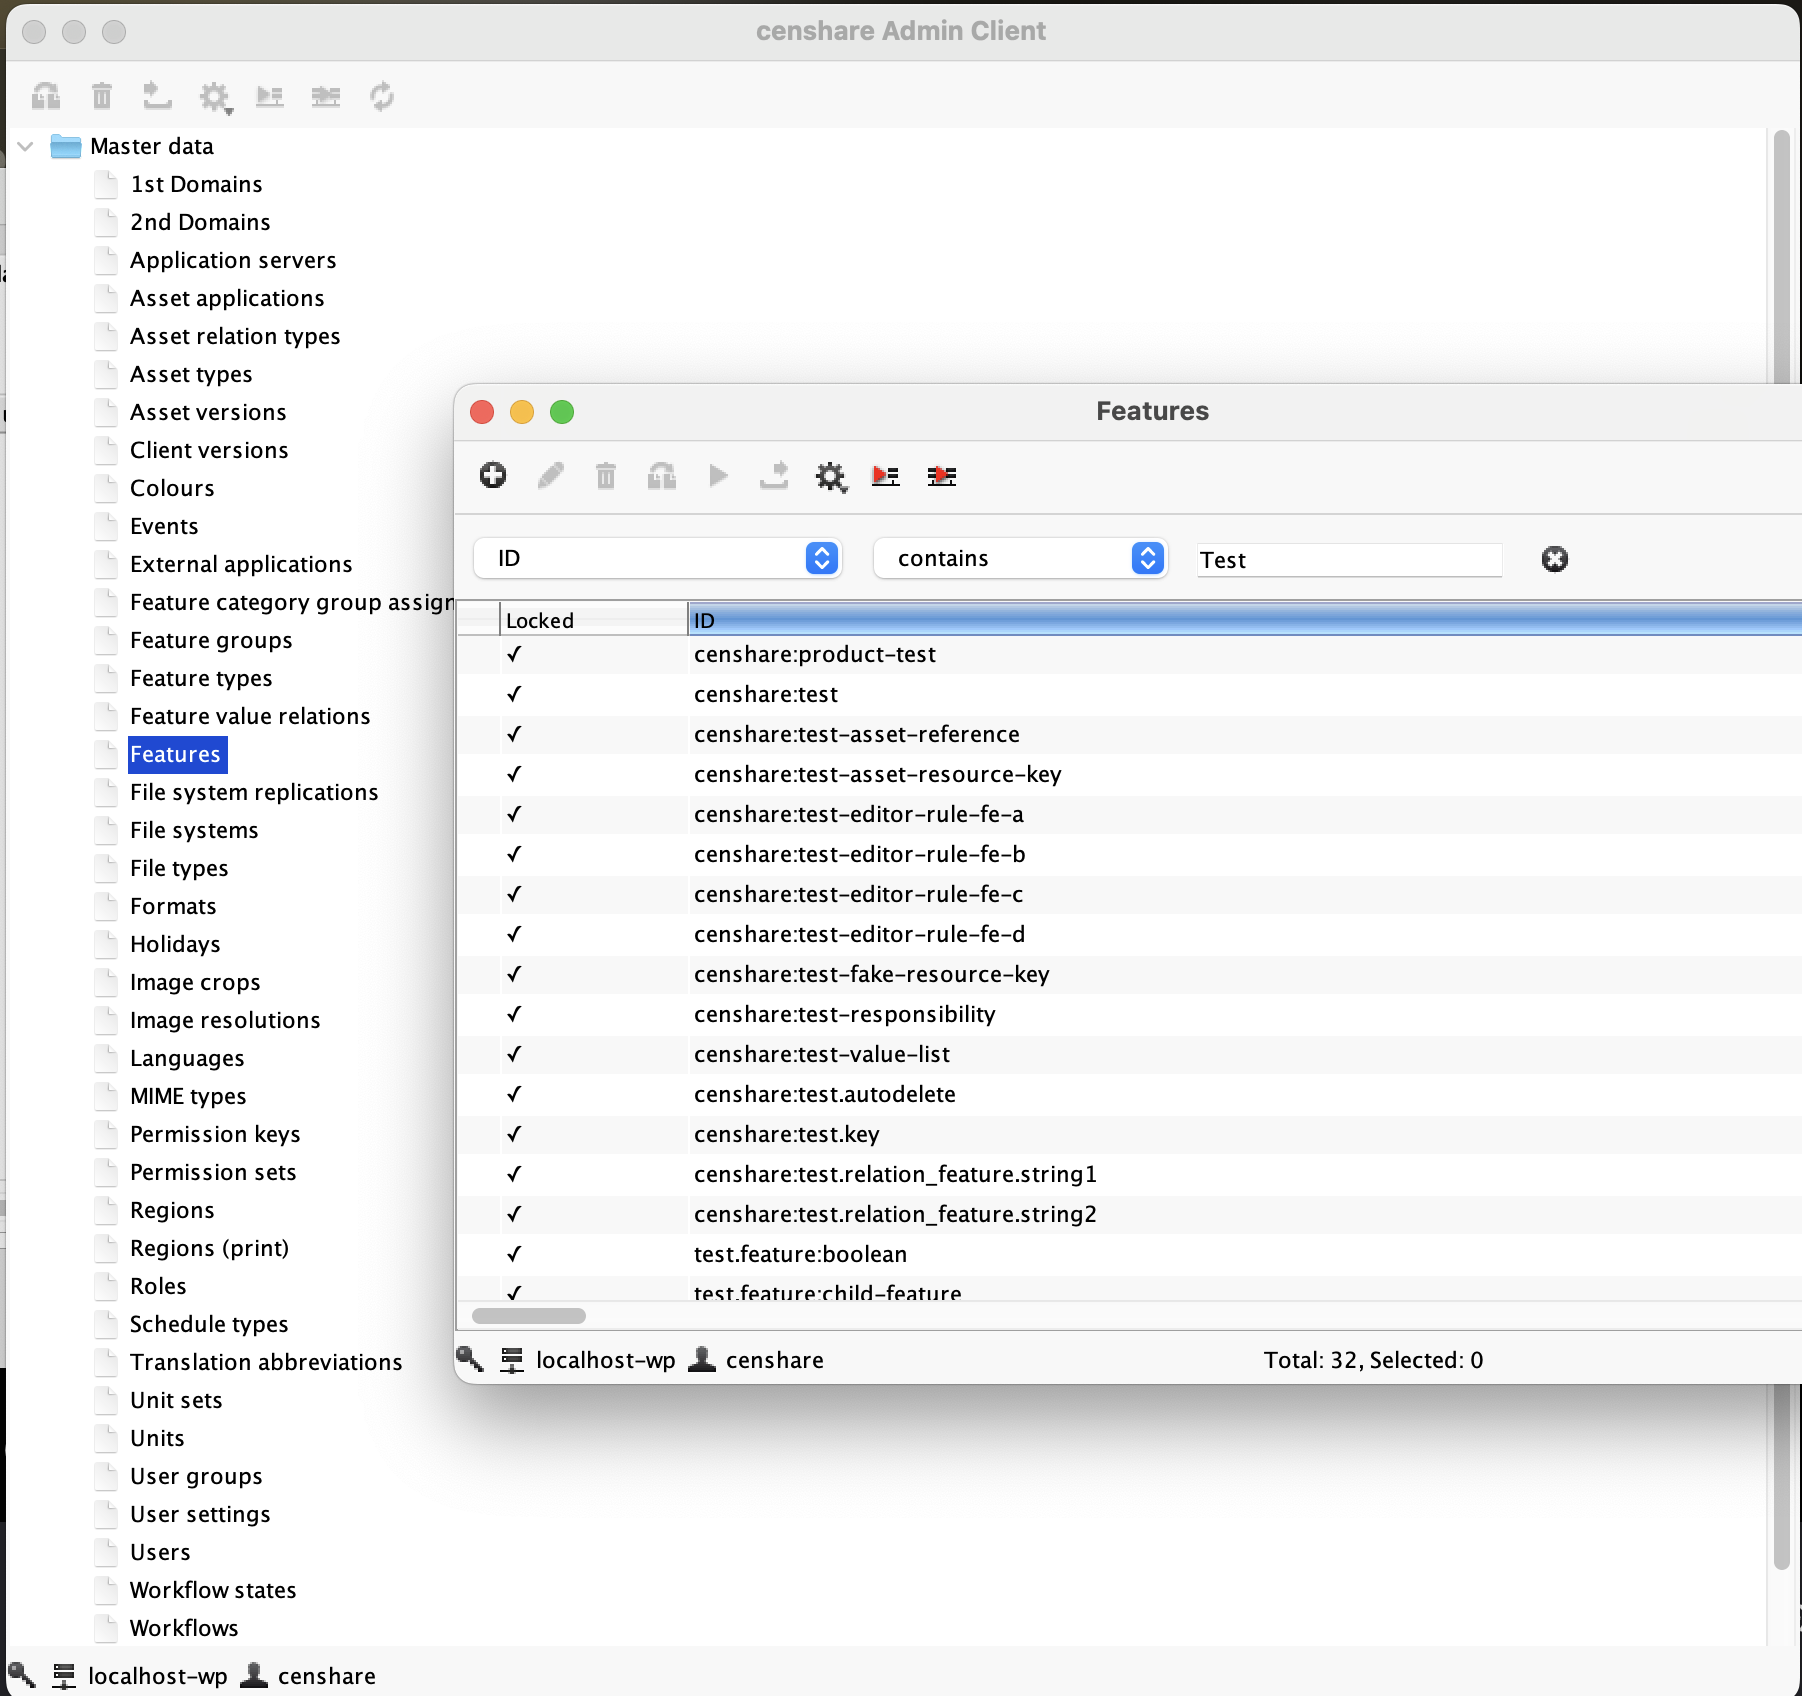
-
Create a new feature.
-
Enter the required fields:
-
ID
-
Name
-
Trait key
-
Property key
-
Type
-
Value type
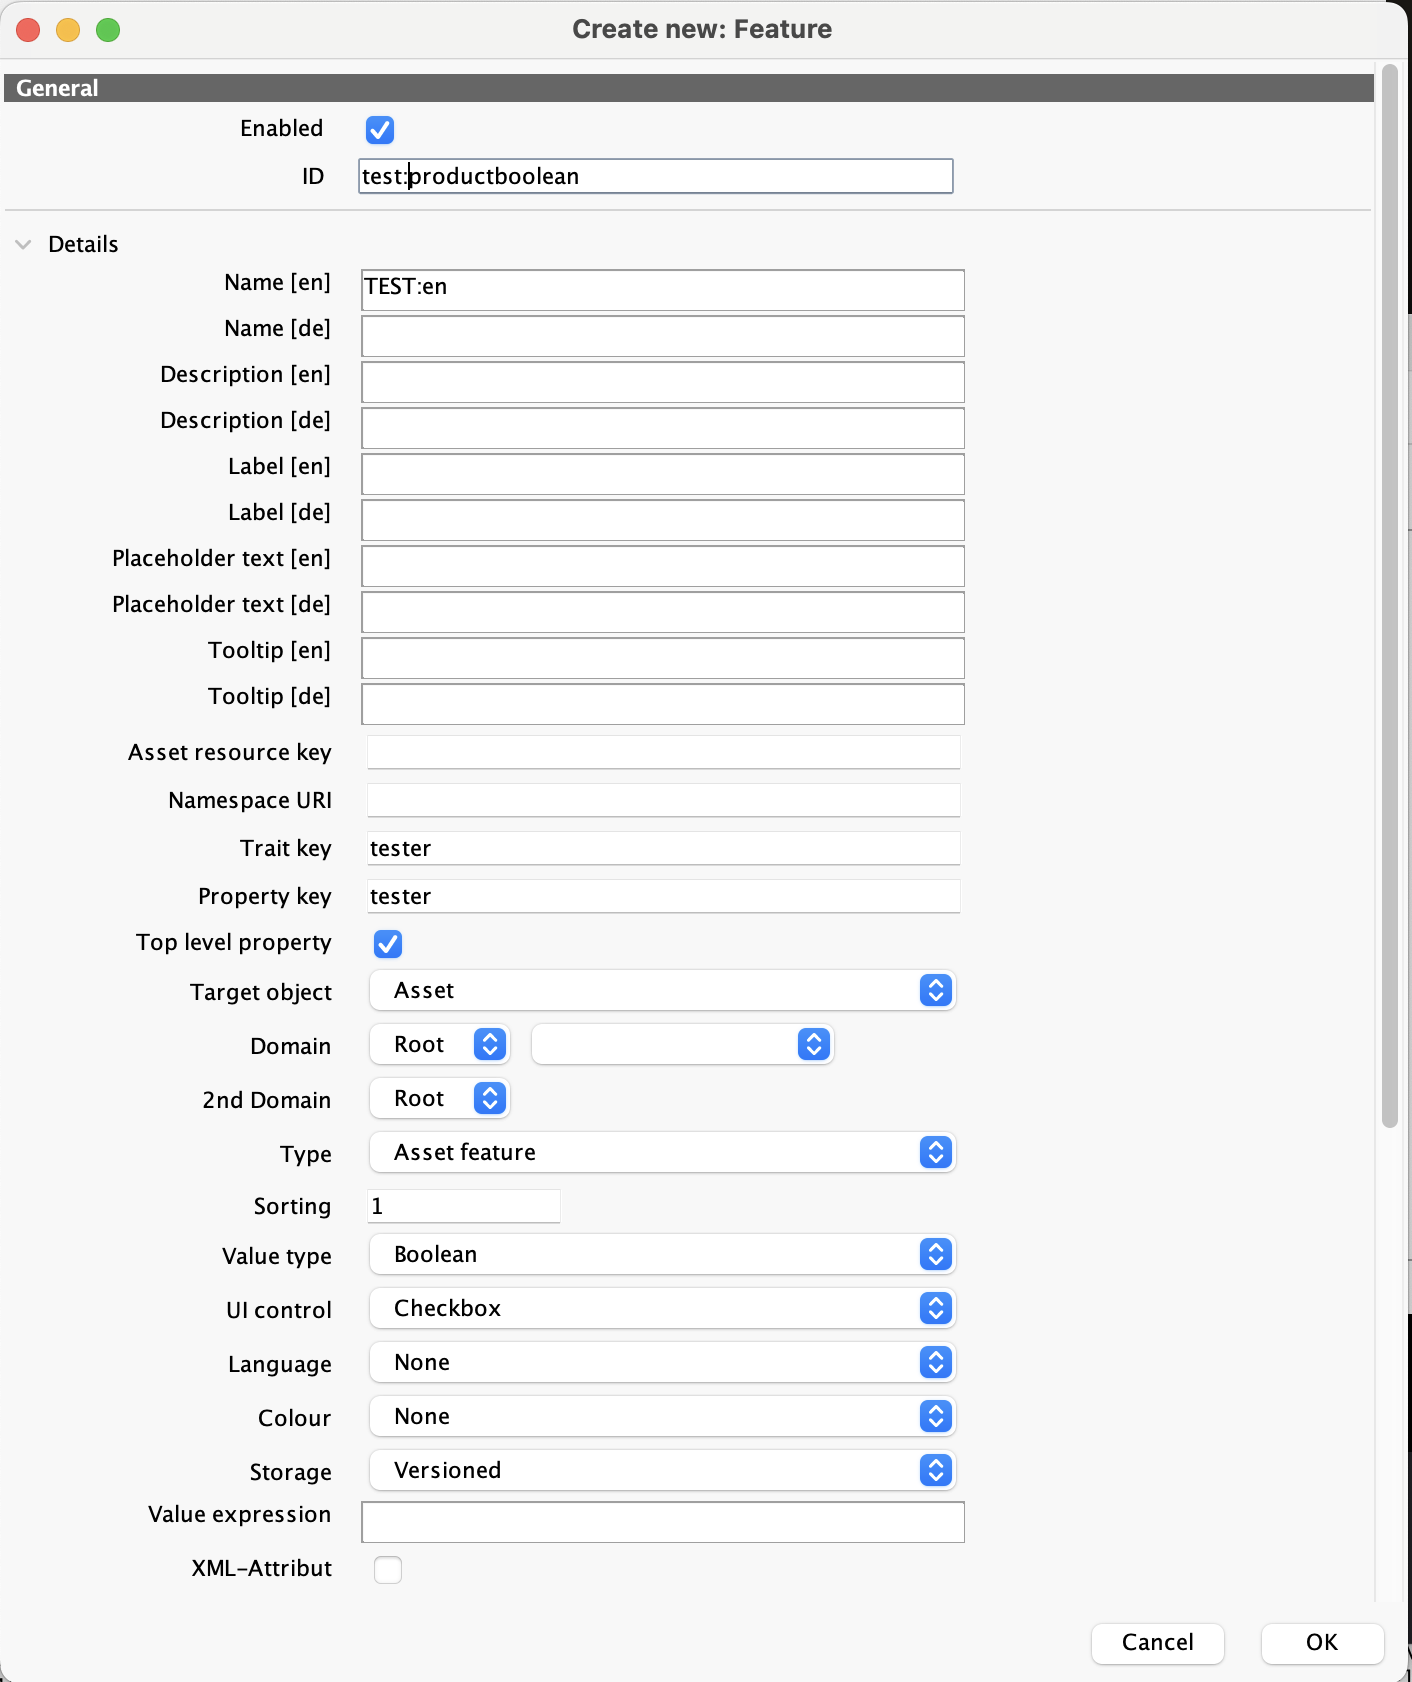
-
-
For testing, it is useful to choose Boolean as the first value type in a feature selection.
-
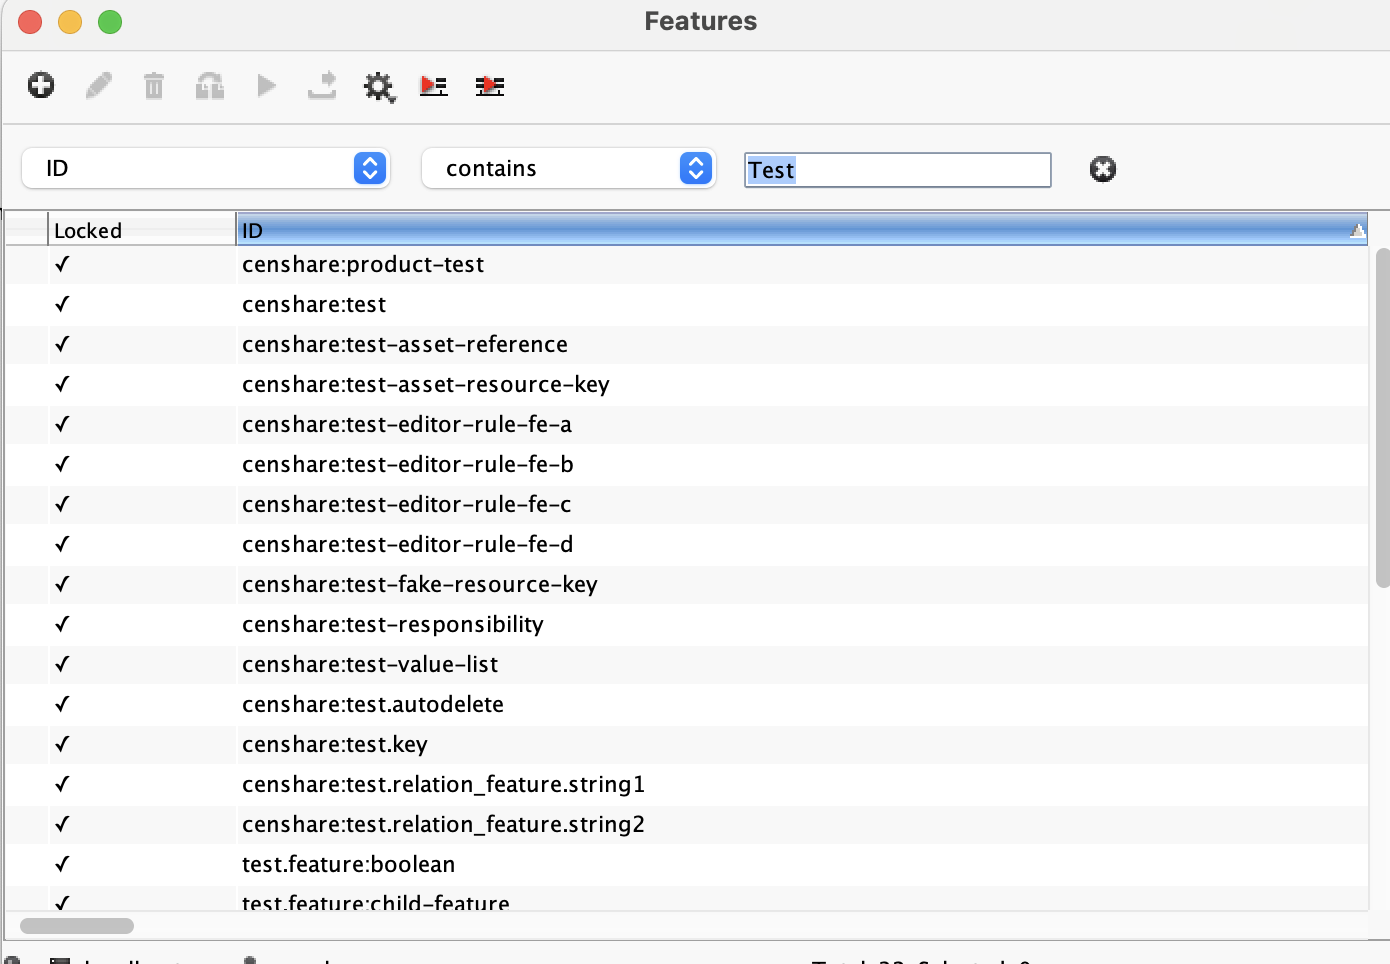
If you do not want to create a new feature, search for test to find pre-existing test features available in the Censhare Admin-Client:
Guidance:
-
Use clear, consistent naming so that you can recognize the feature later in the Censhare Client.
-
Start with simple types (boolean) to validate macro behavior quickly.
Checklist:
- Censhare Admin-Client access confirmed.
- New feature is created OR existing test feature identified.
- Value type is set (use boolean for initial testing).
- Naming and keys are documented for reference.
Assign features to a Product in the Censhare Client
Attach the feature(s) to a Product asset so that they are available to use within the Macro UI Editor.
Steps:
-
Open the Censhare Client.
-
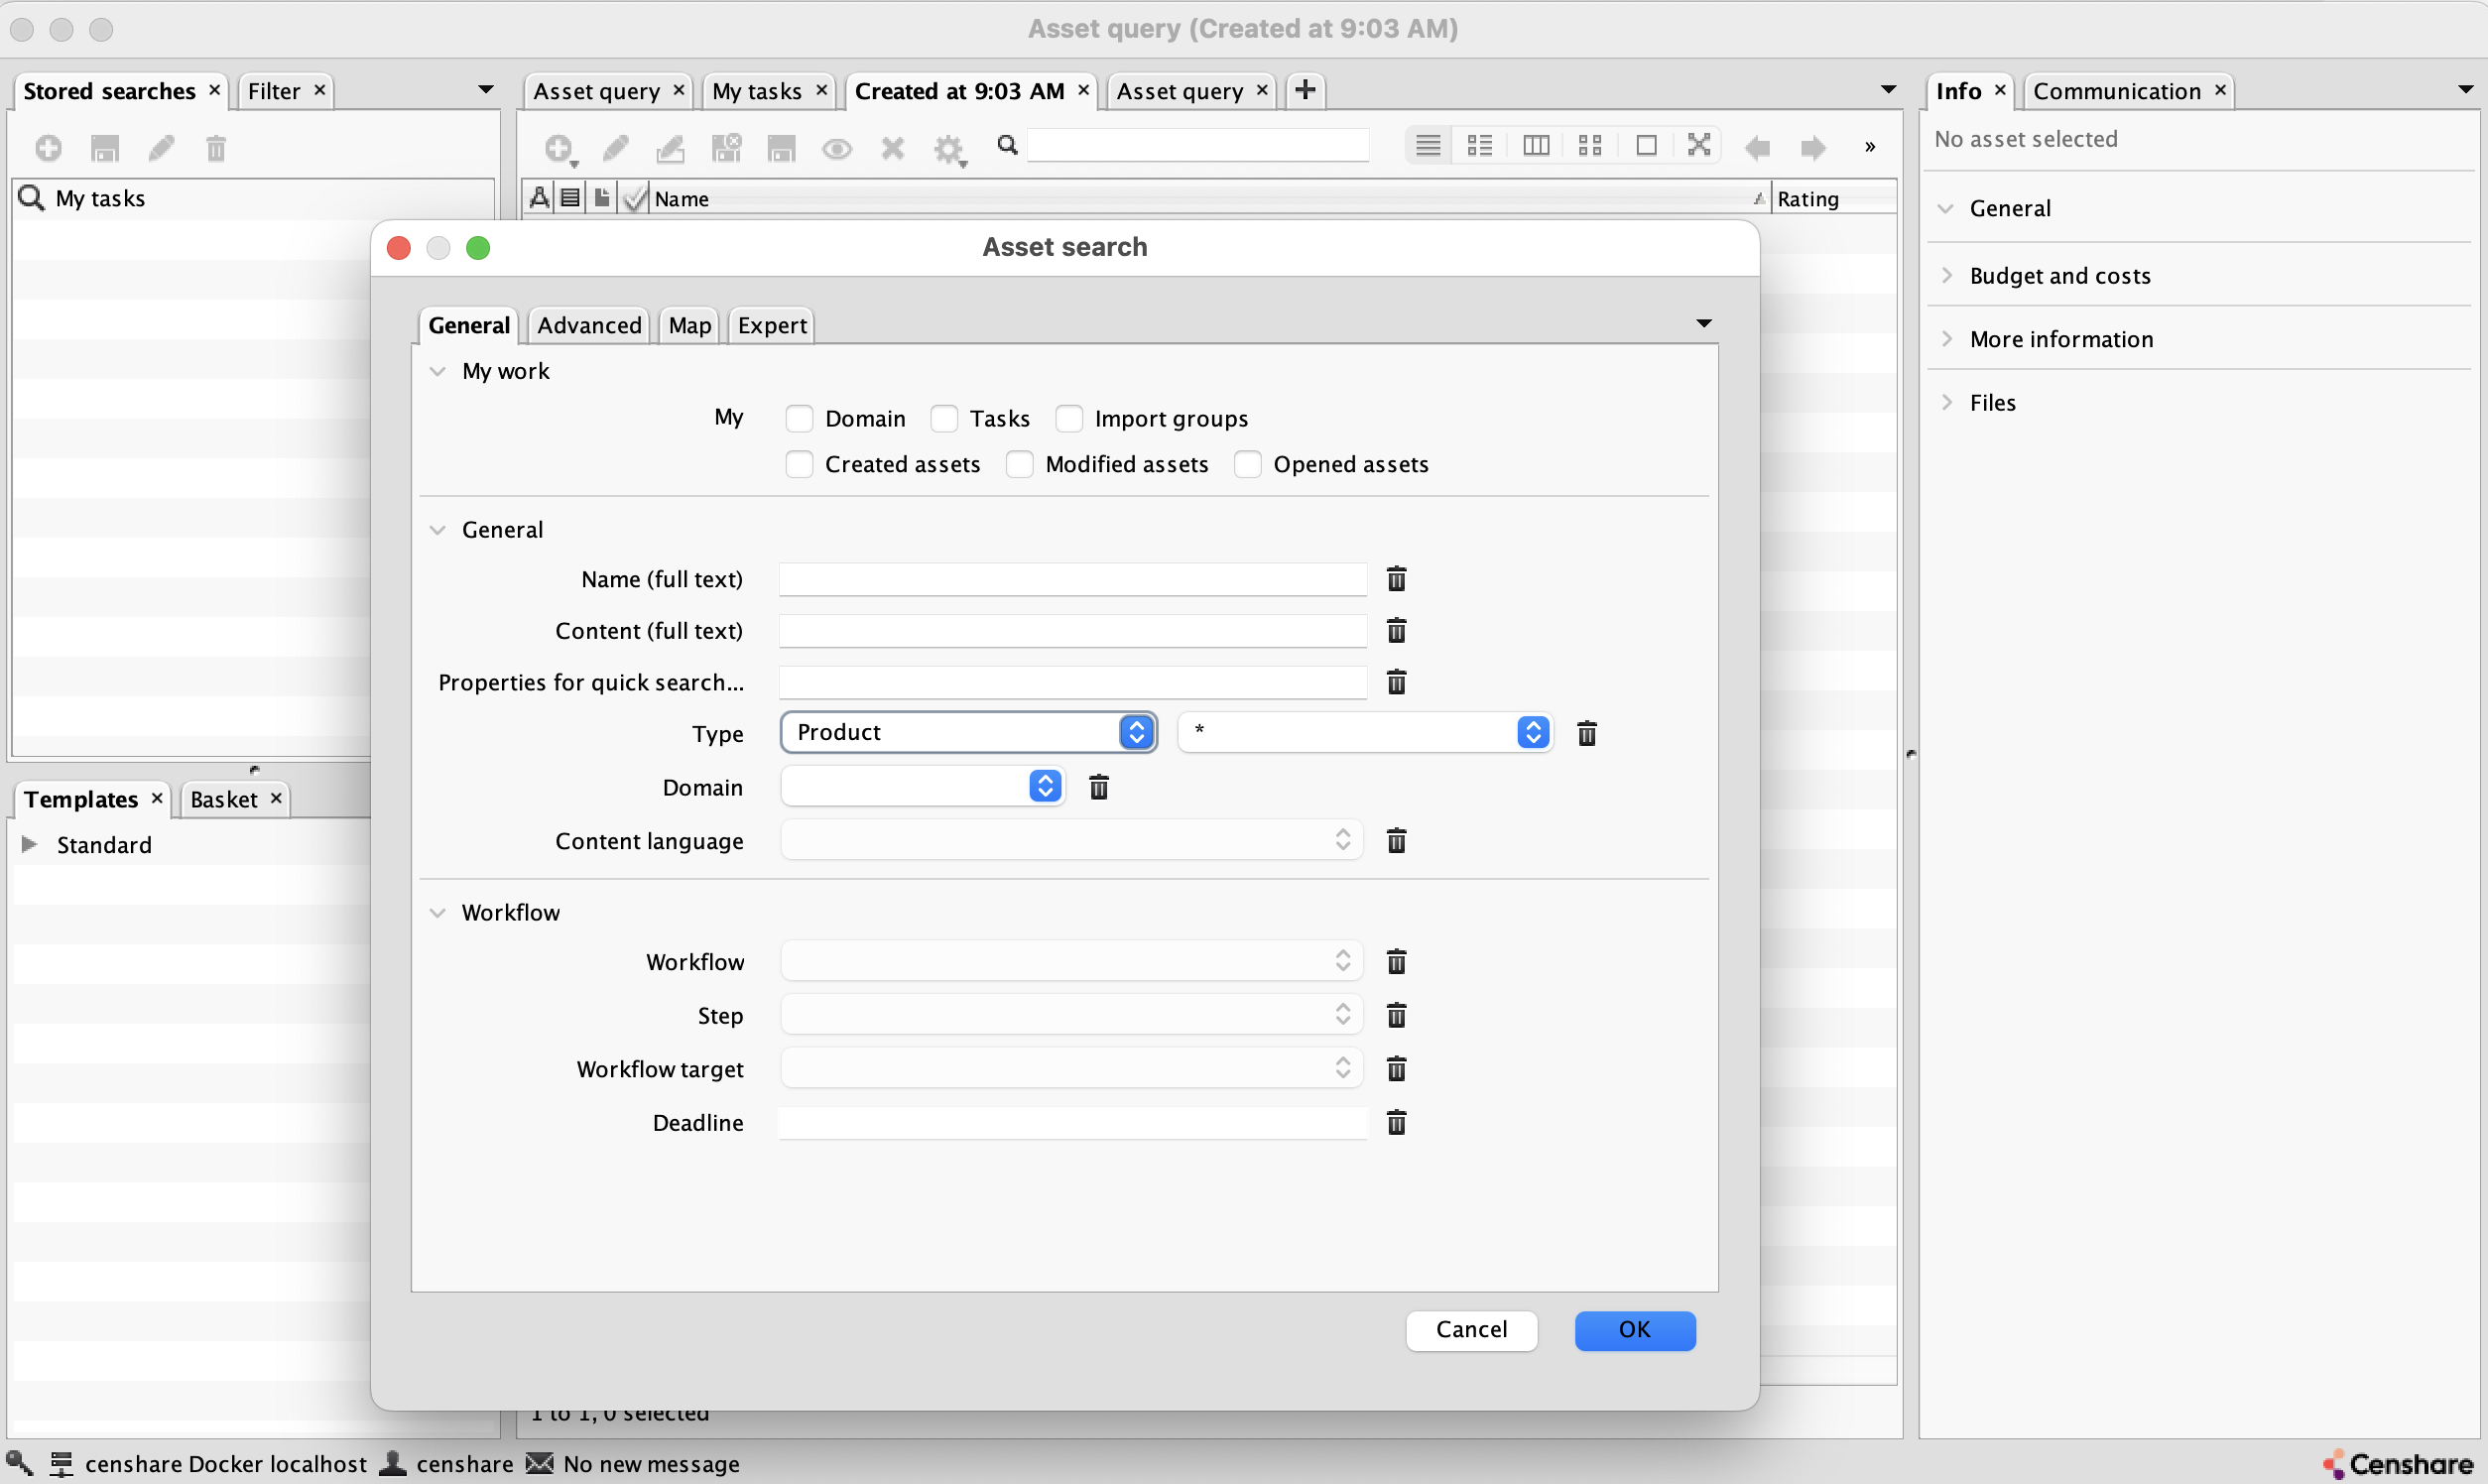
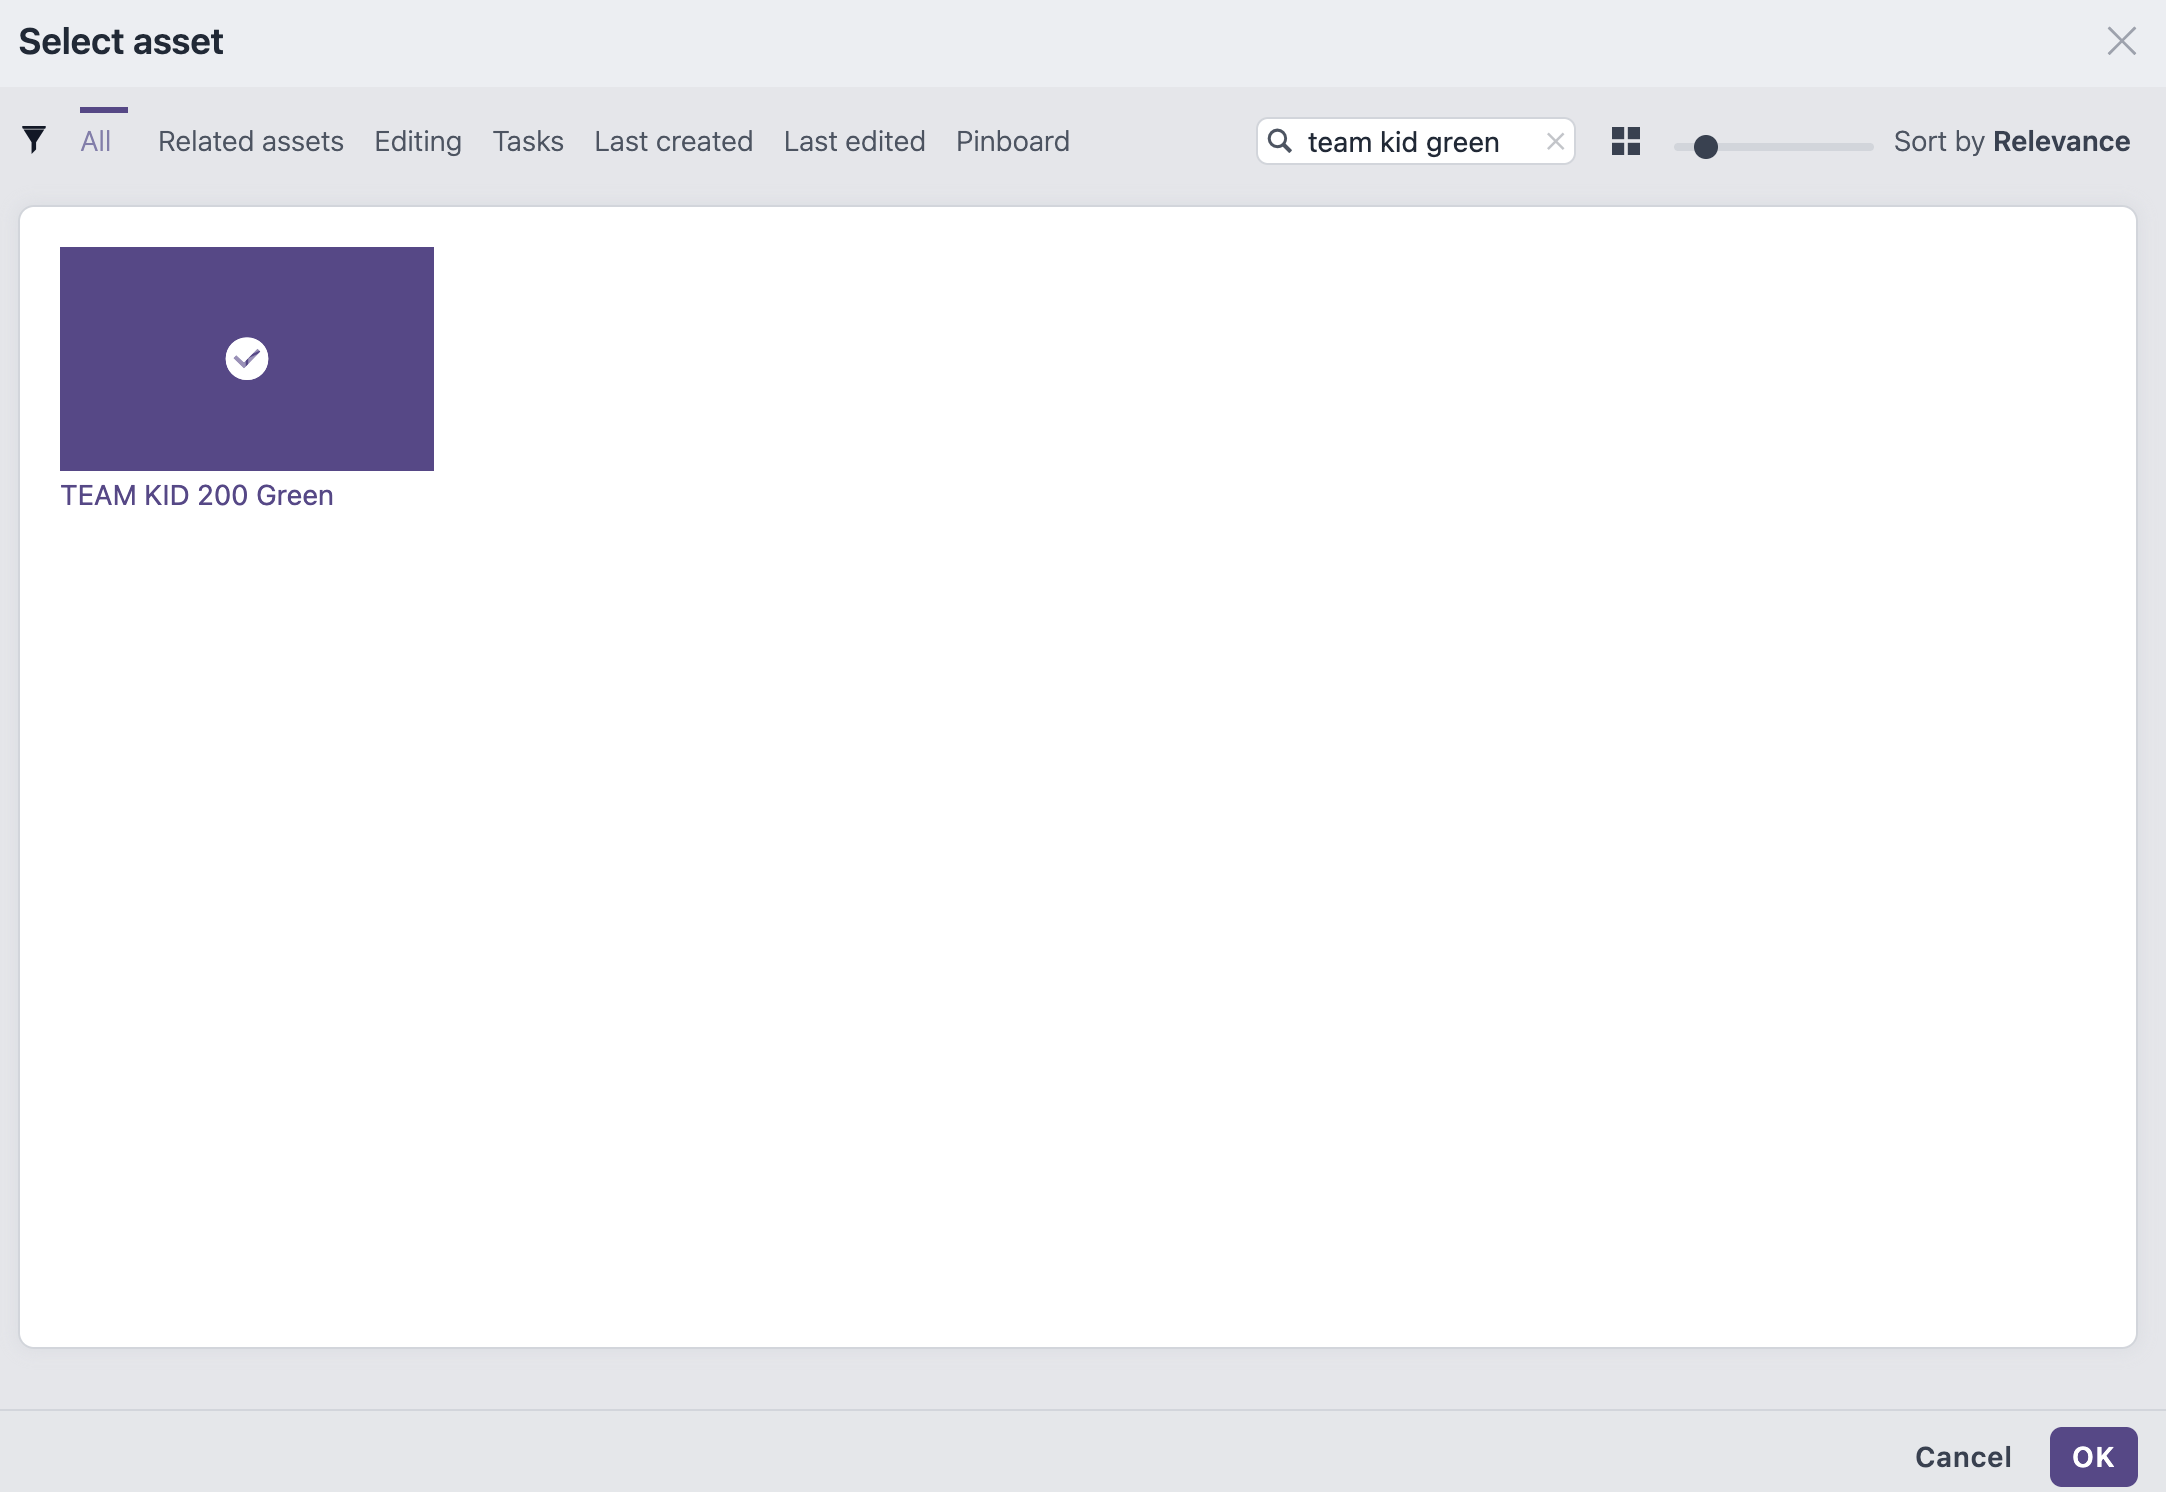
Search for a Product asset, for example Team Kit 200 green. If it does not exist in your system, create an own test asset of Product asset type:
-
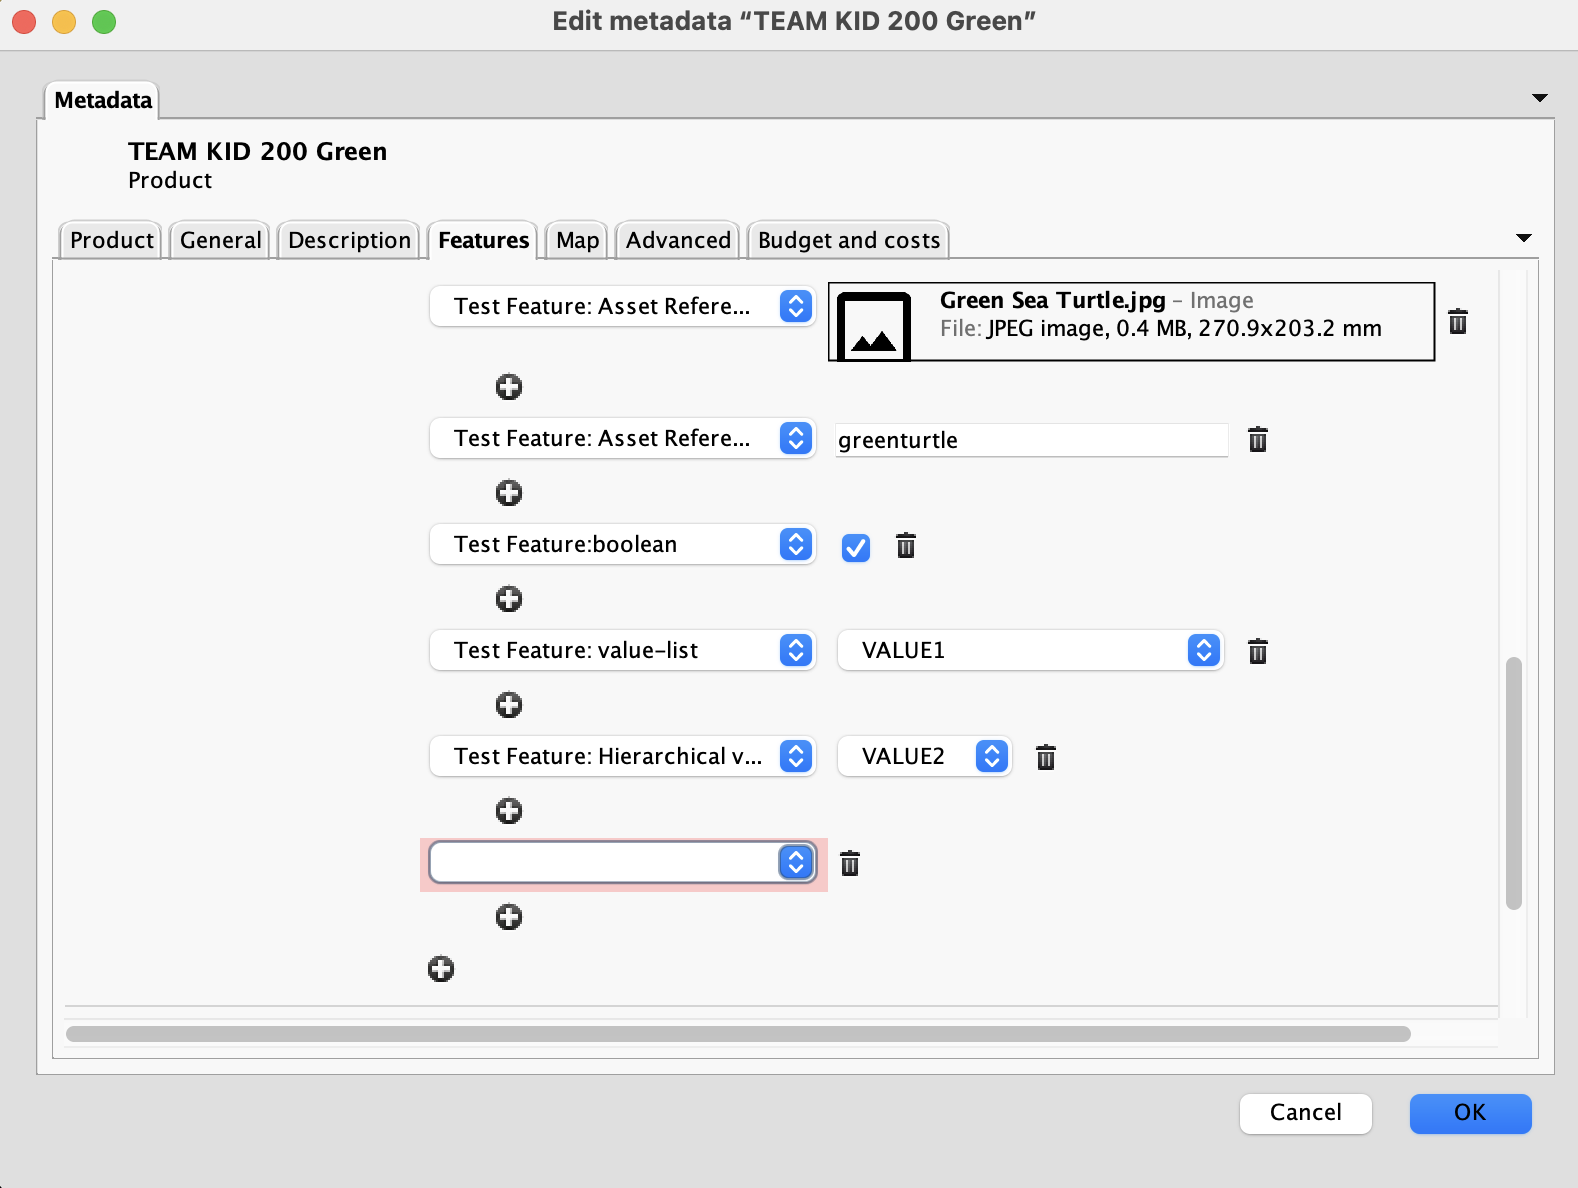
Right-click the asset and select Edit Metadata.
-
Go to the Features tab:
-
Click the “+” icon at the bottom.
-
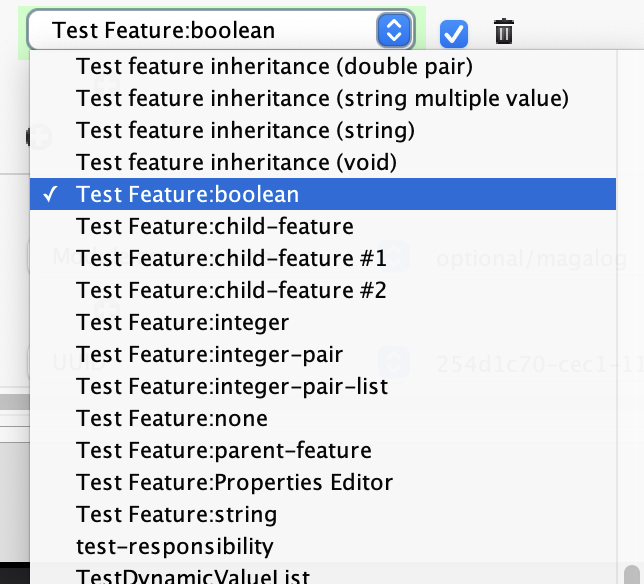
In the dropdown list, select the feature that you have created in the Censhare Admin-Client:
-
Set an appropriate value for the feature and save. For example, for boolean check the checkbox.
Guidance:
-
Ensure that you have selected the exact feature (matching name/keys) created in Create Asset Features in the Censhare Admin-Client above.
-
Use realistic values so that the macro computation reflects typical data.
Checklist:
- Product asset found, for example Team Kit 200 green.
- Feature added via Features tab.
- Feature value set and saved.
- Macro input feature is now available in UI Editor.
Test macro execution with the Preview widget
Use Censhare Web’s Preview widget to test the macro against the Product test asset.
Steps:
-
In Censhare Web, open the Macro asset.
-
Add a rule that fits your asset features:
-
Go to the Rule preview widget beside the Rules Editor and click the "+" above Drop product asset in the widget.
-
Select the Product test asset that you have prepared in Assign Features to a Product in the Censhare Client above, for example Team Kit 200 green:
-
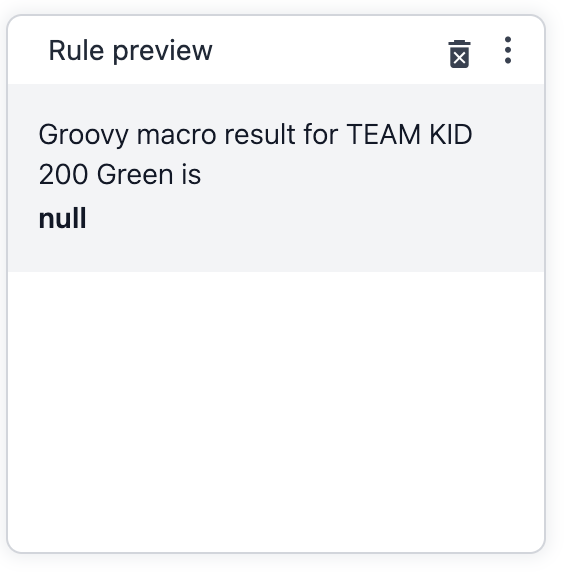
Run/Preview and verify the macro’s derived features by clicking Save for the Macro asset.
-
In case your rule works, the text should be displayed, else null, for example:
What to check:
-
No execution errors.
-
Derived features appear as expected.
-
Required input features are populated.
Checklist:
- Test Product selected in preview.
- Macro runs without errors.
- Derived features are validated.
Add-on: XML Macro definition
Implementation details for macro logic and configuration.
-
XML: Macro definition/configuration:
<?xml version="1.0" encoding="UTF-8"?>
<filters>
    <filter>
        <conditions>
            <condition feature="test.feature:boolean" op="=" value="true" />
        </conditions>
        <result type="text" value="ThisdisplaysTestText" />
    </filter>
</filters>
Conventions and best practices:
-
Naming conventions for features (e.g., input., derived.)
-
Do not use “cs:” as prefix because this is reserved for Censhare-specific elements.