Installation and configuration guide for the HCMS server module.
HCMS as a Censhare Server module: separate artefacts for compatibility
The Censhare Server release 2025.1 has compatibility problems with existing Java code in various modules since the package javax.servlet is no longer used and replaced by jakarta.servlet.
This also affects HCMS when used as a server module.
To solve this issue:
-
If you are planning to upgrade to the Censhare Server
2025.1and want to upgrade to the HCMS5.0, please use the.tgzarchive withjakarta_at the beginning. -
If you want to stay with your current Censhare Server version (anything below
2025.1) and want to upgrade to the HCMS5.0, please use the.tgzarchive withjavax_at the beginning.
This issue does not affect standalone HCMS as a satellite or Docker container. Those communicate with the server via a protocol that is still compatible.
As an alternative to dedicated delivery infrastructure ("satellite"), Headless CMS can be run directly in Censhare server. This alternative has some advantages, but several important disadvantages:
-
There is no need for dedicated infrastructure, thus saving running cost both directly (fewer servers, less memory and disk space needed) and indirectly (simpler management).
-
Scaling is not generally available and high load (high number of requests) can easily overload the Censhare server.
-
For this reason, this setup is not recommended for public websites.
-
-
Other advantages of satellite (possible geographical distribution, strict data separation) are not available either.
Installation
Requirements:
-
Fully set up Censhare server. There is no exact version requirement, and the minimum is actually defined by the required JDK version:
-
2022.2 or later for HCMS version 4.0 and later (requires JDK 17)
-
2019.2 or later for HCMS before 4.0 (requires JDK 11)
-
-
Direct access to the Censhare server filesystem (usually by ssh).
-
Java Admin Client
Installation steps:
-
Download the archive and copy it to the server.
-
In case of multi-server setup, it is needed only on the primary (master) server.
-
-
Unpack the archive in censhare-Custom/censhare-Server directory
-
In standard installation, this directory is also accessible via symlink /opt/corpus/cscs
-
-
In Java Admin Client, use the "Update server configuration" or "Synchronize remote servers" button (the latter one is needed in multi-server setup).
-
HCMS module configuration is now available in Java Admin, Configuration > Modules > Headless CMS
Upgrade steps (if the module is already installed):
-
Download the archive with new version and copy it to the server.
-
In case of multi-server setup, it is needed only on the primary (master) server.
-
-
Stop the server.
-
Remove all files in the directory censhare-Custom/censhare-Server/app/modules/hcms/lib (optionally also the directory itself).
-
Be careful to not delete the other contents of censhare-Custom/censhare-Server/app/modules/hcms; it contains configuration file(s) of HCMS instance(s).
-
-
Remove all filed in the runtime directory modules/hcms/lib (usually work/runtime.master/modules/hcms/lib, but it can be different on multi-server setup).
-
Unpack the archive in censhare-Custom/censhare-Server directory
-
This creates censhare-Custom/censhare-Server/app/modules/hcms/lib again, with new content.
-
-
Start the server again.
Note that installation to existing server does not need restart, but upgrade to newer version does.
Configuration
Configuration is completely separate from the configuration of satellite-hosted HCMS. Instead of special XML asset, configuration file is stored in custom area, created and edited by the Java Admin Client. Note that although most of the configuration options are available in Java Admin Client, some advanced settings still need direct change of appropriate XML file.
It is possible to configure several instances, in the same way normal commands can be configured several times. The only requirement is that these instances have different prefix.
Minimal configuration
Minimal configuration that successfully activates HCMS require following values to set (full description can be found in the following section):
-
Enable the instance
-
General Setup > Enabled checkbox
-
-
Set the correct output channel (assuming there is only one)
-
Dataset > Output Channel (root output channel is preselected already, this should be changed)
-
Data Changes behavior > Primary Output Channel
-
in both cases, root output channel is preselected
-
-
Add HTTP Basic authentication user for administration purposes
-
Authorization > Add user, then fill Username and Password
-
fill * (asterisk) as a value of Role
-
-
This is actually optional; please check the Authorization documentation for other options.
-
Once this minimal configuration is saved and applied (Update server configuration button or its multi-server counterpart), HCMS should be accessible. This can be tested by invoking HTTP GET at /hcms/v2.0/entity and checking that it returns HTTP status 200 and empty JSON object ({}) as a content. HTTP GET at /hcms/v2.0/schema is similar, but returns normally 401 error unless HTTP Basic authorization with configured username/password is used. Full urls have the form of https://<server-host>:9443/hcms/v2.0/entity and https://<server-host>:9443/hcms/v2.0/entity
All configuration options
-
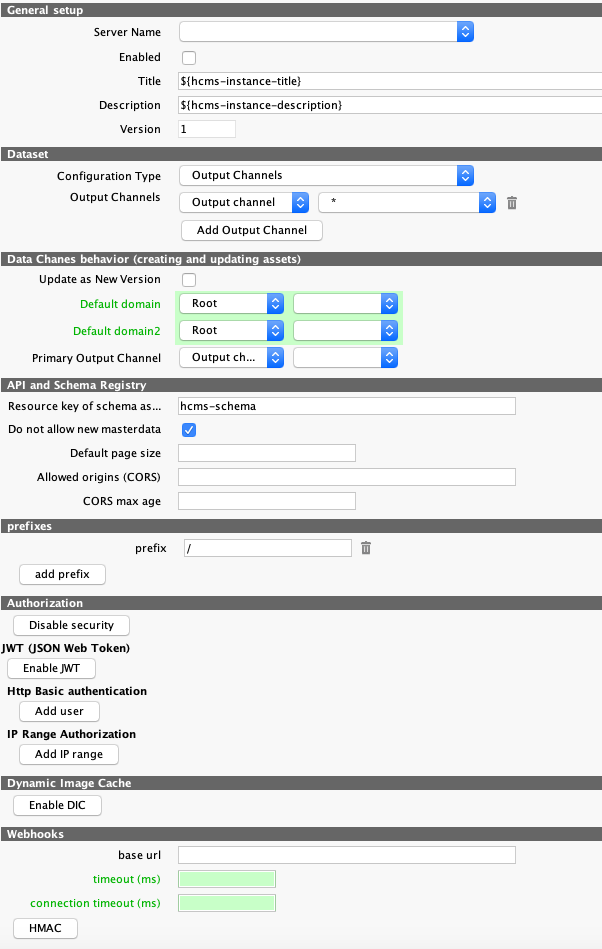
General setup
-
This section is shared with all commands in all other modules.
-
Enabled must be checked to actually enable the instance.
-
Title, Description and Version are not used. It is recommended to change them if more than one instance is configured, to tell them apart.
-
-
Dataset
-
This section defines which assets are actually available via HCMS. There are two possible ways to configure this subset, chosen by the dropdown:
-
Output Channel is used to simulate usual behaviour of the satellite datastore
-
Only assets that have at least one of the configured output channels are available.
-
Channels can be configured either as a strict match, or with a wildcard (*) to match whole subtree.
-
At least one channel is always configured.
-
Primary output channel configured in the next section is always automatically added (unless it's already part of the list). This ensures that new assets are always available.
-
This is the recommended way to configure HCMS server instance.
-
-
Generic Query
-
Allows any generic query to be configured. This query might use Output Channel feature, but it can also use any other criteria.
-
This configuration is very flexible, but it has worse performance than the Online Channel list (the query needs to be executed for every single entity to check if it's accessible or not).
-
Note that it is possible to create invalid configuration that does not provide access to newly assets. This can lead to strange errors.
-
-
Checkbox Hide Related Assets in Queries (enabled by default) controls whether the configured filter is also automatically added to all internal conditions of complex queries.
-
When left unchecked, complex queries might be faster but an information about non-dataset assets might leak out. On the other hand, this might be intended behavior in some cases.
-
Only queries with conditions about related assets (relations or asset reference available as part of a schema) are affected. The JSON conversion is not affected by this checkbox and the serialized entity never contains any data from/about asset that is not part of the dataset. This means that the result of queries might not match the entities.
-
Example: article structure with text assets in several languages, but only one text asset ("en") has Output Channel. Only that one text is part of the entity JSON, but without this checkbox, it is possible to find the article by query content.*.language="de".
-
-
-
Data Changes behavior
-
Update as New Version changes the behavior of updates (HTTP PUT requests) to create new asset version. By default, all changes are done in the same version.
-
Default domain and Default domain2 define domains for new assets.
-
Primary Output Channel is automatically set on each new asset created by HCMS. This is important to ensure that new entities are immediately available.
-
-
API and Schema Registry
-
Resource key of schema asset identify the asset used to store schemas and usually it is unique to each HCMS instance. It is, however, possible to configure several instances (if they should share all schema definitions).
-
Do not allow new masterdata prevents HCMS from creating new masterdata for missing features, assets or relations. It is recommended to keep this option always enabled.
-
Default page size allows custom page size of listings. Missing value means that the default page size (limit) is 100.
-
Allowed origins (CORS) is comma-separated list of domains that are accepted in Origin request header and propagated as Access-Control-Allow-Origin response header. Can be * to accept all domains.
-
CORS max age allows custom value of Access-Control-Max-Age response header (but only if the Access-Control-Allow-Origin is issued).
-
-
prefixes
-
List of custom prefixes added before the /hcms/vX.Y path.
-
Slashes at the beginning and end are automatically removed and/or added to ensure that the final url always contain just single ones.
-
Default is single / prefix, which is the same as empty prefix: normalized url then looks like http://localhost:9000/hcms/v2.0/entity
-
Example: value a/b allows url like http://localhost:9000/a/b/hcms/v2.0/entity
-
-
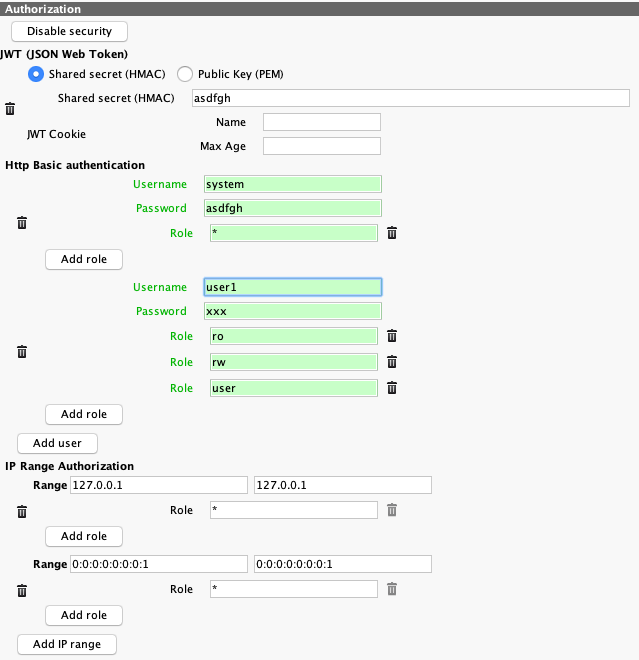
Authorization
-
This section allows configuration of all four authorization providers. Each provider is missing by default and must be added by a special button.
-
Disable security provides full access to all requests. This is not recommended for any real setup.
-
JWT (JSON Web Token)
-
Both HMAC and RSA are supported.
-
Advanced settings (automatic roles, blacklist, multiple keys) are not available in Java Admin Client and must be configured by direct change of the XML file.
-
-
Http Basic authentication
-
One or more users can be added, each with a login and a password.
-
Each user can have any number of roles. Special role * is used to provide all possible roles (full admin access).
-
-
IP range authorization
-
One or more ranges can be added, each one with two IP addresses. Both IPv4 and IPv6 are allowed, but symbolic hostnames are not.
-
Each range must have at least one role (but it can have more). Special role * is used to provide all possible roles (full admin access).
-
-
-
-
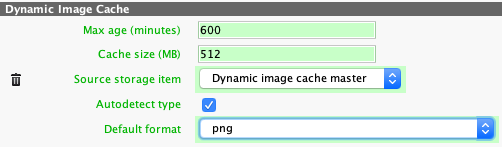
Dynamic Image Cache
-
This section can be added (by a special button) to allow dynamic image cache mappings.
-
Max age specifies how long are unused variants held in the cache. After specified amount of minutes since last use, the image variant is automatically deleted.
-
Cache size is maximum total size of the cache. If the total size of all generated image exceeds this limit, old images are deleted.
-
Source storage item selects which storage item is used as a source of derived images. Usually this is either Dynamic image cache master or Preview.
-
Note that the Dynamic Image Cache supports only jpeg and png formats as a source. For this reason, Master file is not recommended.
-
-
-
-
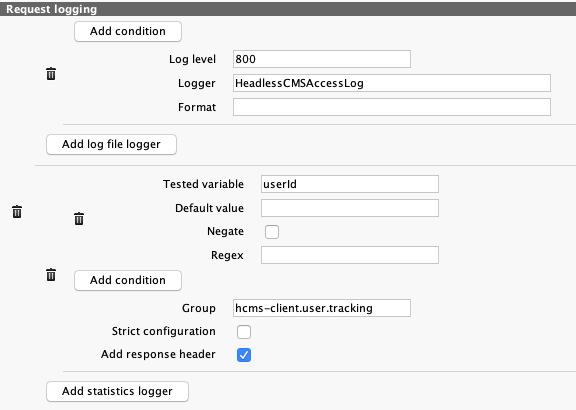
Request logging
-
This section can be added (by a special button) to allow request logging. Both types of loggers are supported.
-
Detailed information about possible configuration options and available values can be found on dedicated page
-
File logger uses standard logging mechanism, configured by the "Administration / Logger Manager" module. By default, requests are logged to work/log/satellite.log together with other log messages.
-
Log level is numeric representation of log level: 1000 = ERROR, 800 = INFO, 500 = DEBUG
-
Logger is the logger name, used by the logging configuration. Usually it has a form of Java class name, but this is not strictly required. When left empty, the logger with use internal class name.
-
Format is the log message format. Default value (used if the field is left empty) is: {remoteAddr:-} - {userId:-} [{timestamp/access_log}] "{method} {url} HTTP/1.1" {status}
-
-
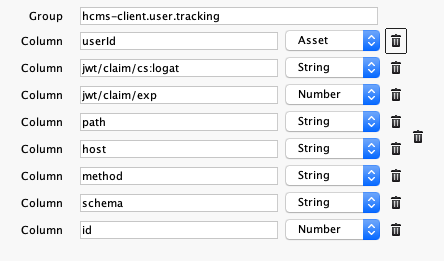
Statistics logger uses "Statistics" server and uses its configuration.
-
Group must contain a name of group from the "Statistics" configuration.
-
-
Examples:
-
-
Webhooks
-
Optional common base url and timeouts for webhooks.
-
Special configuration option: server authentication
This option cannot be enabled in Java Admin Client; the only way is to directly edit the configuration XML and on the element config, set attribute server-auth="true"
In this mode, the standard Server REST API authentication and authorization (whether HTTP Basic or JWT token from Keycloak) is used before the request even reaches HCMS.
This means that instead of the usual HCMS 401 and 403 errors (with JSON description in response body), authentication failure is handled in the standard Server way (HTML response).
In this mode, asset permissions are always properly evaluated by using the authenticated user's permissions (domains and roles). Assets outside user's domain are not visible and modification requires full "checkout" and "edit attributes" permissions.
In addition, user's identity is also provided via standard query variables / logger values and the /auth/whoami endpoint.
Note that it is still possible to configure HCMS authentication and it will be evaluated in addition to the standard Server one.
In most cases, this makes no sense and won't work properly (because request cannot have two valid JWT tokens or two different HTTP Basic passwords), but there is one useful exception: using IP-based rule can be used to grant roles to each and every request.
Special precautions
When using https links (webhooks, uploading binary data as a link), Censhare server truststore must contain all necessary certificates (usually, certificate authorities). Note that in default installation, there are no certificate authorities at all - the list of authorities distributed with JDK is not used! See the corresponding article.
Missing strict data separation
Headless CMS module always has full access to all assets in the database. Configured dataset limit (either by output channels or by a custom query) is applied only at the entity level. Related assets (relations, asset references) are not automatically filtered this way! This must be taken into consideration in order to prevent data leaks. On the other hand, this fact makes representation of complex structures much easier, because it's not necessary to assign Output Channel to all assets in those structures.
Another possible channel for data leak is faceted search; by the very nature of its implementation, it always returns facet values from the whole database, including values from assets outside specified dataset.
In application where data security (and security is general) is paramount, satellite is always recommended due to its strict separation of dataset.
Missing features
-
All cluster-control features are missing from server version.
-
Change notification might be provided in a future version, or replaced by more convenient feature.
-
-
Signed links are always created with HMAC signature.
-
Support for direct S3 links might be implemented in a future version.
-
Schemas deployed as local files (default schemas)
Beside schemas created via the standard REST API, the server module can also automatically use schemas from the directory schemas in the module (full path: censhare-Custom/censhare-Server/app/modules/hcms/schemas). It is empty by default, but custom solution can put any numbers of schemas to be automatically loaded, one file per schema.
Only files matching regular expression ^([0-9]*-)?([a-zA-Z0-9_]+)(-schema)?[.]json$ are loaded:
-
Schema name is derived from the filename (the ([a-zA-Z_]+) group).
-
Optional number prefix and/or -schema suffix is ignored.
-
Extension (.json) is required.
-
Files that don't match are silently ignored.
Because loading of these schemas can fail in several ways, it's important to understand the semantics for troubleshooting:
-
Schemas are not loaded immediately on start, but on the first request that actually needs any schema (most of the REST API endpoints). /entity and /schema endpoints are the most convenient ones to explicitly trigger initialization.
-
Schemas are loaded as one single batch (similarly to POST /schema endpoint). This means that references from one schema to another are allowed.
-
This also means that if one schema fails, no schema is loaded at all!
-
-
These schemas are loaded before the ones created via REST API. This means that references to those schemas are not allowed.
-
Schemas are loaded only once. If the compilation fails (syntax error, missing masterdata, etc), it won't be tried again!
-
The only way to try it again is to force module reload (by changing configuration in Java Admin Client) or server restart.
-
-
Whether this initialization succeeds or fails, other schemas (those created by REST API) are loaded from internal asset storage.
-
It is possible (and allowed) to provide schema definition via REST API. This is treated as an "override" and the new version is used.
Basic diagnosis is provided by the /schema endpoint. For each existing schema, it provides source property with value reflecting its current source:
-
internal: schema was successfully loaded from filesystem
-
override: schema was successfully loaded from filesystem, but then overridden by REST API version
-
Note that this state is persistent, even after server restart.
-
-
repository: schema was created by REST API; there is no such valid schema file on local filesystem
If the schema directory contains some schema file and the schema is not returned by the /schema endpoint (or its source is reported as repository), the loading failed; there is probably some failure in the server log.
Additional features
History
New endpoint section is added, which allows retrieval of historical versions of entities.
-
/history/<schema>/<id>: lists all available versions of the entity.
-
Standard listing response structure is used, with one important change: the values are links by default (just like values=links was specified). This is important because entity data usually do not contain version number.
-
-
/history/<schema>/<id>/<version>: return entity content for given version
-
Returns 404 if the given version does not exist or the asset does not exist at all. Note that historical versions are regularly pruned and history can have "holes".
-
Custom property content via Java scriptlet
Custom handler of property value can be specified by direct declaration of Java class:
{
    "cs:module.class": "modules.hcms.SampleROPropertyExtension",
    "type": "string"
}
The class must exist, otherwise schema is refused. It must have no-argument constructor and one (non-static) method called export with three parameters. For details, see ROPropertyExtension.java for a declaration and SampleROPropertyExtension.java for a working sample of this handler class. Note that it is not necessary to implement the ROPropertyExtension interface; the export method is invoked via reflection.
Properties handled by these custom handlers are always read-only.
Custom search function via XSLT template
The module contains a directory functions which can be used to deploy extension search function. Only XSLT files (with extension either .xslt or .xsl) are loaded and they must be present when the module starts. For each template name.xslt, additional query function in the form $name(...) (note that $"name"(...) is also possible, and necessary if the filename is not a valid id).
Each time the function is used in a query, XSLT template is executed and its result must be a valid query in XML format (<query> element, it's similar to saved queries). Note that this result will be properly combined with the rest of the HCMS query.
Function arguments are available in the template as a parameter named args (it's an array). Besides that, few special functions are available in schema http://www.censhare.com/xml/hcms that allows access to additional context:
-
hcms:require-role(role...): check that the current request has specified role (or at least one of the specified roles, any number of arguments is allowed). If not, the request immediately fails. Useful for basic access control.
-
hcms:has-role(role...): similar to require-role, but instead of aborting request this function just returns true or **false. Useful for more nuanced access control, with fallback values.
-
hcms:variable(name): get value of HCMS variable. If the variable is not available, the evaluation (and the whole request) fails.
-
**hcms:variable(name, default)`: get variable value, with some default in case the variable is not available.
change